Audio is the soul of any video production, carrying emotions and enhancing the viewer's experience. As a filmmaker or content creator, mastering audio editing is crucial to creating professional-grade videos that engage and captivate your audience. DaVinci Resolve, the award-winning post-production software, offers a robust set of audio editing tools that can rival dedicated audio software. In this guide, we'll embark on a journey through the audio editing capabilities of DaVinci Resolve, starting with the basics and progressing to advanced techniques. Whether you're a beginner looking to refine your audio skills or an experienced editor seeking to expand your toolbox, you'll find valuable insights and practical steps to help you take your audio editing to the next level. Let's dive in and discover the power of audio editing in DaVinci Resolve!
Trimming and cutting audio clips
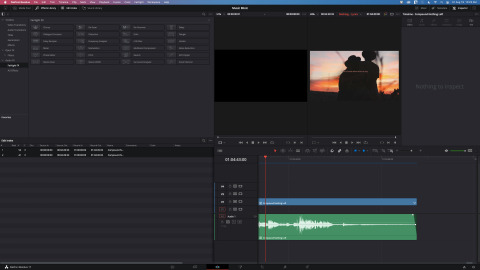
A common way to trim the end of a track is to drag the right edge of the clip. If you are unable to cut the audio, click the Capture Tool icon at the top of the Timeline. Next, move the mouse pointer over the right frame of the video clip in the Timeline and drag the two-way arrow edge to adjust the length of the clip.
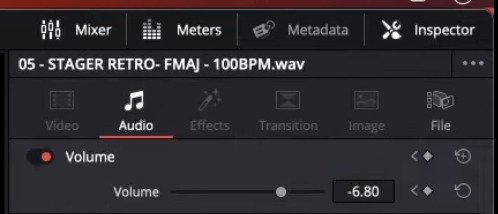
Adjusting audio levels
Sometimes, your recording level could be more balanced, with some parts being overly loud and others being inaudible. You can change the audio levels, which is an easy method to fix this. Most of the time, all you have to do is adjust the track's overall volume. Select Inspector > Audio > Manipulate Volume to accomplish this.
Applying fundamental transitions (crossfades)
You can adjust the fades by locating the grey tabs at the top left (start) and right (end) and pulling them closer to the center. As you apply the fadeout, you will see that the audio's gain line begins to curve.
As a world-renowned audio and video editing software, Da Vinci has many advanced premium features. These editing features enable users to realize all their ideas in Da Vinci.
Fade Out Audio
Fading out audio is an important part of audio-visual editing and can make audio more silky, smooth, and varied.
Hover over the white fade audio circle (the "audio handle") to the right of the audio clip. This circle is usually located at the end of the audio clip. Hold down the left mouse button and drag the fade circle to the left until the desired fade area for the fade effect appears. The Size of this area determines the length and speed of the fade effect.
Normalize Audio in Davinci resolve.
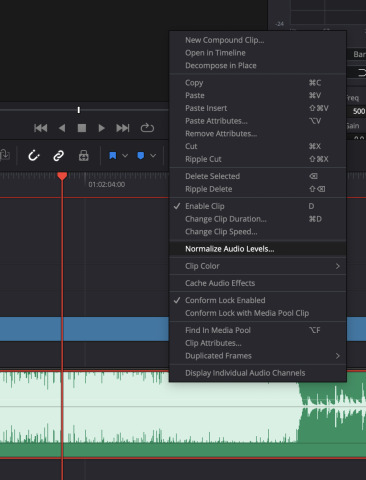
Normalization means adjusting the audio levels to a standard and consistent volume. The main purpose of normalization is to ensure that the audio isn't too subtle or too loud.
So, how to normalize audio? First, right-click on an audio clip in the "Edit" tab and select "Normalize Audio." Then, modify it to the intended dBSF (Decibels Full Scale).
Loop Audio in Davinci resolve
This function can make short music retreat more times into long music. Now let us together see how to make a perfect loop music.
1.Add an Adjustment clip. Go to the Fusion page and select the Adjustment clip.
2.Add a Background node and change the color.
3.Add a Transform node to the Background node.
4.Go to the first frame, add a keyframe, and change the Size to 0.5.
5.Go 5 frames ahead and change the Size to 0.8.
6.Go for another 5 frames and change the Size back to 0.5.
7.Open the Spline editor, make sure the Size keyframes are ticked, select them all, and press the Looping button.
8.You now have endless loops.Back in the Edit page, cut the end frame of the animation to match the start frame so you create a seamless loop.
Audio Visualizer in Davinci resolve.
You can use the Audio Waveform to visualize audio indirectly. Open the Effects Library, find it in OpenFX, and add an Audio Waveform or similar effect to the audio track. In the Inspector, adjust the display settings of the waveform, such as color, style, amplitude, etc.
Syncing audio with video
Drag and drop the audio and video clips onto their tracks on the Timeline. Precisely align the audio and video time points by dragging the start position of the clip or using the Markers and In Points and Out Points functions.
Working with multi-channel audio
In DaVinci Resolve, you can import multichannel audio files such as stereo, 5.1 surround, and more. View and manage multichannel audio tracks in the Audio panel. Use audio effects (such as equalizers, compressors, etc.) to process specific channels individually. Optimize multi-channel audio performance by adjusting volume, balance, and overtones.
Mixing and mastering
Mixing and mastering in DaVinci Resolve is a specialized and in-depth process. Mix and balance multiple audio tracks to ensure balance and harmony between different audio elements (e.g., soundtrack, voiceover, sound effects, etc.)
Noise reduction and audio cleanup
Navigate to the Fairlight FX toolbox at the edit tab's upper left corner, then choose the "Noise Reduction" option.
AnyMP4 Video Converter Ultimate is an excellent video editing software that not only converts 8K/5K/4K/1080p HD videos and DVDs to MP4, MP3, GIF, and more than 500 digital formats 70 times faster. It can also edit, compress, and enhance videos with AI technology, play any video file with the built-in media player, and more. Here are the steps to edit audio in AnyMP4 Video Converter Ultimate.
Secure Download
Secure Download
Here are some basic steps that may involve audio processing in AnyMP4 Video Converter Ultimate:
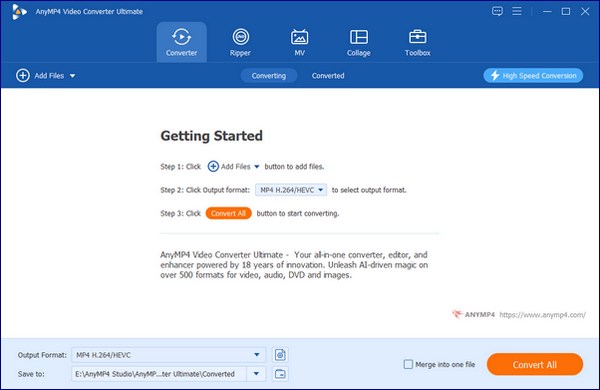
1. Import video or audio files
Click the "Add File" button on the interface to select the video or audio file you want to process and load it into the software.
2. Select the desired operation
AnyMP4 Video Converter Ultimate may not provide complex editing functions like professional audio editing software. However, it supports basic audio editing, such as trimming audio, adjusting volume, compressing audio, and extracting audio from video.
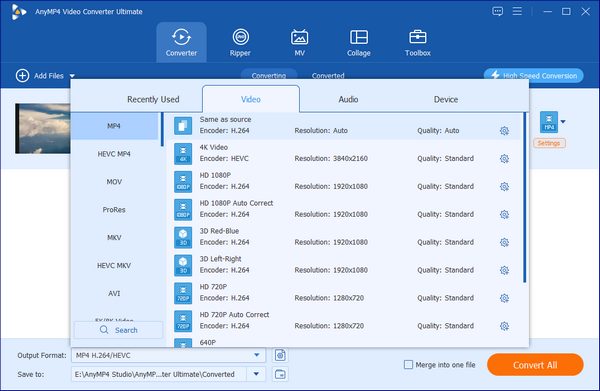
3. Choose the audio output format
After importing the files, choose the audio output format using the "Profile" option. AnyMP4 Video Converter Ultimate supports many audio formats, such as MP3, AAC, WAV, etc. Choose the format that suits your needs. Select the format that suits your needs. Click "Convert All" to start the audio extraction or conversion process. After the conversion, you can find the converted audio files in the specified save location.
Although AnyMP4 Video Converter Ultimate is mainly a video converter, it still provides some essential audio processing functions. These can meet the users' basic needs of extracting audio from video, converting audio formats, and even extracting audio from video. If you want a full-featured product with 2-in-1 video and audio, pick this one!
Is DaVinci Resolve good for audio editing on Reddit?
DaVinci Resolve is quite versatile for Reddit's best free video editor. It is the first of its kind and combines features like color correction, visual effects, online and offline editing, and audio post-correction.
Do YouTubers use DaVinci Resolve?
Yes, they do. They make movies using Adobe Premiere Pro, Davinci Resolve, Final Cap Pro, Filmora, and CapCut.
Is DaVinci Resolve better than Audacity?
Audacity is a free audio editing software with a clean and easy-to-use interface. DaVinci Resolve is a powerful video editing software. If your primary need is audio editing and you don't have many requirements for video editing, then Audacity may be a better choice. If you need to work with both video and audio or if your project requires advanced audio editing features), then DaVinci Resolve may be a better fit.
In conclusion, the audio editing tool DaVinci Resolve has emerged as a comprehensive and powerful tool for basic and advanced audio editing tasks, showcasing its versatility and prowess in multimedia production. From the fundamentals of trimming, cutting, and adjusting audio levels to the intricate processes of fading out audio, normalizing, looping, and utilizing audio visualizers, DaVinci Resolve provides a robust platform for audio editors to bring their creative visions to life.
 Posted by Angelica Liwanag to Edit Audio
More readings
 10 Best Podcast Editing Software For All Skill Levels
Read this article to discover the best software for podcast editing no matter if you are planning to start your own or if you are looking for a new tool to use.
 Combine Video and Audio - How to Add Audio Track to Video Easily
Is there any audio and video file merger online? How do I combine audio and video in FFmpeg? You can learn 3 methods to combine audio and video files together.
 Top 10 Black and White Photo Editor Applications for PC and Mobile
Here we list 10 great black and white photo editor applications for you to remove color from your photos.
 How to Add Music to iMovie [100% Proven and Tested]
Have you ever wondered how to add free music to iMovie? Suppose you don't have any idea how to get the job done. Discover the provided solutions here!