Video editing has evolved significantly and is now regarded as a valuable skill within the creative community. Although video cropping is simple in itself, the skill's capabilities to add essential framings, adjust aspect ratios, modify videos for social media, and remove unwanted elements are highly critical. Tired of awkward framing and black bars in your videos? This article aims to provide a solution to this problem by offering multiple options for cropping videos in DaVinci Resolve. We will explore the various cropping options in the software and provide a detailed, step-by-step guide on how to utilize each option.
Since DaVinci Resolve is an advanced video editing software, multiple cropping tools are available within the program. The most prominent being the Video Adjustment tools under the video preview window, as well as the Cropping options in the Inspector tab.
However, these video cropping options still have their different uses. They are not simply video cropping tools but are built to apply advanced effects to videos being edited in the program. This was due to the nature of the program, which aimed to become as fluid and technically capable as possible.
To provide our readers with the capabilities of the tools that can crop videos in DaVinci Resolve, please read our detailed guides below, which cover both basic cropping options and more advanced uses of the cropping tools.
The tutorial in this section will provide readers with the essential skills to use the basic video cropping tools in DaVinci Resolve, a video editor. Although they are simple, learning how to use them is essential to building the skills for more advanced video cropping executions.
1. Import the clip you want to edit by right-clicking on the media pool and selecting "Import Media."

2. After importing the video, click on the Inspector tab.
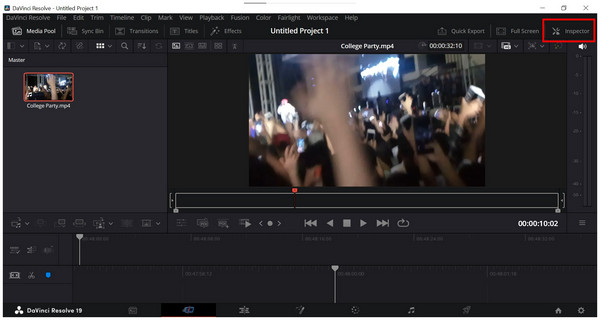
3. In the Inspector tab, scroll down to find the Cropping settings. Simply adjust the measurements under the settings to crop the imported video as needed.

If you want to learn how to add crop bars in DaVinci Resolve, the Cropping options in the Inspector Panel are the easiest to use, but a simpler option for applying basic video cropping is available on the Edit page. Please proceed to the second method to learn it.
1. If you are not already on the Edit Page, go there by clicking on the Edit Page tab.

2. In the Edit Page, select the adjustment options under the video preview. Select Crop among the available options.

3. While the Crop tool is active, apply the adjustment to the video in the preview tab by adjusting the crop selector in the video.

Among the two basic options for cropping videos in DaVinci Resolve, the Cropping Tool is the simplest. We highly recommend using it as your go-to tool for cropping.
1. Above the preview window, select the Aspect Ratio markers. Then, choose 9:16 under Social Media.

2. Once the 9:16 marker is active, activate the Crop tool.

3. Adjust the Crop tool to meet the 9:16 aspect ratio marker.

Although it takes a few more clicks to use, using the aspect ratio marker is the most straighforward option to crop the aspect ratio of videos in DaVinci Resolve. It is also a big plus that it is highly adjustable.
1. Find the timeline where you are editing in the Media Pool. Right-click on it, hover on Timelines, and click on Timeline Settings.

2. In the Timeline Settings, click on Timeline Resolution and select the desired resolution. Click OK to confirm it.

3. Once the Timeline Resolution has been set, click the adjustment tools under the preview window and select Transform. Then, use the tool to fit the video in the preview tab to fit the Timeline Resolution you set.

Despite only using the Transform tool, adjusting the video to the new resolution you selected essentially crops it to the specific resolution that you have set.
1. Select the part of the video where you want the dynamic crop effect to start.

2. Open the Inspector tab and scroll down to the Cropping section. Adjust the cropping values and then click the Small Diamond button to add a keyframe.

3. Adjust the video slider in the timeline to where you want the dynamic crop effect to stop. Then click on the Small Diamond button again to add the end of the keyframe. You can also adjust the crop values according to your liking.

Among the cropping tools featured in this article, applying dynamic cropping with the use of keyframes is the most complex option for learning how to resize video in DaVinci Resolve. However, mastering this skill, along with other advanced enhancements such as changing the frame rate in DaVinci Resolve, will significantly enhance your overall video editing abilities.
Now that we have provided you with the different cropping options in DaVinci Resolve, we can summarize these options as something advanced and highly technical. If complex editing tools are not your cup of tea, AnyMP4 Video Converter Ultimate might be an excellent solution for you, as this tool is designed to be simpler to use and is ideal for beginner multimedia editors.
Although its name suggests that it is a video format converter, AnyMP4 Video Converter Ultimate was designed to be a versatile multimedia editor option. Some of these versatile tools include a dedicated Video Cropper option that allows for quick batch processing of multiple videos.
Additionally, videos processed in the program can also have their video format converted within the video cropper tool itself. Moreover, the cropping videos using the dedicated tool was also designed to be as automated as possible without relying on complex non-linear editing tools.
This was made possible by the simple area selector cropper and aspect ratio selector within the program. These features made AnyMP4 Video Converter Ultimate a program designed for ease of use, quick, and straightforward cropping.
For an easier time understanding how to use the program, please proceed to read our three-step guide below. To follow each step easily, we recommend downloading the software first for a seamless video cropping experience.
Secure Download
Secure Download
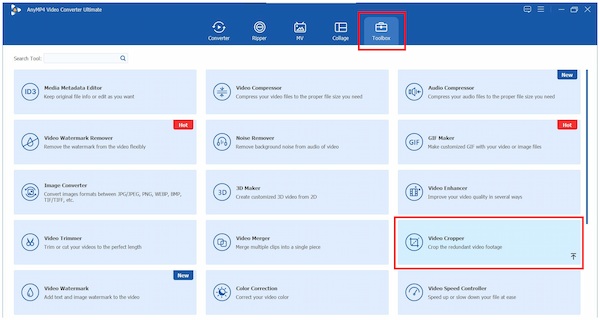
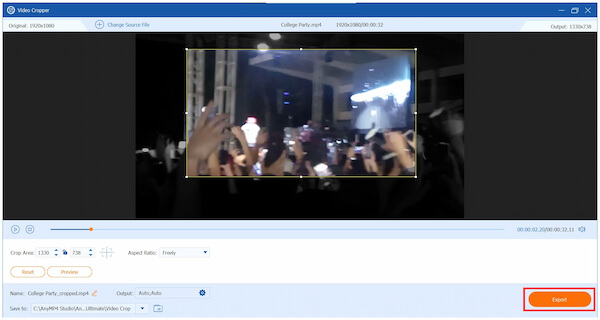
1. Open AnyMP4 Video Converter Ultimate and click on the Toolbox tab. Next, find the Video Cropper tool and then click on it. Then, select the Add Media button in the pop-up that appears to import the video you want to edit.
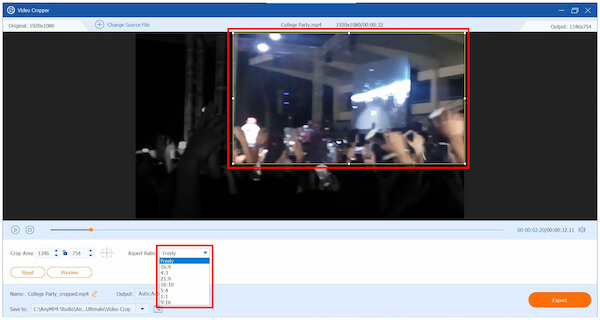
2. After the video has been imported, you can crop it by adjusting the Crop Area box or using the Aspect Ratio selector option. To use the crop area option, simply adjust the Yellow Box in the video preview window to select the part of the video that will be cropped. Alternatively, you can use the aspect ratio option by simply selecting from the available aspect ratios in the menu, which include 16:9, 4:3, 21:9, 16:10, 5:4, 1:1, and 9:16.
3. After using the cropping mode and selecting the portion of the video you want to crop, click Export to start producing the cropped version of the video you added.
By using the alternative option of AnyMP4 Video Converter Ultimate, you will now be able to easily crop videos on your computer without relying on the advanced editing tools of the DaVinci Resolve video editor. The alternative software is both easier to use and way more practical.
Now that we have provided our readers with multiple video options to crop video in DaVinci Resolve, we hope this article has sharpened and enhanced your video editing skills, especially when using demanding software like DaVinci Resolve. However, if you are only looking for a quick and easy solution to crop video clips, make sure to try the simpler alternative with AnyMP4 Video Converter Ultimate.
Secure Download
Secure Download
 Posted by Angelica Liwanag to Edit Video
More readings
 How to Change Playback Speed in DaVinci Resolve Speed Editor
If you want to change your clip’s playback speed, look no further. Discover the DaVinci Resolve speed editor and learn how to adjust your clip’s playback speed.
 How to Add Text in DaVinci Resolve [Easy-to-Follow Guides]
If you want to add text in DaVinci Resolve and don’t know how to accomplish it, don’t stress. Check our post and learn a simple guide for adding text to videos.
 How to Sync Audio and Video in DaVinci Resolve
If your audio is out of sync with the video, worry not. Find out how DaVinci Resolve can sync audio to video automatically and manually, only right here.
 Kapwing Video Editor Review, Is It A Good Video Cropper
Is the cropping feature in Kapwing Video Editor user-friendly? Check the answer from the review and get more alternatives to crop videos online and offline.