Reversing video clips is a classic editing option that can be used in different ways. This effect is a good way to shoot funny videos or edit pranks that seem impossible to do if the video is not set in reverse. Although this video effect is very simple to do, there are multiple ways how to apply it to your video clips, and that will be the topic of our article today. In this guide, we will provide two methods that you can use to reverse a clip in DaVinci Resolve editor. These two options are the simplest methods that you can use in the program if you wish to reverse the clips that you are editing in it. We will also explore an alternative that you can use as a simpler method to reverse clips.
Yes, you can. DaVinci Resolve is highly capable multimedia post-processing software that can be used to edit videos, motion graphics, and even audio mixes. Due to the program’s advanced nature, reversing video clips can be done using multiple options. However, this article will only explore the two ways that are the most simple to follow and use. To proceed to our full step-by-step guide, please continue reading the second part of the article.
This section will feature two reverse clip options that can be used in different ways. The first option is the most straightforward solution, while the second one is more applicable to advanced users. As a comparison, the first method that we will provide will only require three simple steps to set up. On the other hand, the more advanced option was written by using a five-step guide. Without further ado, let us proceed to the complete tutorial of video clip reversing.
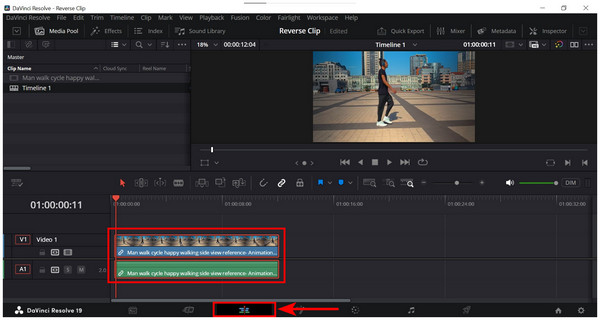
1. Add the media clip that you want to reverse in DaVinci Resolve’s Edit page Editing Timeline.
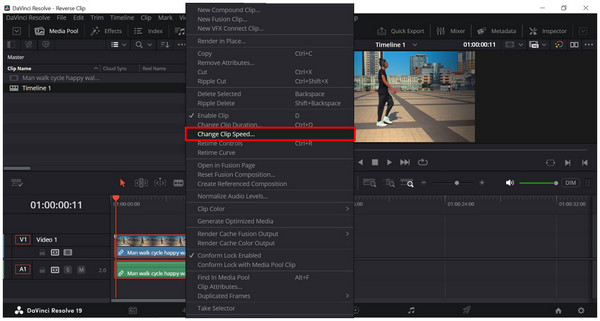
2. Right-click on the video added to the editing timeline and select the Change Clip Speed option.
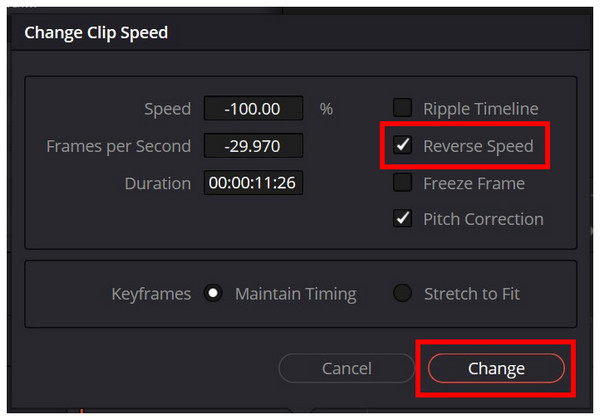
3. In the Change Clip Speed menu that will pop up, check the Reverse Speed box and click on Change to apply the reverse effect.
When you play the video in the main timeline, it will now play in reverse, and you can continue editing it. This option makes DaVinci Resolve an effective reverse video maker. With this simple option now highlighted, we can now proceed to the second option, which is much more suitable for experienced DaVinci Resolve editors. This method will be none other than the Retime Control function.
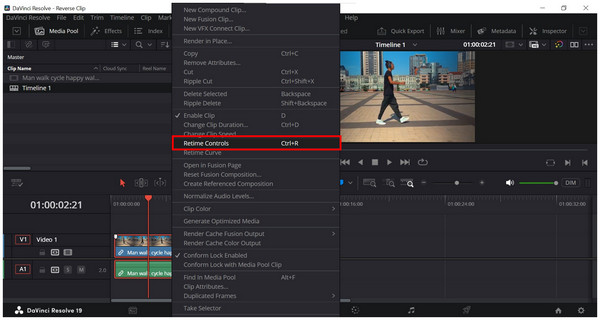
1. Add the video that you want to reverse in DaVinci Resolve’s Edit page Editing Timeline.

2. Right-click on the video that is being edited and select Retime Controls.
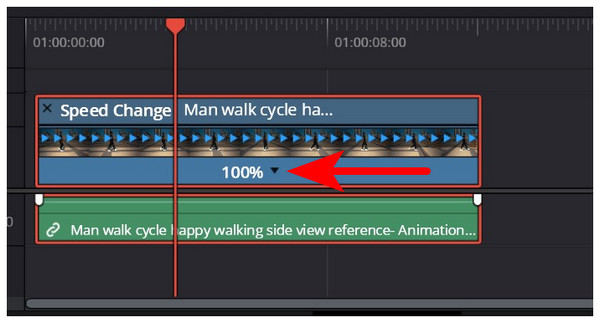
3. With the Retime Controls now enabled, click on the button that looks like an Inverted Triangle in the video that you are editing.
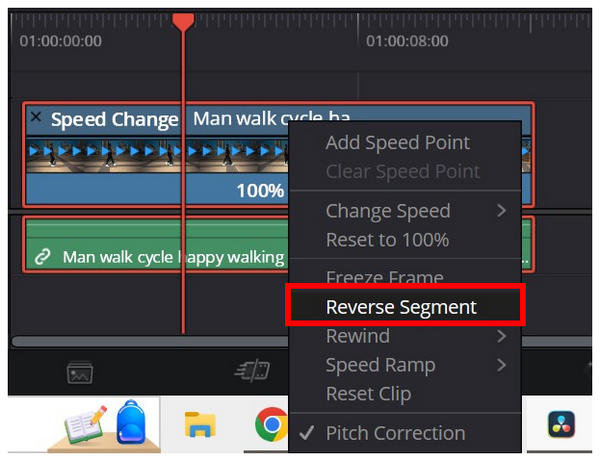
4. In the small dropdown menu that will show up, click the Reverse Segment option.
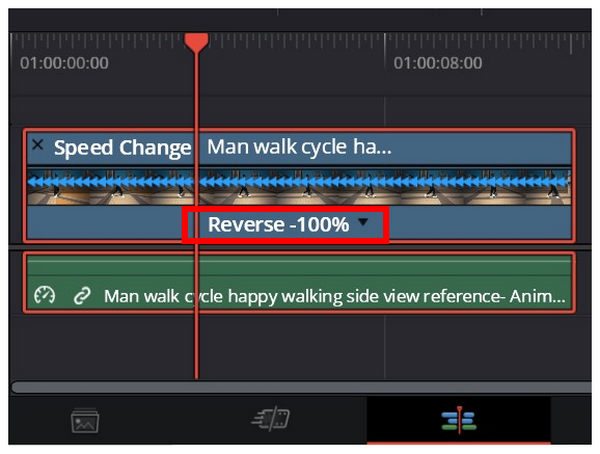
5. With the Reverse Segment option enabled, the video in the editing timeline will now be labeled as Reverse and play accordingly.
Retime controls are more applicable to advanced users since this option can only apply the reverse effect to select portions of a video. To learn the simpler way of adding reverse video effects, please read the next section of this article, where we will provide software that was developed to have a dedicated video reverser option.
Since DaVinci Resolve is an overall post-processing software, complicated editing methods should be expected in it, even if the effect that will be applied is only simple. With that in mind, this alternative software that we will feature will be a better option if you are looking for a tool to reverse videos as simply as possible. This software is none other than AnyMP4 Video Converter Ultimate.
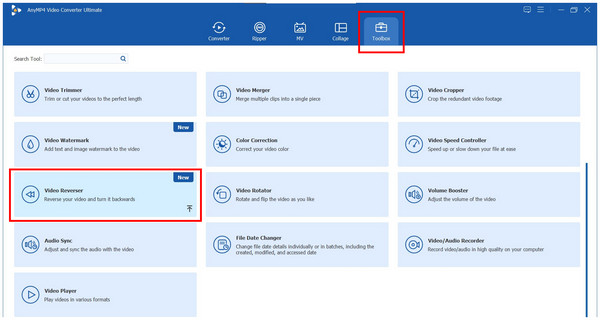
Although it can be mistaken for a file converter tool based on its name, this software was developed to be versatile enough to provide services to its users. The Toolbox section of the article, which features 20+ tools for different practical uses, made this possible. One of these tools includes the dedicated Video Reverser feature, which will be the highlight of this section.
As its name suggests, this option is a dedicated video reverser function that allows you to reverse video clips with a few clicks. If you are interested in how this feature works, please continue reading our three-step guide below.
First, download the software for an easier time following each step.
Secure Download
Secure Download
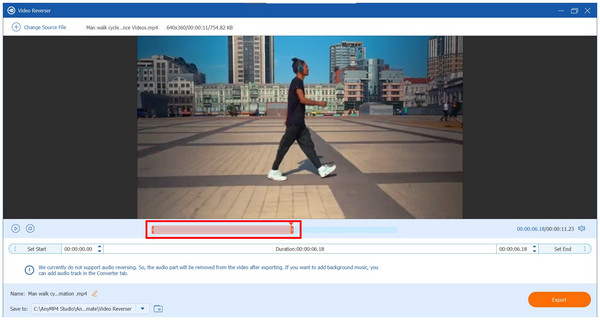
1. Open AnyMP4 Video Converter Ultimate and go to the Toolbox section. Scroll down and find the Video Reverser tool. In the menu that will pop up, add the video you want to reverse.
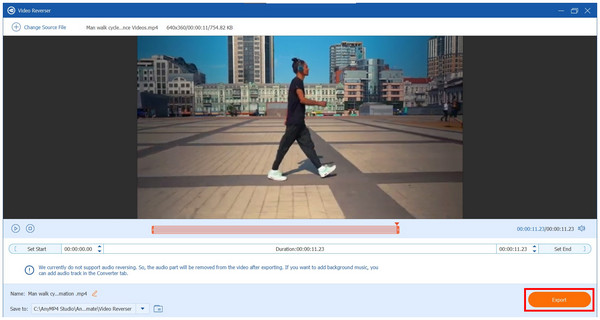
2. Now that the file has been added, you can select the portion of the video that you want to reverse. Adjust the Orange Bar to select the portion that you want to reverse. If you want the entire clip reversed, you can leave the Orange Bar to occupy the entire video.
3. After selecting the portion of the clip that you want to reverse, click on Export. AnyMP4 Video Converter Ultimate will open the folder where the reversed video is saved as an MP4 file.
With the reversed MP4 file now saved on your computer, you can use this clip as an editing asset or for other purposes. Since this option is significantly easier to use than the technical DaVinci Resolve methods, this option is ideal for users who want to reverse videos as straightforward as possible.
Now that we have provided you with two different methods for reversing clips in DaVinci Resolve, we hope that this article has proved useful for your current needs as a video editor. If you are a beginner video editor and DaVinci Resolve feels like it requires too much experience to use effectively, make sure to use AnyMP4 Video Converter Ultimate as a much more accessible video editing tool that you can use.
If you wish to help other DaVinci Resolve users by providing detailed tutorials on how to use video editor with effects, make sure to share this article online to help other aspiring video editors and multimedia enthusiasts.
 Posted by Angelica Liwanag to Edit Video
More readings
 How to Reverse a Video on TikTok - Put TikToks in Reverse
How to put a video in reverse on TikTok? Can I reverse audio on TikTok? This post gives you a detailed guide on how to reverse a video on TikTok in 2 ways.
 How to Play a Video in Reverse on Snapchat
This article is a complete guide to teaching how do you reverse a video on Snapchat. We will explore two options, using snapchat and without using it.
 How to Reverse a Clip in Premiere | Rewind Clips in 2 Ways
Check this and learn how to reverse a clip in Premiere. This way, you can add a unique touch to your video projects. Plus, explore alternatives for beginners.
 How to Change Playback Speed in DaVinci Resolve Speed Editor
If you want to change your clip’s playback speed, look no further. Discover the DaVinci Resolve speed editor and learn how to adjust your clip’s playback speed.