Nowadays, we have a very large need to record audio. For example, we may need to record an online meeting or do post-dubbing for our videos. Thanks to the technology improvement, there are many recording tools to choose from, and Davinci Resolve is one of the well-known ones. This article will introduce the ways of how to record audio in DaVinci Resolve; it can be a very useful tool for fixing the problem you are facing with recording audio. Read the content below and find the useful methods.

Can you record audio in DaVinci Resolve? Suppose you don‘t know how to use it. In that case, this section will explain how to record audio with DaVinci Resolve and how to import audio files directly to sync imported audio with video. The first thing we need is a microphone, and there are many different kinds on the market nowadays. If you don’t want to buy one, a USB microphone is also okay.
Here are the steps you can follow to use the built-in audio recording feature.
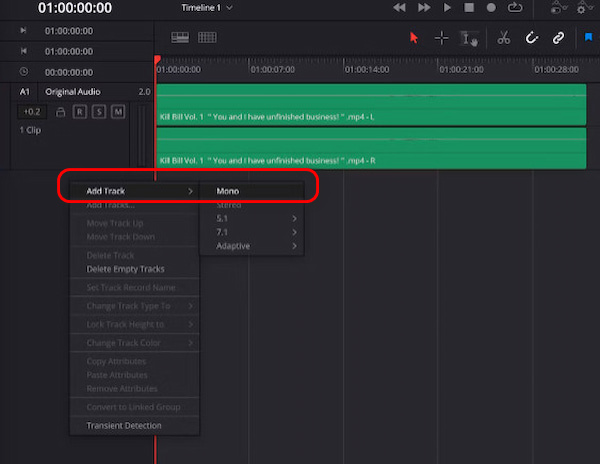
1. To add a new audio track for recording, right-click in an empty area of the timeline area and select Add Track and Mono in the pop-up option.
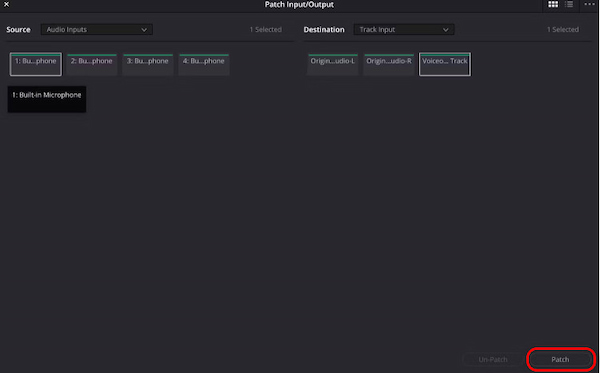
2. You need to select an audio input and output destination, choose it according to your condition and preferences, and select Patch to save your operation.
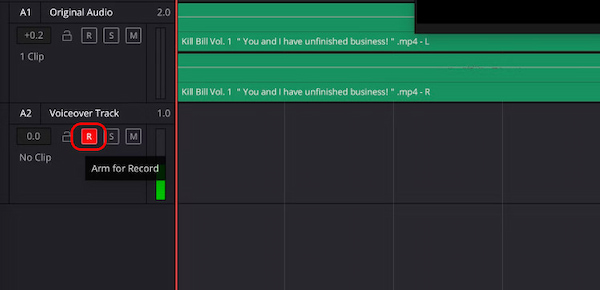
3. Now, arm the track for recording. Press the R button on the track header. This step will also help you determine whether your microphone is functioning properly. If everything is set up correctly, the gain meter will become green when you produce sound.
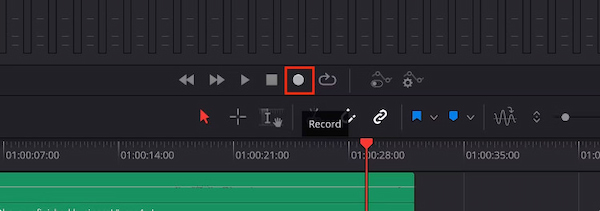
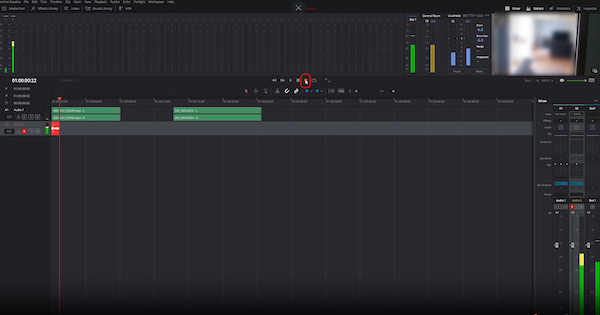
4. You can start recording your audio now. Click the start record button we circled below.
Now that you have obtained the recording technique, however, its feature set requires the user to have a certain editing experience.
Sometimes, if you record audio at the same time as video, the video may need to be re-shot due to an audio error. Luckily, there is a lot of editing software nowadays that can help us with post-dubbing. We need to shoot the video first, and recording the audio dubbing later is completely feasible. So, how to record audio directly into Davinci Resolve?
The method of syncing your video are as follows.
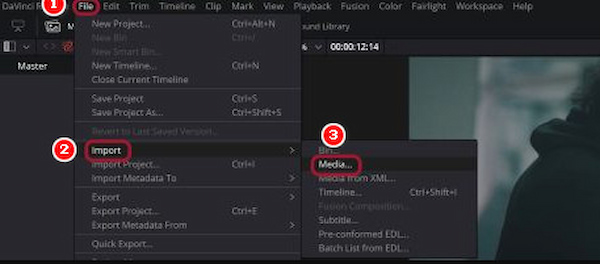
1. Import your videos. Launch it on your computer and import the video you want to sync. Click File and then select Import and Media.
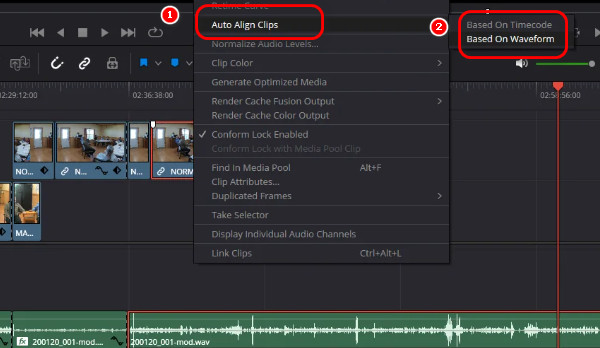
2. Find the clip you wish to sync in the timeline, right-click on it, choose Auto Align Clips, and then select your desired auto-align option.
3. After you set it all, you can start to sync your video.
After you know the basic method of using DaVinci Resolve to record audio, you can easily solve the problem of recording audio and dubbing a video. However, this program might be better suited for individuals who already possess experience with editing software, with its features of complex functions and a boring interface.
In this part, we offered some advice to help you better record your audio.
• Choose the right microphone.
Your microphone’s quality is an important and influencing element in improving audio quality. You can opt for Dynamic Microphones, which are excellent for handling loud sound sources and live settings. Meanwhile, you can select Condenser Microphones, which are perfect for studio recordings and capturing intricate sound details.
• Set appropriate levels.
Adjust levels cautiously, aiming for peaks around -12 dB as a solid target. Choose an appropriate sample rate and bit depth for your recording; typically, use 24-bit at 48 kHz.
• Reduce background noise.
Choose a quiet environment. If you are home, you can negotiate with your parents and keep calm to help you finish the audio recording better.
• Utilize audio tracks effectively.
Utilize separate tracks for dialogue, music, and sound effects. Ensure each track is clearly labeled for easy identification during the editing process.
AnyMP4 Screen Recorder is a professional and convenient desktop screen recorder; it provides users with the best functions to record screen movements or speaker voices; it not only can record system voices but also can record external audio on a computer. It is a handy tool for us to record online meetings, lessons, or game tutorials.
Secure Download
Secure Download
Features:
Here is a detailed guide on how to use it.
1. Download and launch this program on your computer. You will see an interface like this. Choose Audio Recorder.

2. Now, you will see a window where you can adjust your system sound and microphone. After you change these settings, click REC to start your audio recording trip.

As simple as the above steps, AnyMP4 Screen Recorder can help you record audio directly. The majority of users love it because of its simple interface, comfortable colors, and streamlined but effective and comprehensive features. Try this audio recorder software and enjoy a relaxed audio recording journey!
Can you record audio directly into DaVinci Resolve?
Of course! DaVinci Resolve enables you to record audio directly within the software by using its built-in recording feature.
How to record audio in DaVinci Resolve?
To record audio, start by creating a new audio track, enabling it for recording, choosing your microphone, and then pressing the record button.
What are the supported audio file formats in DaVinci Resolve?
DaVinci Resolve is compatible with a wide range of audio file formats, enabling users to effortlessly handle different types of audio tracks. The primary audio formats supported include WAV, MP3, AAC, FLAC, and AIFF.
How do I monitor audio levels while recording in DaVinci Resolve?
The audio meter in the interface shows real-time levels while you record so that you can keep track of audio levels.
What are the best practices for reducing background noise during recording?
To minimize background noise, select a quiet recording space or purchase a noise-canceling microphone on demand. You can also reduce background noise on the microphone.
This article describes how to record audio in DaVinci Resolve, including how to dub an existing video. However, because of its complexity, it is not newbie-friendly. Therefore, we recommend an alternative product, AnyMP4 Screen Recorder, to fulfill your more basic needs and make your recording process faster, more comfortable, and easier to use. I hope this article helps you well.