Have you ever seen a video where the action plays backward? Well, this is the power of a reversed video clip. Reversed video clips are a technique that can add a unique twist to your project. It lets you add a touch of magic to your edits, disorient viewers, or create a sense of rewind. In this guide, you will learn how to reverse a clip in Premiere Pro. We’ll explore the simple steps involved in reversing a clip using the Premier Pro’s tool. So, if you’re ready to add a unique dimension to your videos, continue reading this!
Reversing a clip allows you to add a creative touch to your videos. It creates a rewind effect, particularly in comedic videos or to emphasize a specific moment. The good thing is that the Speed/Duration dialog offers a convenient way to achieve this. This method is ideal for straightforward reversals without needing additional effect.
Here’s how to reverse a video in Premiere Pro using the Speed/Duration dialog:
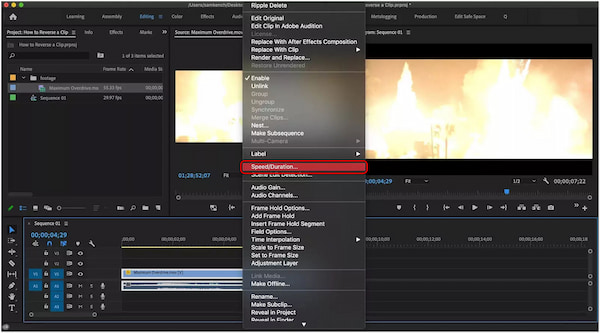
1. Head to your timeline and click the clip you want to reverse. Right-click the selected clip and choose Speed/Duration from the dropdown menu.
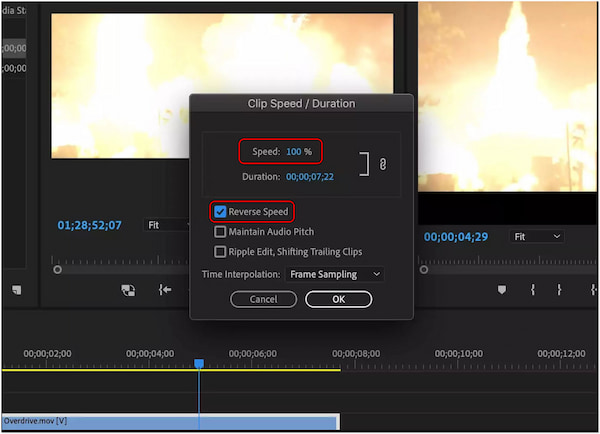
2. In the Speed/Duration window, locate the Reverse Speed checkbox. Ensure it is checked to achieve the reverse effect on your clip.
3. By default, the clip will play entirely in reverse at its original speed. In the same window, you can also speed up video in Premiere. Enter a value to make the reversed playback faster.
Reversing a clip with Premiere Pro using the Speed/Duration dialog makes your project outstanding. Now, a small heads-up. Reversing the video clip can also affect the audio. This means the audio will play backward as well. You don’t need to reverse the audio clip separately.
Premiere Pro excels at reversing clips through the Speed/Duration menu. However, some users find it less intuitive compared to some other editing software. If you’re looking for an easy-to-use tool with a dedicated Reverse feature, AnyMP4 Video Converter Ultimate is a great solution. Don’t be confused by its name! Although its name suggests it’s for video conversion, it comes packed with 20+ video editing tools. This includes a one-click Video Reverser feature. It eliminates any confusion about the process, making it much faster and easier to reverse your clips. In addition, it aims to provide a smooth editing experience. You won’t experience choppy playback during editing. On top of that, it promises to deliver a high-quality reversed video that maintains the original quality of your clip.
Here’s how to reverse a clip in Premiere Pro alternative:
1. Start by getting the free download of AnyMP4 Video Converter Ultimate. Install the multimedia software and let the installation process complete.
Secure Download
Secure Download
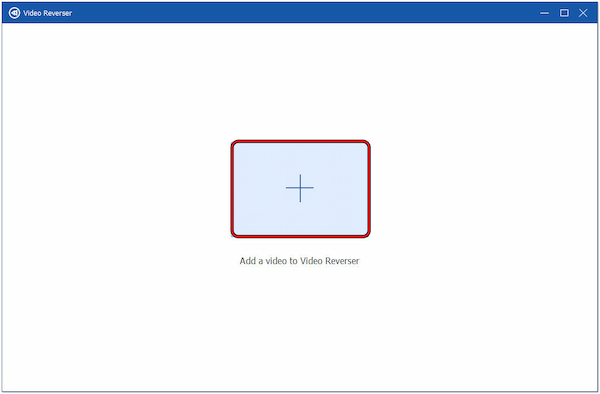
2. Once the installation process is complete, launch the AnyMP4 Video Converter Ultimate on your computer. Head straight to the Toolbox tab and look for the Video Reverser feature.
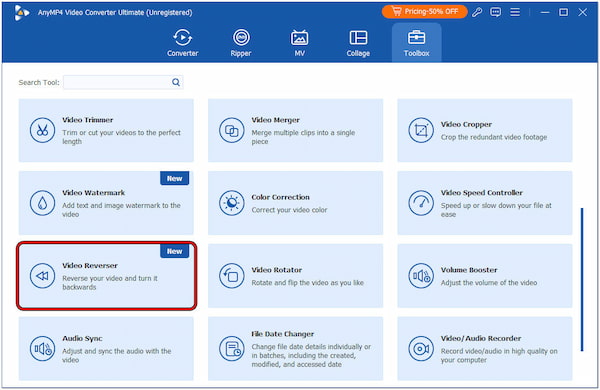
3. After locating the Video Reverser feature, click it. In the Video Reverser window, click + in the center to browse and select the video clip you want to reverse.
4. By default, the entire video clip will be reversed after exporting it. But, if you only want to reverse a specific section, you can use the sliders to define the portion you want to reverse.
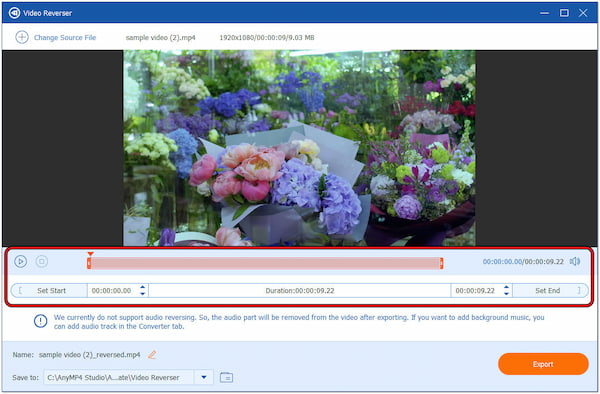
5. Once you’re satisfied with the selection, rename the file and choose your path destination. Afterward, click Export to initiate the reverse processing. The exported clip will automatically save with a reverse effect.
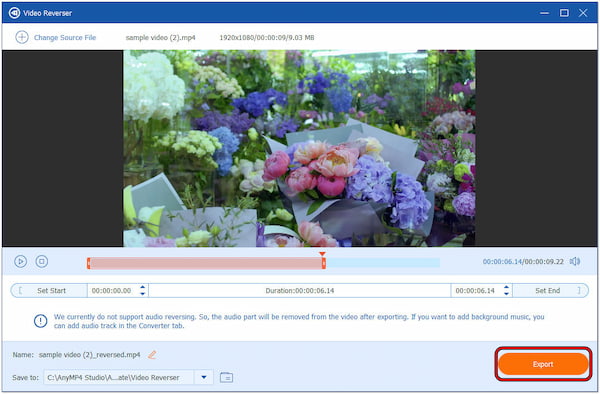
Note: AnyMP4 Video Converter Ultimate does not support audio reversing. The audio from the video will be removed after exporting. But here’s a good thing. You can add music to video by navigating to the Converter tab of this software.
| Features | Premiere Pro (Speed/Duration) | AnyMP4 Video Converter Ultimate (Video Reverser) |
|---|---|---|
| Ease of Use | It requires familiarity with the Premiere Pro menu and settings. | It is more intuitive and has a dedicated Video Reverser feature. |
| Processing Time | It has a slower editing performance, mainly with longer clips. | It has a smooth editing playback and allows the selection of specific segments to be reversed. |
| Quality of Reversed Video | It might affect the original quality, especially larger files. | It maintains the original video quality of the reversed clip. |
| Workflow | It has a multi-step process. | It only requires a single-click operation. |
| Additional Features | It offers additional editing options beyond video reversal. This includes speed adjustment, time remapping, and keyframing. | It boasts over 20+ editing tools beyond the Video Reverser tool. It includes Video Speed Changer, Video Rotator, Video Enhancer, Video Cropper, Video Rotator, and more. |
The Best Choice:
If you prioritize a simple and user-friendly experience, AnyMP4 Video Converter Ultimate is the better option. But, if you’re a professional editor and already familiar with Premiere Pro’s workflow, it might be sufficient. Overall, Premiere Pro offers more flexibility for professional video editing, while AnyMP4 is specifically designed for reversing and other video editing.
Can you reverse a video in Premiere Rush?
Unfortunately NO! Premiere Rush currently lacks a built-in feature to reverse videos. However, you can use the Creative Cloud App’s Quick Actions. This app allows you to perform quick edits on your videos, including reversing them. You can do it by dragging your clip into the app and choosing the Reverse Video from the Quick Actions menu. If desired, you can adjust the speed and audio settings. Then, download the processed clip and import it into Rush for further editing.
Does inverted video mean reverse video?
Inverting a video flips the image horizontally or vertically, making it appear mirrored. Meanwhile, reversing a video changes the playback speed, so the action goes backward. In other words, a reversed video plays the clip in rewind.
Is there an app to play videos backward?
YES! There are several apps and reverse video makers that can play videos backward! These apps come with editing features, allowing you to reverse a video before playback. But here’s a thing. Check their descriptions first to see if they offer reverse playback functionality.
Can I reverse a specific part of a clip in Premiere Pro?
Sadly NO! The Speed/Duration method reverses the entire clip. However, you can achieve a similar effect by splitting the clip at the desired point. Then, reverse the second half and reorder the clips in the timeline. Alternatively, you can use AnyMP4 Video Converter Ultimate’s Video Reverser feature. It allows you to reverse a specific part of the clip. You can use the sliders to define the portion you want to reverse or set a specific duration.
Does reversing the clip affect the audio?
YES! Reversing a clip in Premiere Pro will also reverse the audio associated with that clip. This is because the software treats the video and audio as a single unit by default. When you reverse the clip, the order of the video frames and audio samples are both flipped. This resulted in the audio playing backward as well.
By learning how to reverse a clip in Premiere Pro, you add a creative spark to your video projects. As covered in this guide, the Speed/Duration method in Premiere Pro offers a simple and effective way to achieve this effect. However, we understand that not everyone is comfortable with complex editing software. If you find Premiere Pro a bit daunting, fear not! Tools like AnyMP4 Video Converter Ultimate can be your saving grace. This all-in-one multimedia solution offers a beginner-friendly Video Reverser tool that allows you to reverse a clip in just a single click. Regardless of whether you’re a pro-editor or just someone seeking a simpler approach, there’s a method to achieve the reversed effect in your projects!
 Posted by Riley Mitchell to Edit Video
More readings
 How to Reverse a Video on TikTok - Put TikToks in Reverse
How to put a video in reverse on TikTok? Can I reverse audio on TikTok? This post gives you a detailed guide on how to reverse a video on TikTok in 2 ways.
 How to Play a Video in Reverse on Snapchat
This article is a complete guide to teaching how do you reverse a video on Snapchat. We will explore two options, using snapchat and without using it.
 How to Use Adobe Premiere to Compress Audio Files (100% Working)
These are comprehensive steps to use Adobe Premiere to compress audio files. We will cover all the information for Premiere and recommend a good alternative.
 How to Make Video Quality Better in Premiere Pro (2025)
Join us, discover what we need, and learn how to improve video quality in Premiere Pro. Check this to learn how to enhance video quality with this tool.