Red-eye filters are ideal for modern designs that focus on horror or gothic themes. This helps these kinds of motifs project their intended aura and mood. This effect commonly occurs when a camera flash illuminates a section of the eye, causing it to look vampire red. Unfortunately, it does not fit with all kinds of photos, such as those meant to be regular looking or photographs taken in professional settings. With that in mind, this article will look at several solutions that can remove red eye effect in photos captured digitally using three editing tools, from the easiest to use all the way to the most advanced. Please continue reading below to learn more about this topic.


The red-eye effect on photographs occurs when the light from a camera flash meets the retina of the eyes directly. This will usually occur if the subject of the photograph is looking directly in the camera lens making their eyes reflect the flash. Since a healthy retina is rich in blood and the anatomy of the eye is more delicate than other parts of our body, the interaction between external lights and the eye may result in unusual results such as grotesque-looking red eyes.
Now that we have learned the common cause of this effect, we can now move on to the solutions that are ideal for fixing this issue. In the next part of the article, we will first present the platform that is easiest to use. Afterward, the next two recommendations will be more advanced and more suited for experienced photo editors.
We will start our recommendation of solutions by presenting the easiest platform that can be used to remove red-eye effects in photos when it comes to availability and ease of use. With those factors in mind, the first solution on this list is none other than AnyMP4 Watermark Remover Online, an online platform specially designed to fix specific spots of a photo because of its background as a watermark cleaner. Due to its unique background, this platform became ideal for fixing red-eye effects caused by camera flash. In terms of availability, it also takes the top since it can be used as an online tool meaning that it does not require downloading a setup program and a long installation process.
To learn how to use the software, please read our step-by-step guide below:
1. Go to AnyMP4 Watermark Remover Online’s website, then click the Remove Now button. Upload the photo with a red-eye effect that you want to edit in the next window.

2. Among the selection tools, use the Brush option since it is circular, making red-eye selection easier. Once the section of the eye that you want to fix has been selected, simply click the Remove button. Wait for the process to finish.
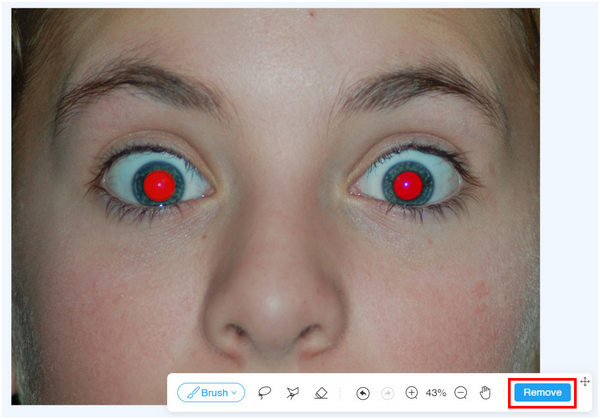
3. With the red-eye effect now fixed, select the Download button to save the edited photo.
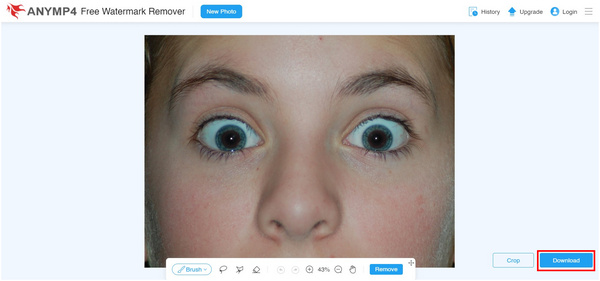
By following these three simple steps, your images with red-eye effects can now be edited without using dedicated editing tools that require editing experience along with a steep price tag. Additionally, you can also use this tool for its intended purpose of cleaning images with annoying tags and watermarks.
In terms of photo editing platforms, Photoshop might be the most advanced and powerful. This made the tool the go-to option of graphic designers and photographers for improving their photos or editing their crafts.
Despite the program’s advanced and complex features, Adobe has equipped its editing platform with a tool designed for fixing red-eye issues; the common occurrence of this problem might have pushed the developers to add a tool made for red-eye caused by flashes. This specific tool is aptly named Red Eye Tool, which can be found under the modes of Spot Healing Brush Tool.
To learn how to use the Red Eye Tool of Adobe Photoshop for fixing unwanted red-eye effects, please read our guide below:
1. In Photoshop’s opening interface, select Open, then find the photo that you want to edit.
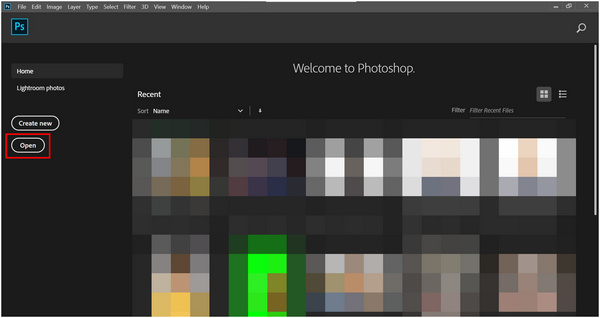
2. With the image now added, find the Spot Healing Brush Tool and then right-click on it. Choose the Red Eye Tool on the list of modes that will pop-up.
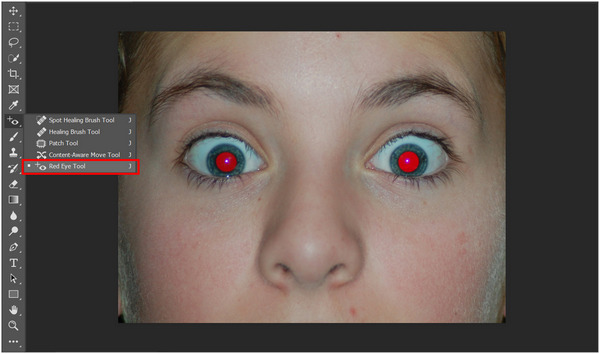
3. Using the Red Eye Tool, select the portion of the photo around the red eye. The tool will automatically fix the red eye problem and turn it into the natural shade of the retina. Your photo is now fixed and you can now save it as usual.
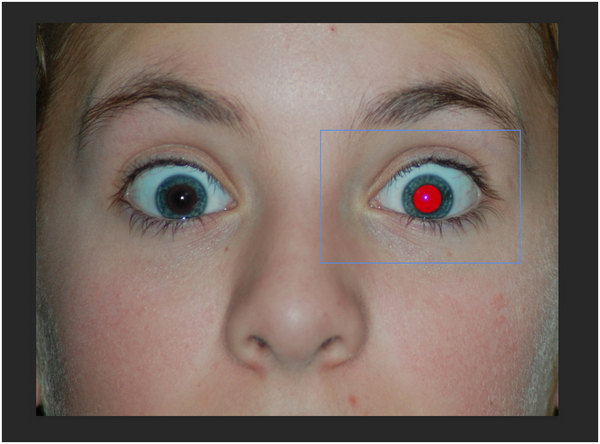
Photoshop’s Red Eye Tool is one of the most convenient tools for photographers who often work at night time or in dimly illuminated venues. Using this dedicated spot healing healing option, images will look instantly natural. If you want to enhance your image quality in Photoshop, after removing the red eye, this post helps.
For the most difficult tool to use in this guide to remove red eye effect on photos, Adobe After Effects will be the last platform that we will discuss. This automatically becomes the most challenging tool to use for removing red-eye caused by camera flash since it is a video editing tool, contrary to the two initial tools, which are both photo editing platforms at their core.
1. Open the image that you want to edit by clicking and dragging into the editing window.
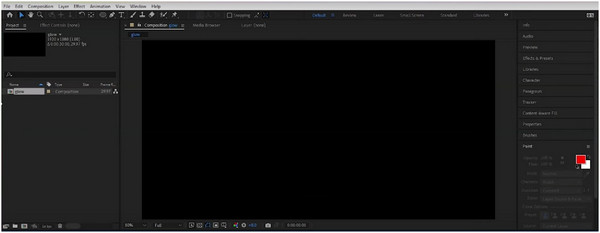
2. After adding the image, use the Selection Tool by clicking it on the toolbar on by pressing V. With the tool now activated, select the eye section of the photo that you want to edit.
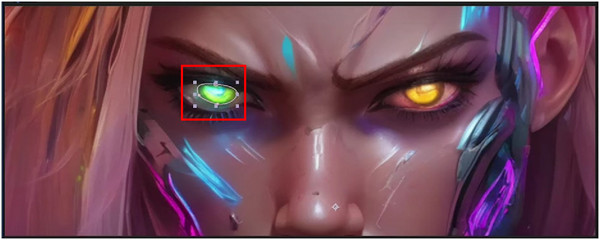
3. With the eye section now highlighted, open the Effects and Preset tool and then select the Hue/Saturation option. In the color adjustment window, simply adjust the hue, saturation, and lightness of the selected subject until it look natural. This option can be used to change the red pigment present in the photo that is being edited as by adjusting its primary color elements itself.
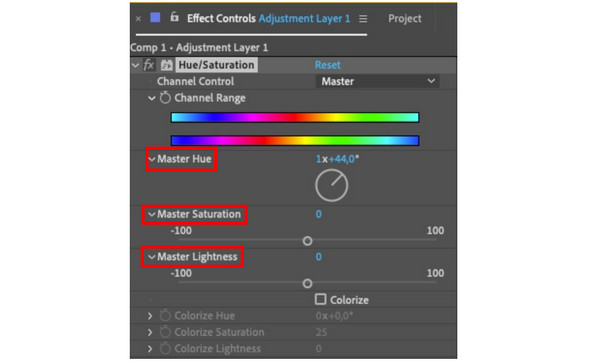
Unlike Photoshop and AnyMP4 Watermark Remover Online, After Effects is much more complicated to use, and it does not have a dedicated tool to fix a specific section on the screen instantly. Because of this, this tool is not ideal for beginners, and it might be overkill if you only want to fix red-eye effects on photographs caused by the camera flash.
Can I remove the red-eye from the photos?
Yes, you can. This problem is a common occurrence in images, and there are tools that can be used to fix it. The easiest among them is AnyMP4 Watermark Remover Online.
Can you fix red-eye in Apple photos?
Yes, Apple Photos has a dedicated tool for it. It can be found in the Adjust panel. Simply look for the Red-eye option and then select Auto to fix it automatically.
Which tool is used to remove red-eye impact from a picture?
Most editing tools have a dedicated red-eye editor. Photoshop has its own Red Eye Tool. At the same time, online platforms such as AnyMP4 Watermark Remover Online can be used to solve this problem.
How can you remove red eye effect from a photograph?
Simply use the editing platform of your choice. Most of them have a dedicated red-eye editor tool. Alternatively, AnyMP4 Watermark Remover Online can also be used to fix this.
What is the tool to use on After Effects to remove red eyes?
After Effects has no dedicated red-eye remover tool. Because of that, fixing red eye effects on it is way more tricky. You must know the right combination of tools to fix eye color, such as red eyes. After Effects remove red eye is harder to use.
Red-eye effects on photos are a common problem among photographers. This problem is even more common today since people can now capture images through their phones. Thankfully, there are easy to use tools that can be used to fix this problem easily. Just be sure that the tool that you are using fits your current editing skill level.
Please share this article online to help other people having problems with unwanted red eye effects on their photos.