Color grading is the transformative process that elevates the visual impact of your videos. It goes beyond simply fixing technical issues. It lets you establish a distinct style, enhance emotions, and create a polished final product. In this post, we will guide you in the process of color grading in Premiere Pro. We will equip you with the knowledge and steps to achieve stunning results. Continue reading for additional insights!
Premiere Pro’s color grading is also referred to as color timing. It is a post-production process used in filmmaking and video editing. It involves manipulating the colors, contrast, and other visual aspects of an image. Color grading allows filmmakers and editors to establish a unique visual style for their projects. It can be used to create a realistic, dramatic, or stylized look. It can also be used to fix technical issues with the footage. This includes white balance problems or uneven exposure. It helps ensure consistent color tones throughout a film or video, even if scenes were shot in different locations or under varying lighting conditions.
Color grading presets are pre-configured settings that alter the colors, contrast, and overall look of your video footage in Premiere Pro. These presets offer an easy way to achieve professional-looking results, saving you time and effort compared to manual color correction.
Here’s how to access Premiere Pro color grading presets:

1. On the right side of the Premiere Pro interface, find the Effects panel. If it’s not visible, go to Window and select Effects to enable it.
2. Within the Effects panel, there are two main ways to find color-grading presets:
Browse by Category: Expand the Lumetri folder within the Effects panel. This folder contains subfolders categorized by different effects, including Looks. Here, you’ll find a collection of pre-made video color grading presets.
Search Bar: Use the search field at the top of the Effects panel. Type keywords like color, grade, look, or the specific style you’re looking for. This will filter the effects and display relevant presets.
Note: If you’ve downloaded color grading presets from external sources, you might need to import them. Locate the downloaded preset files. Drag and drop them onto the Looks folder within the Lumetri Presets section of the Effects panel.
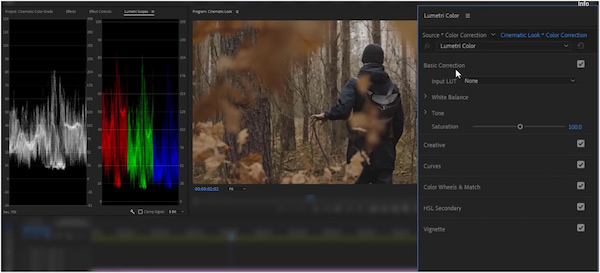
Premiere Pro offers powerful color grading tools within the Lumetri Color panel. Regardless if you’re a seasoned editor or just starting, mastering these tools can unlock your creative skills.
Here’s how to color grade in Premiere Pro:
1. Begin by switching your workspace to focus on color grading tools. Go to Window, select Workspaces, and choose Color from the available options. This will switch your interface to focus on color grading tools.
2. In the Timeline panel, select the video clip you want to color grade. The Lumetri Color panel is your primary tool for color grading. Locate it on the right side of the interface. It offers various sections for adjustments:
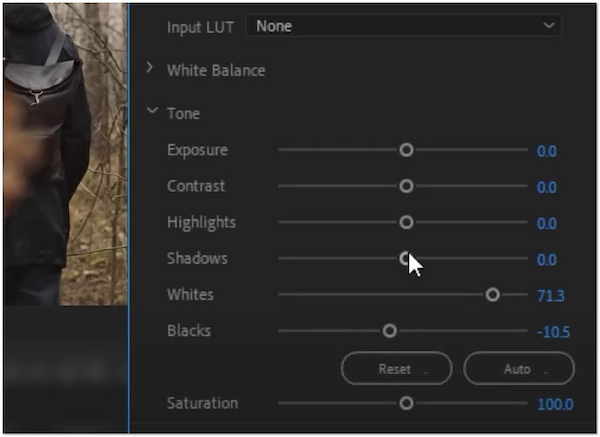
3. Start by addressing any technical issues with your footage. Use the Basic Correction tools to adjust exposure for proper brightness. Correct white balance for neutral color temperature and fine-tune contrast/saturation for a balanced look.
4. Regularly preview your adjustments by playing back your video clip. This allows you to fine-tune the color grading and ensure it achieves the desired effect.
Color grading in Premiere Pro lets you transform your videos and bring them to life. By mastering these techniques, you can elevate your video editing skills to a new level. Remember, experimentation is key to developing your color grading skills.
Premiere Pro’s built-in Lumetri Color panel offers powerful color grading tools. However, Adobe Premiere color grading plugins like Sapphire by Boris FX can extend your creativity. It boasts numerous effects, including tools specifically designed to enhance your color grading workflow.
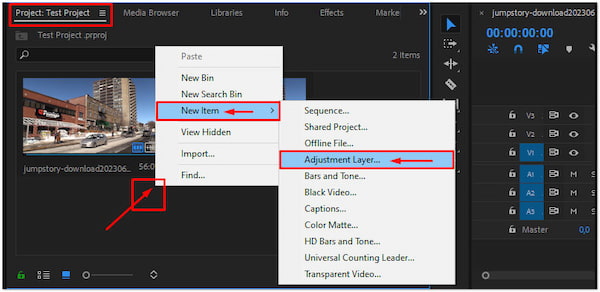
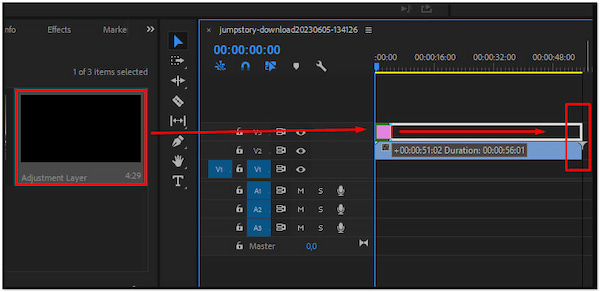
1. Beforehand, verify that Sapphire is properly installed and integrated with Premiere Pro. In the Timeline panel, choose the video clip you want to color grade.
2. Create a new adjustment layer above your video clip. Apply the Sapphire effects to the adjustment layer instead of directly to the clip.
3. Locate the Effects panel on the right side of the interface. Search for Sapphire effects or browse through the folders to find specific effects.
4. Look for the download button associated with the GIF.
Sapphire in Premiere Pro unleashes your creativity in color grading. By using its effects, you can elevate your color grading skills and achieve stunning results.
Color grading can elevate your videos from ordinary to extraordinary. Though Premiere Pro offers robust color grading tools, navigating them can be challenging. If you’re seeking a user-friendly color grading experience similar to Premiere Pro’s basic adjustments, then AnyMP4 Video Editor is a compelling solution. This AI color-grading Premiere Pro alternative goes beyond simple adjustments. It boasts innovative features that allow you to create professional-looking results.
Not to mention, it uses AI to generate 3D LUTs that perfectly complement your footage automatically. What’s more, it comes with 40+ unique filter effects that can spice up your videos. In actuality, it isn’t just about color grading; it’s a complete video editing toolkit. You can start your project with pre-made, customizable texts, transitions, and even stickers. On top of that, it supports over 200 formats that you can export in 4K resolutions.
1. Initially, get the free download of AnyMP4 Video Editor. Install this automatic color grading Premiere Pro alternative and let the installation process complete.
Secure Download
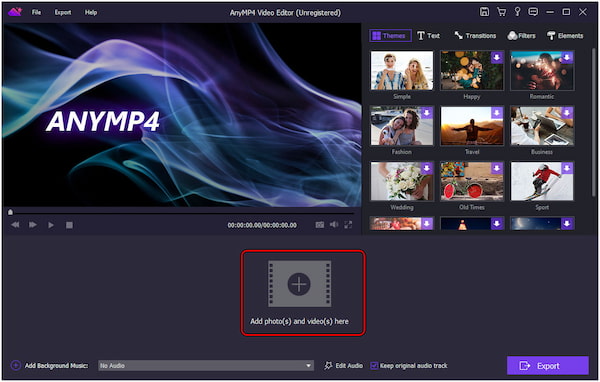
2. After installation, launch the AnyMP4 Video Editor on your computer. Click Add photo(s) and video(s) here to import the video you want to color grade.
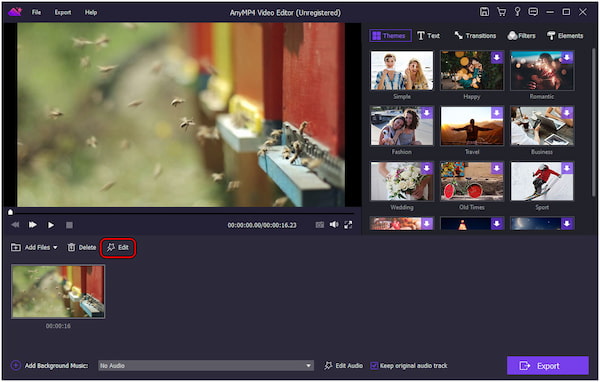
3. Once the video is loaded, look for the Edit option and click it. In the editing window, select the Advanced option and start manually modifying the Temperature, Tint, and Exposure.
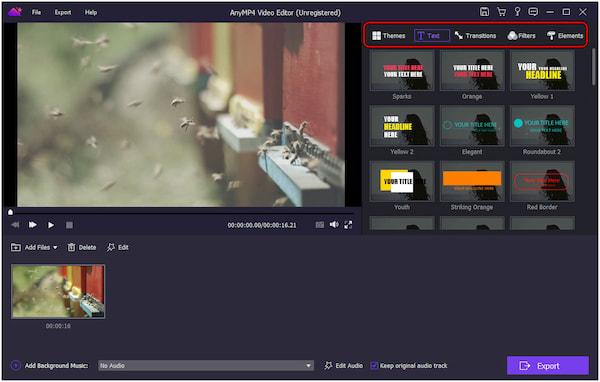
4. Check the 3D LUT box and choose your desired filter effect from the dropdown menu. You can also explore other tools like Crop and Clip to achieve your desired framing.

5. Go back to the AnyMP4 Video Editor’s main interface and make additional edits. Here, you can add themes, insert text, set transitions, and more.
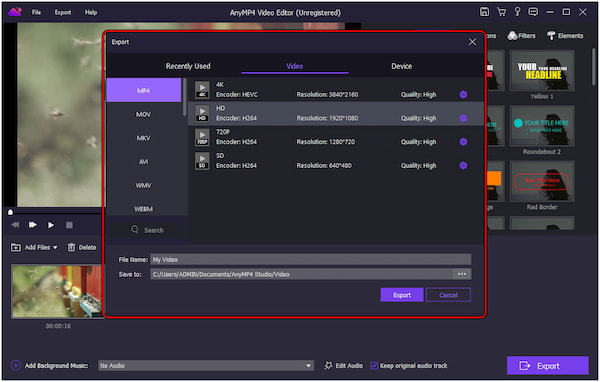
6. After editing and enhancements, click Export and select Export to Video option. Choose your preferred file format and quality, then click Export to save your color-graded video.
AnyMP4 Video Editor provides an efficient solution for those seeking a simpler approach. With its essential color correction tools and creative features, it allows you to bring your video editing vision to life. All of these can be done without a steep learning curve.
Is color correction and color grading the same?
NO! Color correction is a technical process that aims to fix any color imbalances or issues in your footage. Meanwhile, color grading is a more creative process. It is used to establish a specific mood, style, or visual theme for your video.
What is the color grading technique?
Color grading covers various techniques. It is used to configure the colors, contrast, and visual appearance of an image/video. Some key techniques used in color grading are Color Wheels, Log Grading, LUTs, and Curves.
What is the best format for color grading?
The ideal format for color grading depends on the project’s requirements. RAW formats offer flexibility and control for color grading as they capture the most color data. However, these files can be large, which requires you to convert RAW to JPG or MP4.
How do you color grading a picture?
Though color grading is primarily used in video editing, there are ways to achieve similar effects on still images. Tools like AnyMP4 Video Editor offer features for adjusting temperature, tint, and exposure. It can be used for basic color correction and some creative color adjustments.
Color grading in Premiere Pro can transform your dull videos into visually captivating footage. This guide explored the process of color grading. It equips you with the knowledge and steps to elevate your video editing skills and achieve stunning results. However, using Premiere Pro can be daunting for beginners. The good news is that there is a user-friendly tool available. AnyMP4 Video Editor lets you enhance your video like a pro, even without extensive editing experience.
 Posted by Riley Mitchell to Edit Video
More readings
 Colorize GIF Image: Turning Black & White to Vibrant Colors
Discover how to colorize GIF images and breathe new life into black-and-white animations. Learn techniques to add vibrant colors using popular editing tools.
 AI Photo Color Correction: Get Photo Preset Right
Read this article guide to learn how to apply color correction photos and videos using five software to improve your captured images and video clips tenfold.
 4 Methods to Remove Black Color Background from Photo
Looking for an easy-to-follow guide to remove black color background from image? You’re at the right place! Check our informative guidepost for more details.
 Mastering Video Color Correction Tools and Techniques
This post will outline essential video color correction tools and techniques. Learn how to achieve professional-looking visuals through color adjustments.