Video editing goes beyond stitching clips together. Color correction breathes life into your footage. It turns flat and dull visuals into polished and professional presentations. Premiere Pro offers powerful tools to achieve both natural-looking corrections and distinct creative styles. In this post, we’ll go through the process of color correction in Premiere Pro. We will cover how to color-correct a single clip and multiple clips in Premiere Pro. This will help you achieve realistic footage and gain knowledge in basic color correction.

Color correction is a process used in various fields, most likely in photography and filmmaking. It fixes imbalances and inconsistencies in colors within an image or video clip. The color correction’s goal is to achieve a natural look where colors appear accurate and realistic. Just like how we perceive colors in real life. It involves adjusting the white balance to eliminate unwanted color casts. Additionally, it configures the contrasts to enhance details and corrects exposure to balance out highlights and shadows. Color correction ensures consistency across footage shot under different lighting conditions. This makes the final video appear cohesive. In simple words, it’s like fine-tuning the colors to match what our eyes expect to see.
Color correction in Premiere Pro can take your clips from dull to professional-looking videos. In actuality, it offers an auto color correction feature, but achieving a natural look requires manual adjustments. Below, we’ll explore the Premiere Pro’s basic tools and how they work:
Color correction can elevate your video into polished and professional-looking clips. Fortunately, Premiere Pro offers tools within the Lumetri Color panel to achieve a natural look. For good measure, you can save your color correction settings as a preset for future use. In addition, you can explore other tools within Lumetri Color for more precise color adjustments.
Here’s the process of color-correcting video in Premiere Pro:
1. Navigate to Window and select the Lumetri Color option. Clicking this opens the Lumetri Color panel on the right side of your workspace.
2. In the Lumetri Color panel’s Basic Correction section, click the Auto button. Premiere Pro will analyze your clip and create a basic color correction.
3. Here’s where you achieve a natural look:
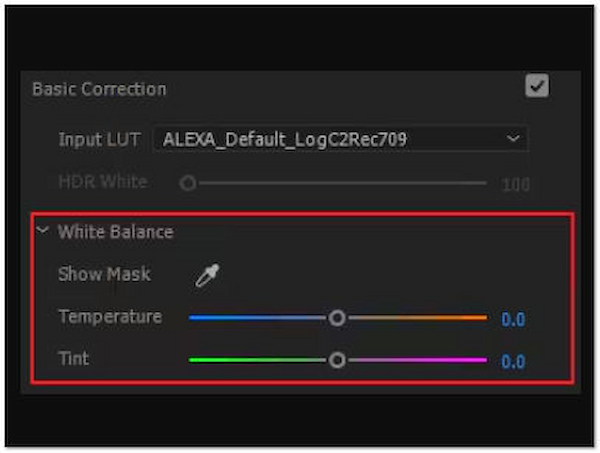
White Balance: Use the eyedropper tool to click a neutral white area in your shot. This helps eliminate color casts and ensures whites appear truly white. You can refine the white balance using the Temperature and Tint sliders.
Exposure and Tone: Adjust the Exposure slider to brighten or darken the footage. Use the Tone section to manipulate the tonal range. Remember, aim for balanced shadows, mid-tones, and highlights that reflect a natural scene.
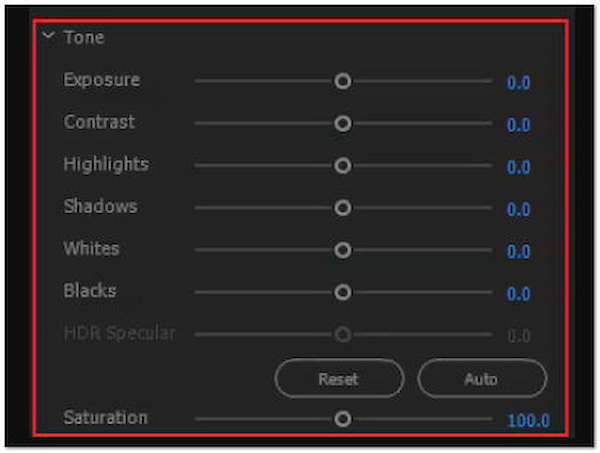
Saturation: A natural look involves slightly lowered saturation. Use the Saturation slider to reduce color intensity while keeping colors pleasant.
Note: Use the Bypass button next to the Lumetri effect to compare the original and adjusted clip. This helps visualize your video color correction progress.
Color correction can be time-consuming, especially when applied to numerous clips. Luckily, Premiere Pro offers an efficient method to achieve consistent color across your entire project. The Premiere Pro’s Adjustment Layers offer a powerful solution for achieving consistent color across your entire project.
Here’s how Adobe Premiere color correction in multiple clips works:
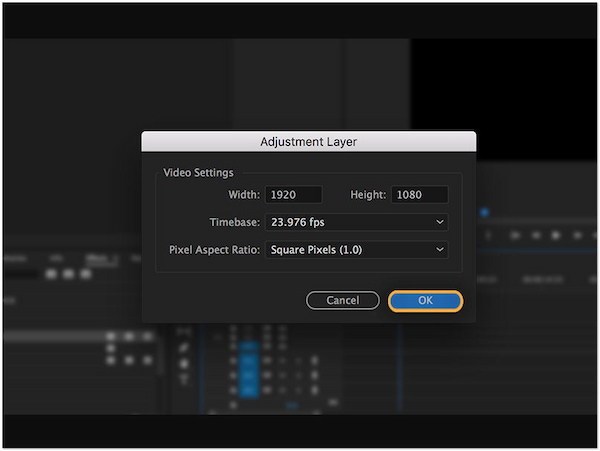
1. Right-click anywhere in the Project panel, click New Item, and choose the Adjustment Layer. In the New Item dialog box, adjust the layer’s size to match your project settings or leave it as default. Click OK.
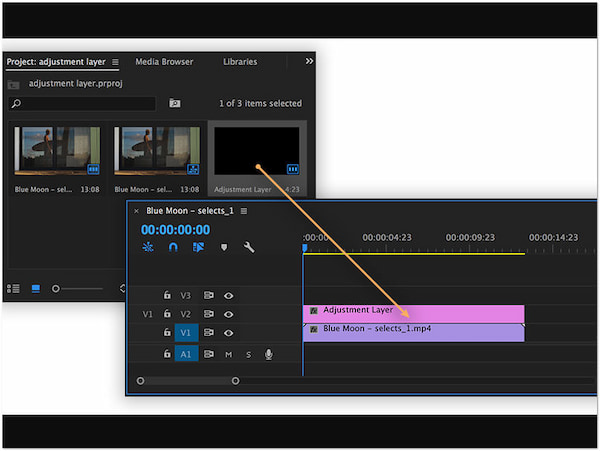
2. Drag the newly created Adjustment Layer from the Project panel into your timeline. Extend the Adjustment Layer in the timeline to cover the entire duration of the clips you want to color correct. Any clips positioned below will be affected by the color adjustments you make.
3. With the Adjustment Layer selected in the timeline, locate the panel. Find Lumetri Color in the Effects panel and drag it onto the Adjustment Layer in your timeline. It will appear on the right side of your workspace.
4. Use the various tools within this panel to achieve your desired color correction. You can refer to the previous guide for detailed information on color correction.
Note: Applying adjustments once to the Adjustment Layer affects all clips below it. It saves you time compared to individual clip corrections.
Undoubtedly, Premiere Pro is a powerful tool for color correction. It excels in video color correction and provides natural-look clips. However, it might be complicated to use for beginners. Fortunately, alternative tools like AnyMP4 Video Converter Ultimate are available for easy color correction tasks. This multimedia software goes beyond media conversion. It includes over 20+ editing tools, including an AI-powered Video Enhancer feature. It allows you to improve your clip in several ways. It can optimize video effects, upscale video resolution, reduce video shakes, and remove video noise. Take note, all without requiring extensive manual adjustments. This tool can be a good option for beginners or those who need a more streamlined workflow.
Here’s how to color correct in Premiere Pro alternative:
1. Start by getting the free download of AnyMP4 Video Converter Ultimate. Install the multimedia software and allow the installation process to complete.
Secure Download
Secure Download
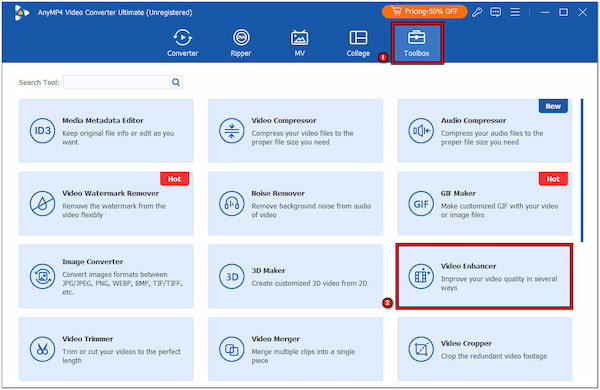
2. After completing the installation, run the AnyMP4 Video Converter Ultimate on your computer. Head to the Toolbox tab and look for the Video Enhancer tool.
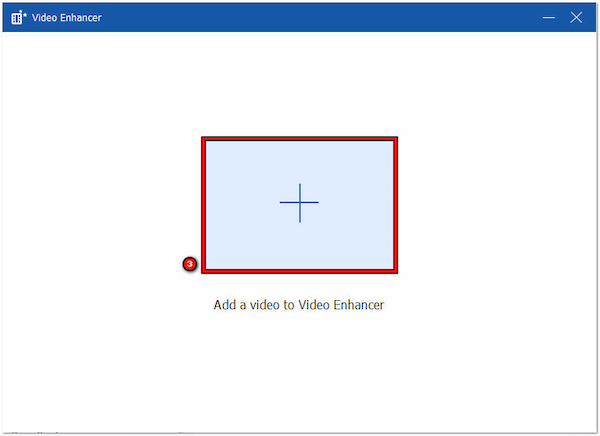
3. In the Video Enhancer window, click + to add the video you want to color correct. You will be presented with various options to enhance your video.
4. Depending on your preference, click the box of each option to apply the effect:
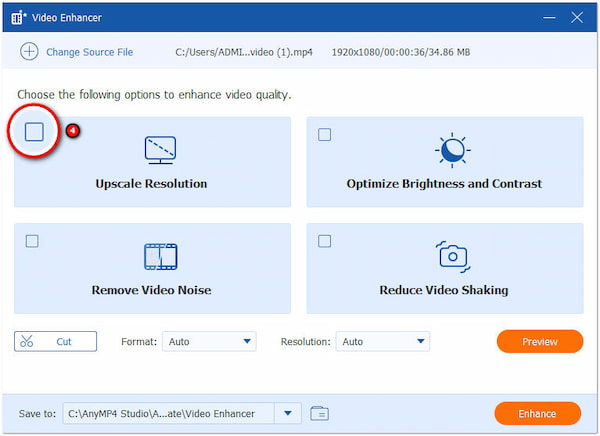
Upscale Resolution: This feature improves the quality of low-resolution videos by increasing the number of pixels. It takes your blurry video and attempts to make it appear sharper and more detailed.
Optimize Brightness and Contrast: This feature automatically adjusts the overall brightness and contrast of your video. It can be helpful for videos that appear too dark, washed out, or lack visual depth.
Remove Video Noise: Digital video noise can manifest as unwanted grain or speckles in your footage. This feature uses AI to identify and remove this noise. It resulted in a cleaner and smoother video.
Reduce Video Shaking option: Shaky footage can be distracting and unpleasant to watch. This feature stabilizes shaky videos by analyzing the movement and applying adjustments to minimize these jitters.
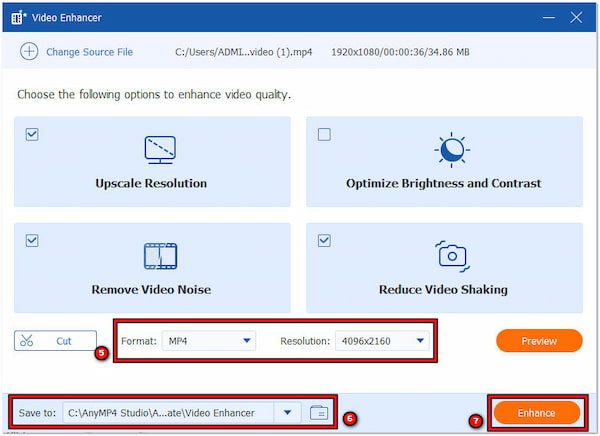
5. After checking the appropriate box for your edits, choose your desired format. You can also select your preferred resolution. Finally, click Enhance to save and apply the edits.
AnyMP4 Video Converter Ultimate’s Video Enhancer feature serves as an efficient AI color correction Premiere Pro alternative. It lets you color-correct and improve the overall visual appearance of your clips. Aside from improving video quality, it also provides a Cut tool. This tool allows you to split video into parts or trim unwanted footage on your clips.
Is color correction and color grading the same?
NO! Color correction is a process of fixing imbalances and achieving a natural look in your video. Meanwhile, color grading goes beyond correction and adds a specific creative style or mood to the video.
Why is auto color not working in Premiere Pro?
There are several reasons why auto color might not achieve the desired look. But the most common is due to complex footage. Auto color is a good starting point, but it might struggle with scenes with challenging lighting conditions, mixed white balances, or extreme color casts.
How do you use a fast color corrector in Premiere?
Unfortunately, Premiere Pro’s fast color correction is already gone. However, there are efficient ways to speed up your color correction workflow. Learning keyboard shortcuts for frequently used adjustments in the Lumetri Color panel can significantly improve your speed.
Is Premiere Pro or After Effects better for color correction?
It depends on your preference! Premiere Pro offers robust color correction tools within the Lumetri Color panel. It is suitable for most basic and advanced color correction needs. On the other hand, After Effects provides even more advanced color correction tools and deeper control over specific color manipulations.
Color correction in Premiere Pro transforms ordinary videos into captivating clips. Premiere Pro allows you to balance colors, adjust exposure, and create a distinct visual style for your project. Remember, achieving a natural look or a specific creative vision is an iterative process. However, not all users find Premiere Pro easy to use. In such cases, tools like AnyMP4 Video Converter Ultimate can be your companion. This tool allows you to color-correct and improve your clips automatically. It eliminates the need for extensive editing to achieve stunning videos.
 Posted by Riley Mitchell to Edit Video
More readings
 Top 5 Video Color Editors for Windows 11 and macOS Sequoia
Here are the top 5 best video color editing software to help you change video color and tone on your computer easily without losing quality.
 Invert Colors on iPhone – Save Your Eyes from a Bright iPhone Screen
How do you use the invert color on your iPhone to protect eyes and save the battery? Here is how to invert colors on iPhone or enable dark mode with ease.
 3 Ways to Change the Color of a Video (Beginner Guide)
Learn how to change the color of a video like a pro here! Discover effective methods for color transformation to add visual impact to your videos.
 Colorize GIF Image: Turning Black & White to Vibrant Colors
Discover how to colorize GIF images and breathe new life into black-and-white animations. Learn techniques to add vibrant colors using popular editing tools.