Have you ever dreamt of creating captivating videos but felt intimidated by complex editing software? Well, Clipchamp can be your one-stop shop for transforming your video clips into polished masterpieces! It allows you to create stunning videos without exerting effort. In this post, you will learn how to edit video in Clipchamp, from basic to advanced editing. We will uncover some of its notable functionalities. Also, we’ll provide steps into how you can use these functionalities to craft pro-like videos.
Clipchamp - Video Editor is a web-based video editing tool acquired by Microsoft. It is programmed to make video creation accessible to everyone, regardless of experience. It lets you import and edit videos, images, and audio files directly on your web. Clipchamp offers a user-oriented interface with a timeline editor. You can trim clips, add transitions, overlay text, and even record screens or webcams. There’s also a library of royalty-free stock videos, music, and sound effects to enhance your projects. It lets you create unlimited videos in high definition without watermarks. There are also paid plans offering additional features like cloud storage and access to wider stock assets. Clipchamp also integrates with other Microsoft services like OneDrive, Google Drive, Dropbox, and Xbox.
What is Clipchamp on Windows 11? Basically, it is the official video editor for Windows 11. This means Microsoft included Clipchamp as a pre-installed app on most Windows 11 computers. You can find it directly in your Start Menu. Meanwhile, On Windows 10, it can be installed as an app through the Microsoft Store. Compared to the web version, it offers faster performance, mainly for editing large video projects. As mentioned, it is not only exclusively available on Windows computers. You can access it and edit videos using any device with a browser and internet connection, regardless of whether you’re using a Windows, Mac, Chromebook, or Linux. So, as long as you have a modern browser, you can use Clipchamp to create and edit videos.
Here’s how to add background to GIF with AnyMP4 Video Converter Ultimate:
Video editing with Clipchamp is straightforward, regardless if you are using the web version or the downloadable application. In both versions, you’ll find the same editing tools and functionalities. This means you can pick the method that best suits your workflow.
Here’s how to edit video in Clipchamp:
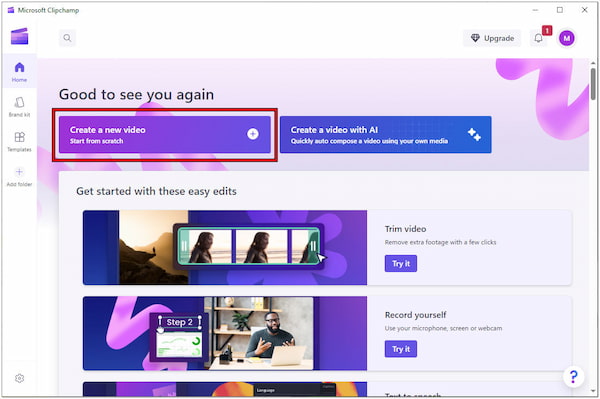
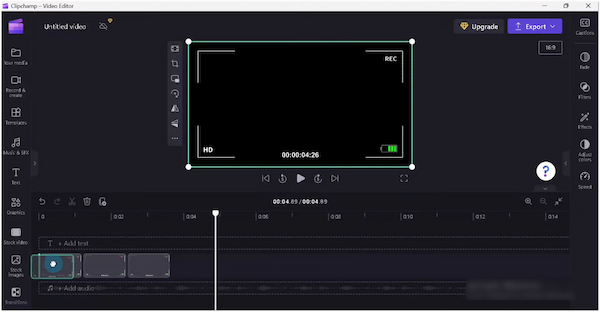
1. Upon launching the Clipchamp, you will be presented with a dashboard. Select the Create a new video option to proceed with the timeline. Click Import Media to browse the video file from your local drive. On the other hand, click the Down Arrow to import video from OneDrive, Google Drive, Dropbox, or Xbox.
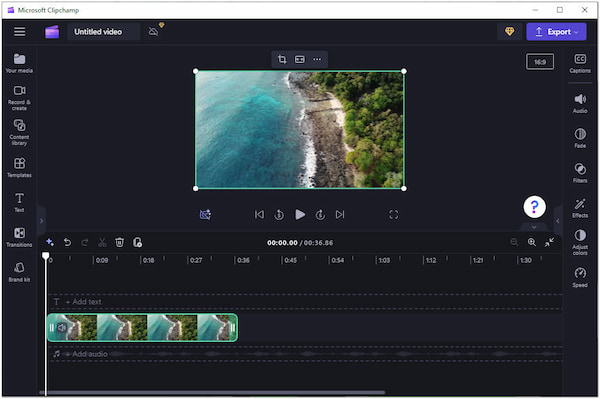
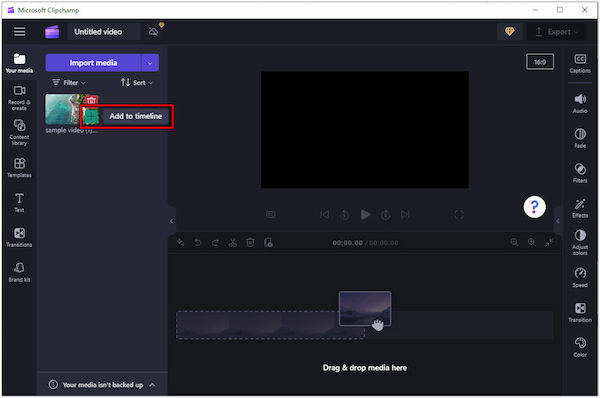
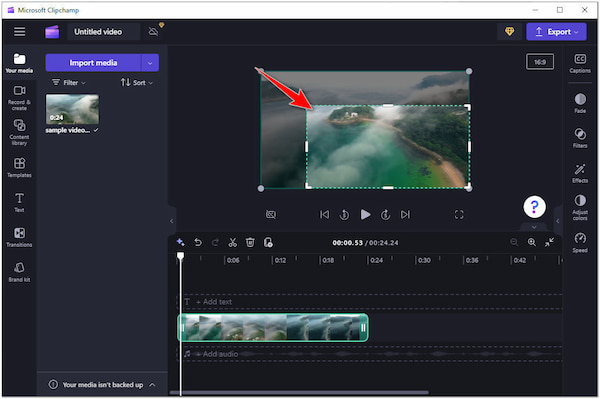
2. Before you begin editing, you need to add the video file to the timeline. Click the Green Plus button or drag and drop the video into the timeline. If you wish to add multiple media files to the timeline, just repeat these steps. On the other hand, you can highlight all the video files to drag and drop them into the timeline.
3. Here’s use some of the editing functions of Clipchamp:
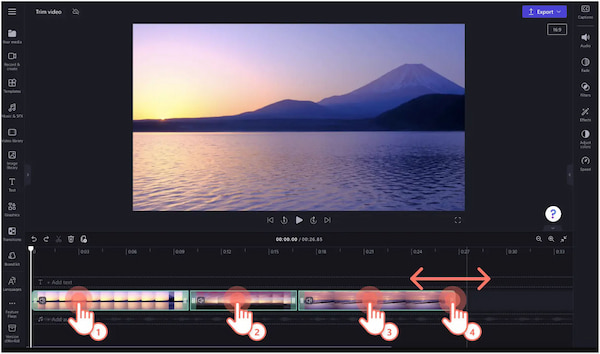
1. Click the media clip on the timeline, and it will turn green. Then, drag the green handles at the beginning or end of the clip inwards to trim the unwanted footage.
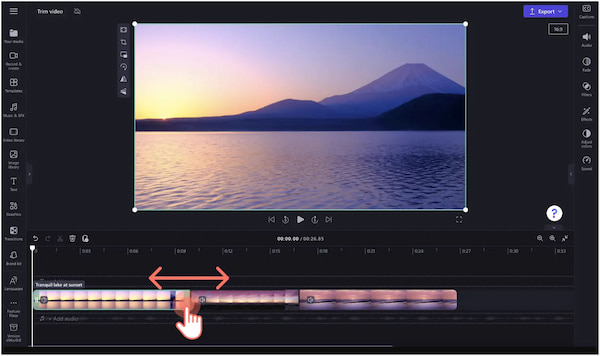
2. If you want to trim several clips, hold down the Shift key. Click each clip you want to trim on the timeline. Then, use the green handles to adjust the start and end points for all the selected clips simultaneously.
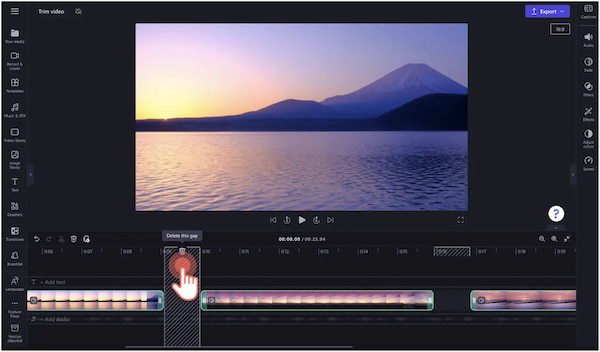
3. After trimming your videos, you might see empty spaces between the clips. Look for the Trash icon to remove the unwanted space between your clips. Repeat this for any other gaps to merge video clips and create a smooth flow.
In actuality, there’s no direct way to reverse video in Clipchamp. So, what you’re going to do as an alternative is to split video into parts. Here’s how it works:
1. Cut your video into numerous smaller clips using the Trim feature.
2. Consider zooming in on the timeline to isolate individual frames. This allows you to split the video right in the middle of frames, creating smaller segments.
3. Now, take all those small video clips and rearrange them in reverse order. The clip that originally ended your video becomes the new beginning, and so on.
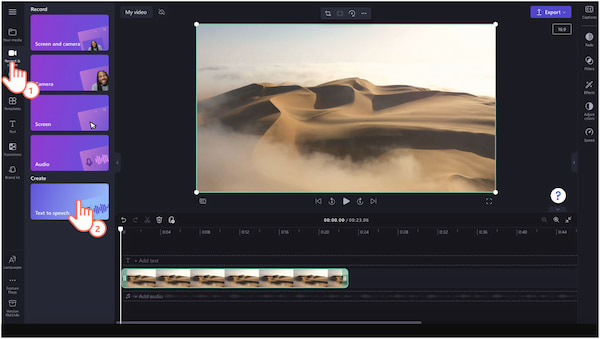
1. Navigate to the Record & Create tab and select the Text to Speech option. A property panel representing the text-to-speech tab will appear on the right pane.
2. Click the Language dropdown menu to choose your preferred language. Options include English, French, German, Spanish, Italian, and more.
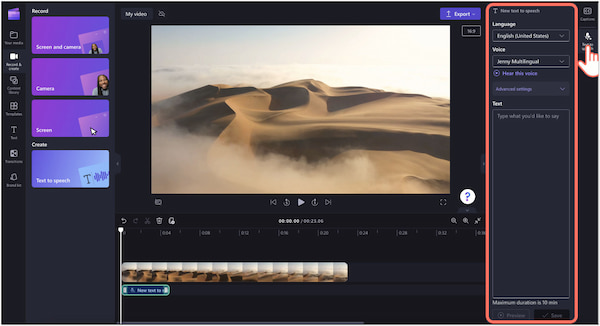
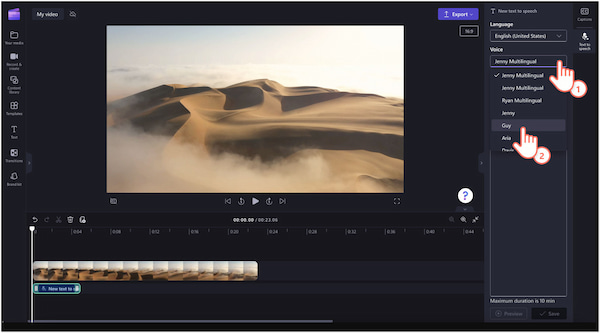
3. Give your video a voice. Click the dropdown menu next to Voice to explore the available options. Each voice option has a Hear this voice button that lets you listen to a sample.
4. In the properties panel, you’ll find a text box where you can type your script. Once you’ve written your text, click the Preview button to hear how it sounds.
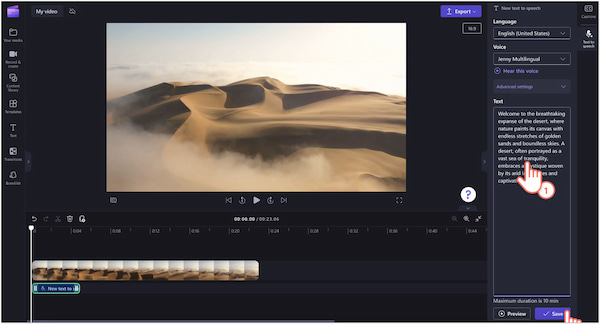
Note: Each voiceover can be a maximum of 10 minutes long only.
Clipchamp offers two methods for cropping and resizing your video assets:
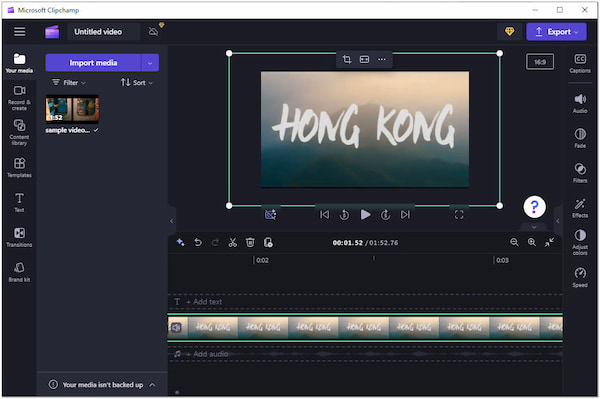
Option 1. Automatic Cropping
1. Click the media clip in the timeline so it has a green border.
2. Click the Fit option in the toolbar that appears above your video clip.
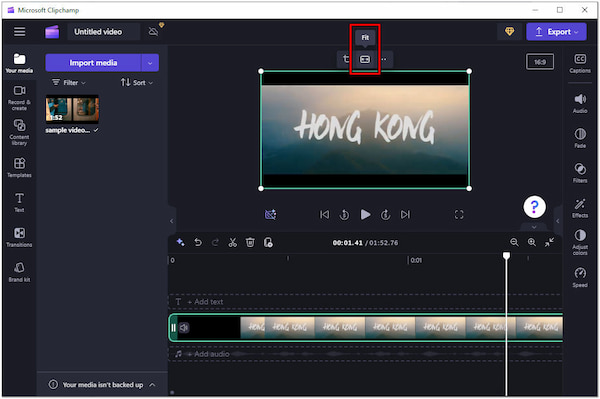
3. Clipchamp will automatically crop the video to remove black bars.
Option 2. Freehand Cropping
1. Click the media clip in the timeline so it has a green border.
2. Click Crop in the toolbar above your video clip and click it.
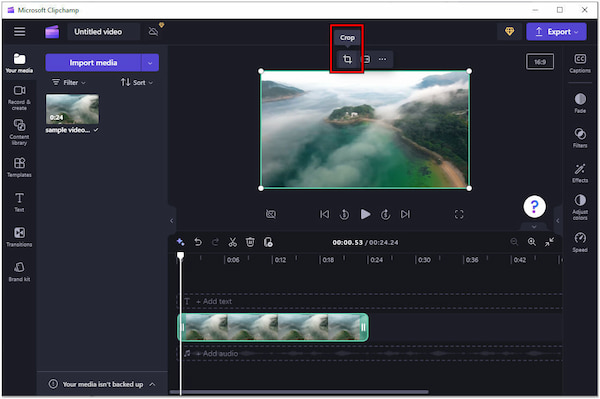
3. Drag the cropping handles inwards to define the specific area you want to keep.
4. You can select to crop video to square or any desired ratio.
1. Go to the Content Library and select the Visuals option. Type the keyword Green Screen in the search field and scroll through the available options.
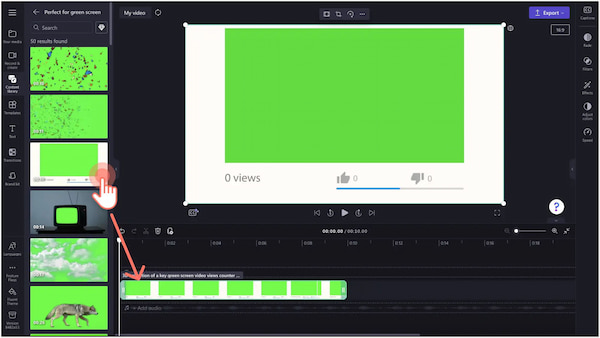
2. Once you find the perfect green screen clip, drag and drop it onto your timeline. Then, add your video in the My Media tab.
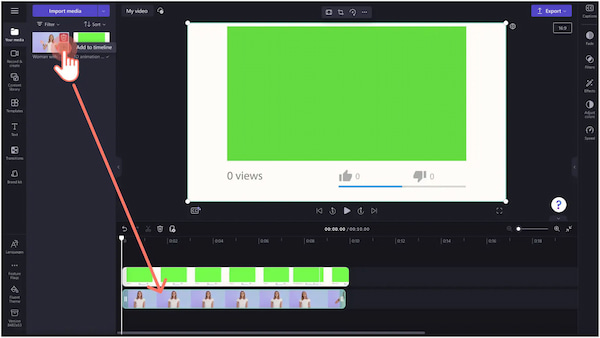
3. Drag and drop your imported video clip onto the timeline. Position it directly below the green screen footage.
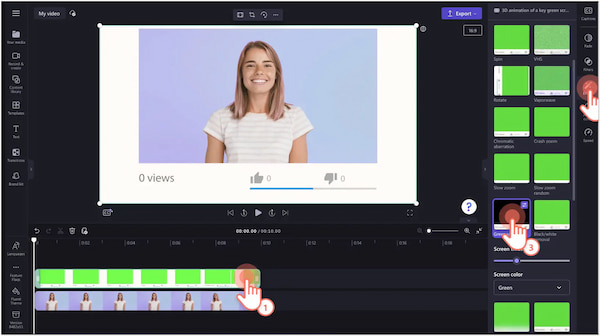
4. Click the green screen footage on your timeline to highlight it. Navigate to the Effects tab on the property panel and click the Green Screen effect option.
5. Adjust the Screen Threshold for optimal green screen removal. Also, you can choose the color key for your green screen.
Once you’ve finished editing a video in Clipchamp, it’s time to export it! Exporting essentially translates your project into a media file that you can save, share, and use on other platforms. Clipchamp’s export feature gives you control over the final format and quality of your video.
1. Look for the Export button in the top right corner of the Clipchamp editor interface. A window will appear with a few video quality options, offering the following resolutions for export:
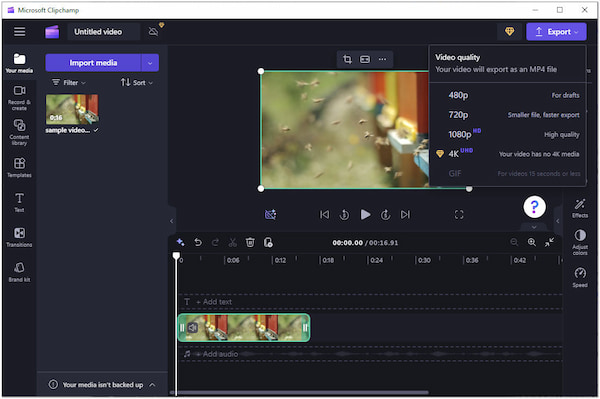
Note: If you need to export your project in 4K resolution, you’ll need to upgrade to a paid plan. Yet, if you don’t want to upgrade your plan, check this one to upscale 1080p videos to 4K.
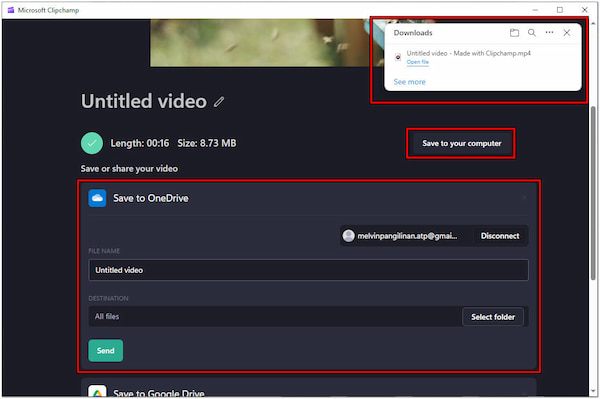
2. Once you’ve chosen your resolution, click it to initiate the export process. By default, Clipchamp will save your exported video to your computer. Yet, you can choose to send it directly to other cloud storage services.
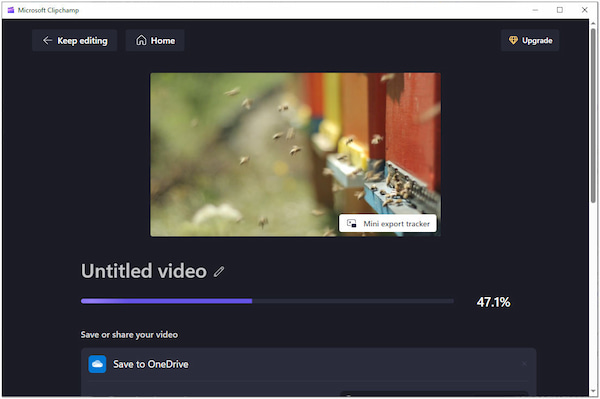
3. Clipchamp will render your video and show you a progress bar. The export time varies depending on the length and complexity of your video. Also, it may take time, depending on the chosen resolution.
GIPHY is a convenient option for casual users looking for quick and simple editing of GIFs, including adding backgrounds. However, if you have a slow or unreliable internet connection, it will affect the performance and responsiveness of the editing process.
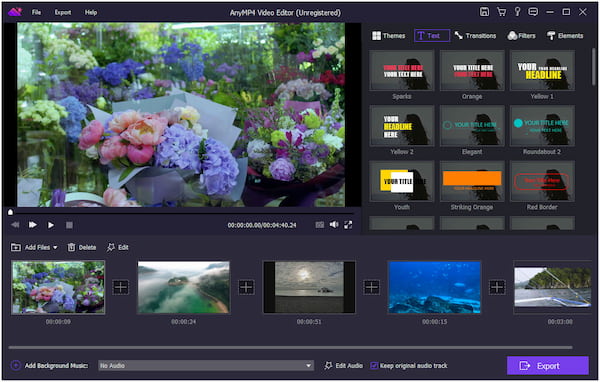
Clipchamp - Video Editor undoubtedly excels in basic video editing, but AnyMP4 Video Editor goes further. Similar to Clipchamp, you can use the Clip tool to trim unwanted footage. You can also rotate videos and adjust video effects, playback speed, and volume of each clip. For those looking to elevate their projects further, it offers advanced editing tools. You can use color correction tools to enhance the visual style of your clips. What’s more, you can add mosaic effects to blur out sensitive areas and apply artistic filters. It even lets you crop video into specific ratios or manually define your custom crop size.
For good measure, AnyMP4 Video Editor provides pre-designed templates to jumpstart your creative process. It also comes with customizable text options, stylish transitions between clips, and decorative elements to personalize your video. But the biggest advantage of AnyMP4 Video Editor is its export flexibility. It allows you to save your project in various formats, including the high-resolution 4K option.
Secure Download
Why does Clipchamp take so long to import?
Uploading big video files naturally takes longer. Try to compress video or use a lower resolution before importing it. Another reason is a slow internet connection. A fast internet connection is crucial for smooth uploads. Check your internet speed and try again on a stronger connection.
Does Clipchamp have a watermark?
Fortunately, Clipchamp does not impose a watermark. If you use your media or the free stock assets from their library, it won’t add a watermark to your exported videos.
Where does Clipchamp save files?
By default, Clipchamp saves your project files in the Download. You can’t choose a specific location unless you finish the exporting process. You can export the finished video file to your desired location by clicking the Save to your Computer option. Also, you can choose to directly save it to cloud storage services or upload it on an integrated social media platform.
Is Clipchamp safe?
YES! Clipchamp is considered a safe platform for video editing. They have security measures in place to protect user data and privacy. It uses a secure HTTPS connection to encrypt your data during transfer. Also, it outlines its data collection and usage practices in its privacy policy.
In conclusion, knowing how to edit video in Clipchamp allows you to elevate your videos. You’ve learned how to import media, make basic edits, and export your finished projects. While Clipchamp excels in user-friendliness, some projects require more advanced features. If you crave additional editing power, consider AnyMP4 Video Editor as an alternative. It boasts powerful tools for your basic and advanced editing needs. No matter which platform you choose, unleash your inner video editor and have fun bringing your creative visions to life!
 Posted by Riley Mitchell to Edit Video
More readings
 ClipChamp Video Editor Reviews and Alternatives
The best online video editor you'll ever find is here. Check out the ClipChamp Video Editing tool and discover its amazing advanced features.
 8 Outstanding Open-source Video Editors [Worth Try]
Check out the list of the best open-source video editors that you can operate to produce stunning videos for social media, websites, or elsewhere.
 Best 10 Video Editing Apps for Chromebook
Are you looking for a video editor for Chromebook? You are certainly in the right place! Come and discover the video editor we have listed in this post.
 Canva Video Editor: Learn Everything About Canva
Canva is known for being a visual content editing software. Did you know that you can edit videos on Canva? Learn the full guide here.