Transferring files from iPhone to PC has always been the devil's errand. The iPhone is not completely incompatible with PC, but unlike data syncing with Mac, it is still a challenge to do data migration between iPhone and PC. There are a few ways you can sync and transfer data between your Windows and iPhone or iPad. This article will share these ways and show you how they work in detail.
As mentioned previously, iPhone is not compatible with PC in the way that works with Mac. That is why you need a powerful file transfer for iPhone, such as AnyMP4 iPhone Transfer Pro.
In a word, it is the most convenient way to transfer files from iPhone to PC without data loss.
Secure Download
Secure Download
Step 1. Connect iPhone and PC
When you need to transfer files from iPhone to PC, download and install iPhone Transfer Pro to your computer. Then connect your iPhone to the same machine with a Lightning cable. Once you launch the software, your device will be recognized immediately.
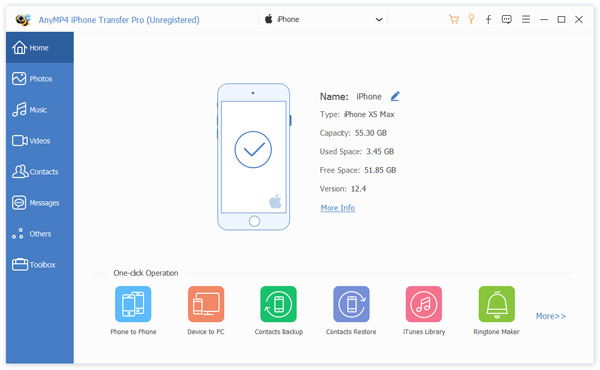
Step 2. Preview files on iPhone
After data scanning, you can see your files on iPhone by categories. To transfer photos from iPhone to PC, for example, go to the Photos tab from the left hand column. Then you can view iPhone photos with thumbnails.

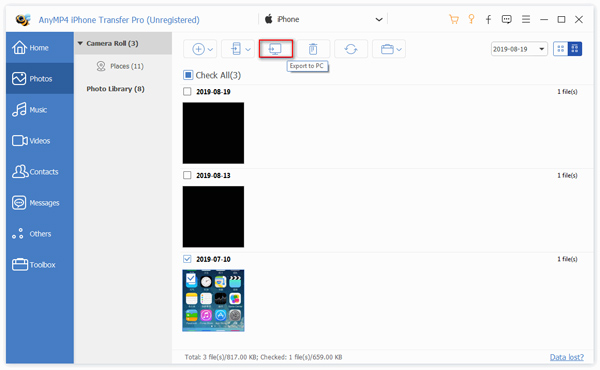
Step 3. Transfer files from iPhone to PC
Check the desired files, click the PC icon at the top ribbon and choose your computer. On the popup, select a specific folder to save the files and start file transferring. It only takes a few minutes to sync hundreds of photos.
iTunes is still a useful way to manage files on iOS devices, though Apple has removed it from the latest macOS. The file sharing feature in the latest version of iTunes allows you to transfer files from iPhone to PC quickly.
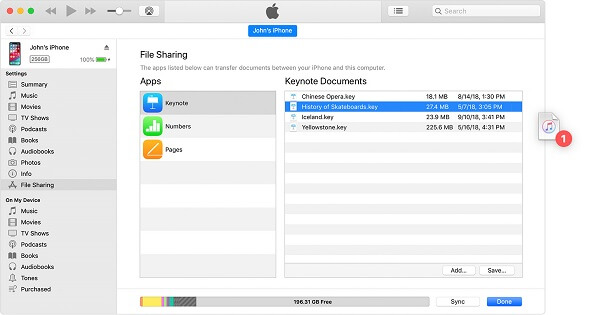
Step 1: Plug your iPhone to your computer with a USB cable. Then launch the latest version of iTunes. When it detects your device, click the Device icon at the top left side.
Step 2: Go to the File Sharing tab from the left hand column to display all apps supported. Select the app contains the files you want to transfer, and you can see the files available.
Step 3: Finally, highlight the files, drag and drop them to your desktop. When it finishes, quit iTunes and unplug your iPhone.
If you do not have a Lightning cable, you can still transfer files from iPhone to PC wirelessly. iCloud allows you to download photos, videos, contacts, notes, and mails from iPhone to PC.
Step 1. First of all, turn on your iPhone, go to Settings -> [your name] -> iCloud. Turn on the file type you want to transfer, such as Photos, to back up them to iCloud.
Tip: Alternatively, you can back up your files to iCloud Drive.
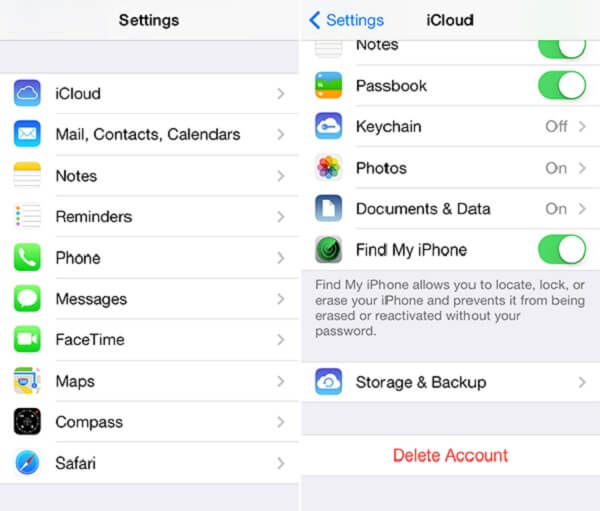
Step 2. Open a web browser, and access the iCloud website. Sign in your iCloud account and enter the verification code if you have enabled two-factor authentication.
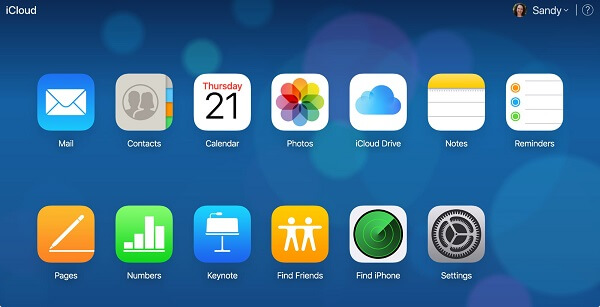
Step 3. In the home page, head to Photos, iCloud Drive and more you wish to sync. Then export them to PC.
If you just want to transfer a single file from iPhone to PC, such as a voice memo, email can meet your need. Bear in mind that all email providers have the maximum email size limit, from 10MB to 25MB.
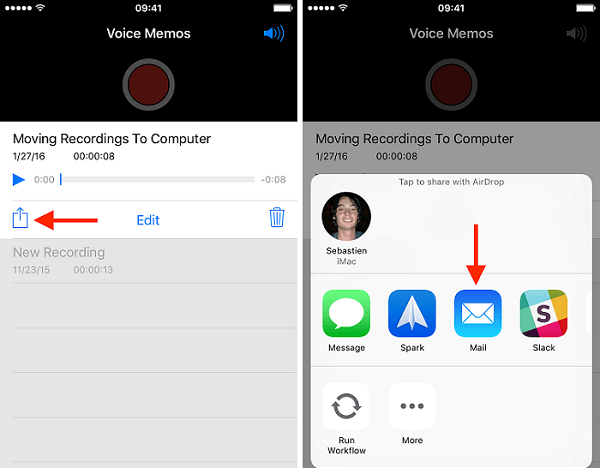
Step 1. Open the app contains the file you want to transfer, like Voice Memos.
Step 2. Find the desired file and tap the Share icon to open the toolbox panel. Choose Mail to go to the new-mail screen. Type in your email address in the To field and tap the Send icon.
Step 3. Next, open your browser, access your email address and open the latest mail. Download the file attachment to finish file transferring from iPhone to PC.
Note: This way is also available to transfer files from iPhone to Mac and Chrome OS.
AirDrop is a file transfer functionality between iPhone and Mac. Unfortunately, it is not available to PC. If you have a MacBook or other Mac computers, AirDrop is a quick way to get file syncing.
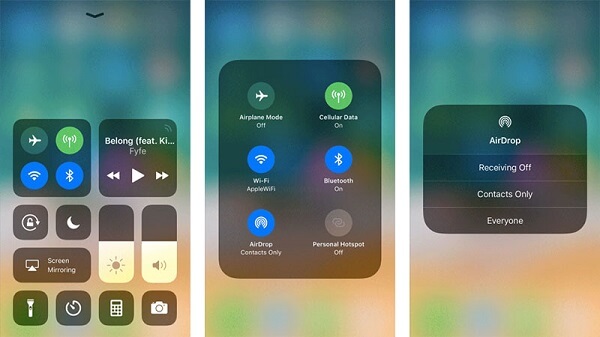
Step 1. On Mac, click the Wi-Fi icon and connect a network, no matter it is connecting to the internet or not. Next, launch Finder, select AirDrop from the left side, and choose Everyone from the bottom.
Step 2. On your iPhone, swipe up from the bottom to open the Control Center. On iPhone X, swipe down from the top right corner. Enable Wi-Fi, Bluetooth and AirDrop.
Step 3. Open the app from which you want to transfer files to Mac, like Photos. Select the files, tap the Share icon and choose your Mac in the AirDrop row. When it is done, you will get the Sent message.
This article shared 5 ways to transfer files from iPhone to PC and Mac. Sometimes, you just need to download your iPhone files to computer for backup. iTunes, iCloud and AirDrop were released by Apple to sync files between iPhone and computer. Plus, you can use email to transfer files occasionally. If you have a lot of files to sync or need to back up files to computer regularly, we suggest you to use AnyMP4 iPhone Transfer Pro. More questions? Please leave a message below.