Deciding to own an iPhone also comes with being responsible for keeping your files. Of course, your phone is the most important thing for you and your data. So, if your iPhone accidentally breaks or falls off your hands, you might worry that you won’t be able to use it anymore. That is why deciding to back up your phone is essential while your iPhone still works.
This post will teach you how to back up your iPhone without using iCloud. Indeed, there are some ways to save your data. Now we go through these two tools to protect your data without using the famous iCloud.
After reading this article, you will discover how to safely keep your data through different tools. Kindly continue reading to know more information.

A backup of your iPhone’s data will save you a while. This step in owning an iPhone is the essential plan to do next. Accidents happen, and when your iPhone is at risk, the first thing that you probably think about is how to recover your information.
With AnyMP4 iPhone Transfer Pro, you can back up your iPhone without using iCloud.
This tool will significantly help you since it offers additional cool features. You can manage your data to have a backup in this tool. Guaranteed that you will have peace of mind knowing that even if accidents happen, you can keep your necessary files like your photos, videos, documents, and so much more.
Kindly continue reading this post to discover the steps to use this backup tool.
1.Download and install AnyMP4 iPhone Transfer Pro.
Secure Download
Secure Download
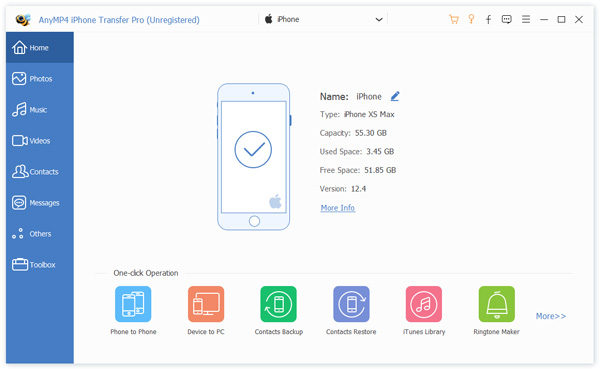
2.After opening the program, connect your iPhone to your PC using a USB cable. The main interface will show the connected iOS device and its features’ information on the app's left side.

3.Located on the left side of the application, click Toolbox. The function of Toolbox has a 1-click transfer. It has an option to transfer content directly from device to PC. By clicking Device to PC, you can now export your preferred content from your iPhone to PC.

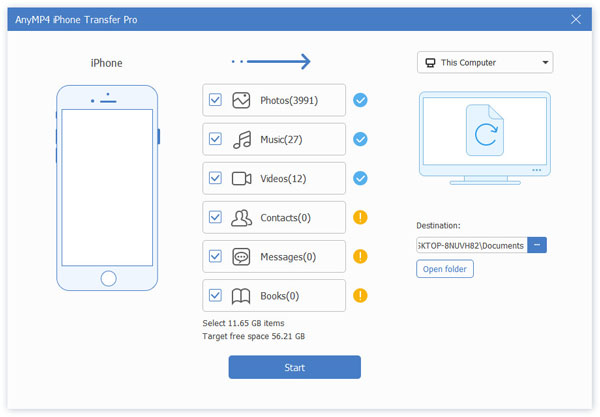
4.An interface will show the content to be synced to your PC. You can check or uncheck the box of content you prefer to transfer. After that, you can also choose what specific destination you’ll place your data.

To conclude, the AnyMP4 iPhone Transfer Pro has many convenient features. This powerful software allows users to manage their data like delete the files you want to remove and keep those you like. It also lets you transfer data from iPhone to iPhone for backup without iCloud.
shows the current space of the data you are syncing. Furthermore, it is a fantastic tool to use for data management.
If you are an Apple user, you would probably think that when transferring your favorite music, photos, or contacts, iTunes is the first thing that comes to mind. iTunes has been made in the Apple industry to store and organize music, audiobooks, TVshows, contacts, and calendars.
This post lets you discover how to sync your data on your iPhone with iTunes. The process is started through simple and easy steps. Continue reading to learn further to use iTunes.
1.Download and install iTunes on the official website of Apple.
2.Open iTunes, then connect your iPhone with a USB cable. Click the iPhone icon on the top left corner of the application.

3.On the left part of the app, select Summary. In Summary, you can see all the current content of your iPhone like photos, videos etc. On the center part of the data backup tool, choose if you want an automatic backup or a manual backup and restore. If you choose to automatically back up your data, you can select iCloud or your computer. You can also encrypt a local backup by setting a password. Then click Back Up Now to finalize.

In this method, you will back up all the data on the iPhone to iTunes. However, if you want to backup selected file types like music to iTunes, then you will refer to this post.
To summarize, syncing in iTunes is also a great way to keep your content for future use. It has been helpful since iTunes is specifically made for Apple users. Through the tool, you can manage your data collection well. However, many innovations are made by Apple, but iTunes is not quite evolving. Each update of this application has not addressed some issues, like their syncing lags.
Through these tools, you can backup your iPhone without so much hassle to deal with. However, kindly note that the software is not perfect as well. They can help you in a more excellent way to keep your data safe if you decide to switch devices. Through this comparison chart, you can decide which tool you can use aside from iCloud to backup your data. The items listed below are the advantages and disadvantages of utilizing AnyMP4 iPhone Transfer Pro and iTunes. This table will also tell you what expectations you might face when you use one of them. Please continue reading if you want to discover their pros and cons.
| Methods to back up the iPhone | AnyMP4 iPhone Transfer Pro | iTunes |
|---|---|---|
| Supported Data Types | Photos, Music, Movies, Voicemails, Text Messages, Contacts, Music Videos, ePub, PDF, Podcasts, iTunes, Ringtones, Audiobooks, Playlists, Photo albums. | Photos, Contacts, Videos, Calendars, Audiobooks, Music, Audiobooks, TV shows, Podcasts, and more. |
| Pros | Has a very intuitive interface Also performs well in multiple iOS devices Select the data for backup. | It is cost-free tool Well-integrated with iOS devices. |
| Cons | Still requires USB cables to connect. | Has a confusing interface. It has been reportedly running slowly on Windows. |
Through comparing these devices, the comparison of these tools proves that every application has a flaw. However, if each tool meets your needs effectively, you can use them whatever fits your needs the most. Kindly take note of their pros and cons and know how to deal with them.
How long does it take to back up my phone?
In every application, the time it takes to back up a device varies. In iTunes, it takes around 20 minutes to 2 hours. It depends on how large your data is.
What will happen if I fail to backup my iPhone?
Well, the answer is nothing. But if you need something vital to you that was previously stored on your device, then you’re already too late to recover it. That is why it is so important to backup your iOS device whenever possible. This will give you peace of mind knowing that your data is safe.
How to change iTunes backup location?
In changing the iTunes Backup location, you need to make a symbolic link from your present iPhone backup location to a new one. You can do this by navigating to New Location and creating a new MobileSync folder. After that, you can copy the current iPhone backup folder into a new MobileSync folder you have made previously. Finally, you can make a Symbolic link that points from the default iTunes backup folder location into a new one. iTunes will now backup the iPhone into its new selected location once a Symbolic link is made.
What will happen if I delete a backup?
Then your data stored is removed. That is why it is strongly recommended to backup your iPhone before anything happens. You might be caught in an accident, and your iPhone might fall off. To prevent huge data loss, have a backup for your iPhone.
In conclusion, deciding to have a backup on your iPhone is vital, especially if you experience sudden and unexpected accidents like a broken phone. It is strongly recommended to make backup iPhone data a habit. This habit of creating backups will prevent you from having a significant data loss. Additionally, if you want to sync something between your iPhone and computer, you can manually or automatically backup your data with just a few clicks. However, by comparing the two different tools mentioned, you can see what tool is more convenient to utilize. The AnyMP4 iPhone Transfer Pro tool is hassle-free and safe to use. It also has a friendly interface to help you navigate the tool better. The good thing about this is that it has a 1-click Transfer which makes the syncing process quick.