Enhancing your Canva video with the right music can elevate it from good to great. Fortunately, Canva can incorporate audio into video. It provides a user-friendly way to achieve this directly within the platform. In this post, we’ll explore different ways to add music to Canva video projects. This allows you to create a more engaging and impactful experience for your viewers. So, if you’re ready to elevate your Canva with music, continue reading this!
Let us first answer the outlined question: can you add music to videos in Canva? Definitely, you can add music to videos in Canva. In actuality, they offer two options for this purpose. You can upload your saved music files or choose from their extensive stock audio library. Not to mention, this library includes royalty-free music tracks, sound effects, and even a few popular music. But here’s a thing. Free Canva accounts have restricted access to the stock music library. Using premium music tracks restricts you to one-time use per design. Upgrading to Canva Pro allows unlimited use, but it adds a cost factor. In addition, ensure you have the right to use any music you upload yourself.
As mentioned, Canva allows you to add audio tracks to your video projects. This can be done by using Canva’s audio library or uploading your audio. For good measure, anyone with a Canva account can access the music library. Indeed, you read it correctly! You have access to the music library, whether free or subscribed to Canva Pro. However, there’s a catch. Access to the music library varies depending on your account type.
Not to mention, there’s a distinction between the free and premium music options. The free music consists of a large collection of royalty-free music and sound effects. This means you can freely browse the library, search for specific genres, and add these tracks to your designs. Meanwhile, the premium music features a curated selection of popular music with additional royalty-free tracks. Now, a small heads-up. You cannot use premium music for commercial purposes like advertisements or business videos.
Note: Canva’s music library offers a wealth of options for free and Pro users. Free users have access to a massive collection of royalty-free music. On the other hand, Pro users get an expanded library with popular music.
Taking your Canva video to the next level involves adding the perfect soundtrack. Fortunately, Canva provides a user-friendly way to achieve this directly within the platform. It provides an extensive music library that comes with various soundtracks.
Here’s how to add music to Canva video on a computer:
1. On the left sidebar of the Canva editor, look for the Audio tab. If you cannot find this option, select the Apps button and select Audio.
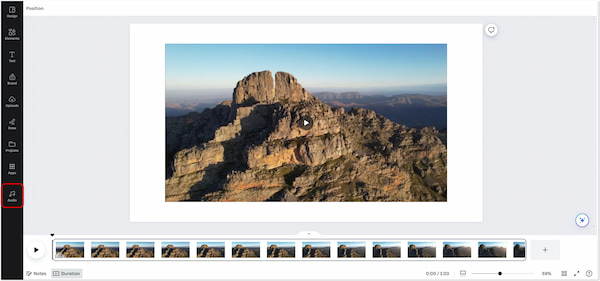
2. Within the Audio tab, you’ll be presented with the extensive Canva music library. Browse through various categories or use the search field to find specific tracks.

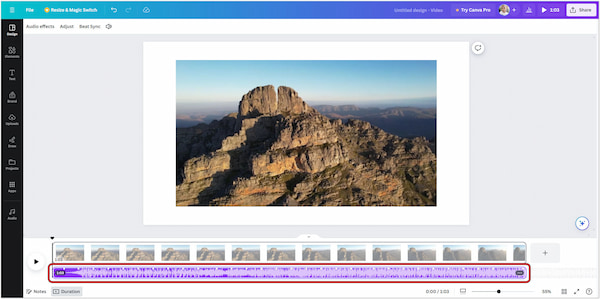
3. Click Play to preview the track before adding it to your video. Once you’ve found your preferred music, click it to add it to your video.
4. The chosen music track will appear on your video timeline. By default, it will be placed at the current playhead position. Drag and drop the music track to adjust its starting point.
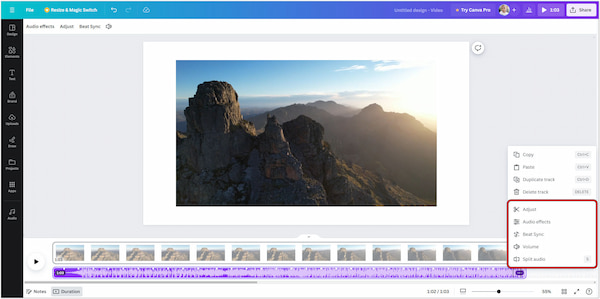
5. Optionally, make basic adjustments to the track. Right-click the music track on the timeline, and a menu will appear. Here, you can adjust volume, split audio, fade in/out audio.
Canva’s music library is indeed extensive, allowing you to try different options to suit your preference. If you have a subscription, you can add and layer up to 50 audio tracks on your design. However, there’s a catch: adding audio is not available on Canva Docs.
Canva’s mobile app makes it incredibly convenient to create and edit videos on the go. Adding music is no exception, allowing you to enhance your project with a fitting soundtrack! You can effortlessly incorporate music into your Canva video project in no time.
Here’s how to add music to a Canva video on mobile:
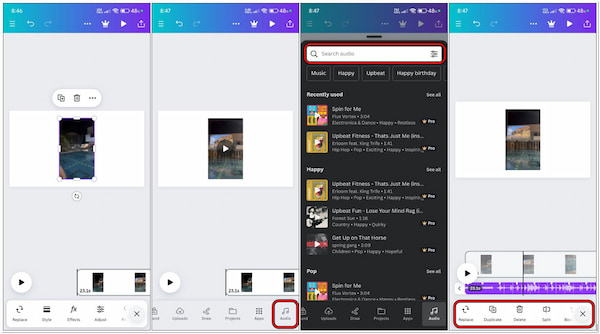
1. Navigate to the Toolbar located at the bottom of the editor. Swipe through the available options until you see the Audio tab, and tap it.
2. Similar to the desktop version, you’ll be presented with the expansive Canva music library. You can browse by category or use the search field to find specific tracks.
3. Tap the Play button to preview the track before incorporating it into your video. Once you’ve found the perfect match, tap directly on the track.
4. After tapping the chosen music track, it will appear on your video timeline. You can tap and hold the music track, then drag it to adjust its starting point.
5. Tap on the music track on the timeline to reveal a menu. Here, you can duplicate audio, configure the volume, and even use the Beat Sync feature.
The Canva mobile app’s music library is just as extensive as the desktop version. Unfortunately, the mobile app currently doesn’t support layering multiple audio tracks. But here’s a good thing! You can extract audio from mp4, delete it, and upload your music.
Unlike adding music from the library, uploading your audio involves a different approach. Although Canva offers a music library, you might have the perfect audio clip you want to incorporate into your video. The good news is that Canva lets you upload your own audio files directly within the platform.
Here’s how to add music to a Canva using your own audio or music:
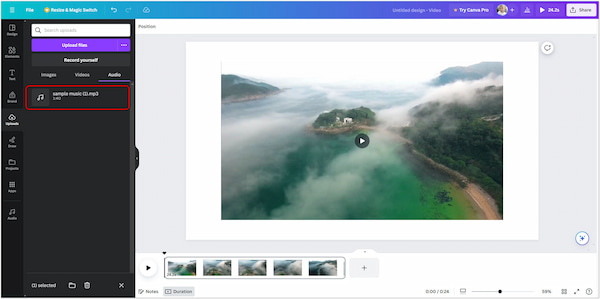
1. Navigate to the left sidebar of the Canva editor and look for the Uploads tab. This tab serves as your portal for uploading various elements, including audio files.

2. Within the Uploads tab, you’ll see options like Images, Videos, and Audio. Select Audio and click the Upload Files button. This will open your computer’s file explorer window.
Note: Canva provides flexibility beyond its extensive music library. You can incorporate your audio files to personalize your video project. However, there is a limit on the size of the audio file you can upload. In such cases, you need to compress audio to meet the 250MB file size limit.
3. After successful upload, the audio track will appear in your uploaded audio section. Click and drag the audio track and drop it onto your video timeline.
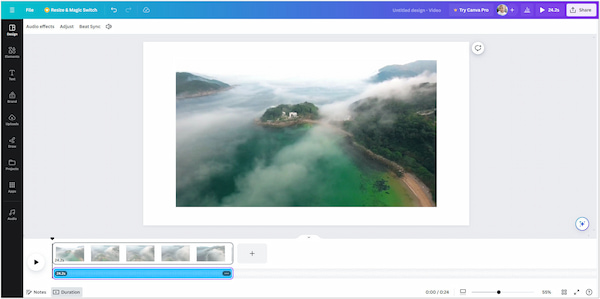
4. Similar to adding library music, the uploaded audio will appear on the timeline at the current playhead position. Drag and drop it to adjust its starting point within your video.
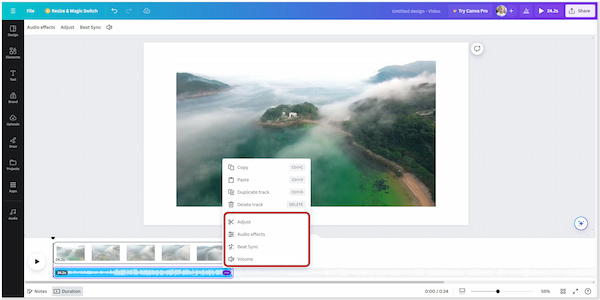
5. Right-click the audio track on the timeline, and a menu will appear. Here, you can adjust the audio track, add fade effects, and modify the volume.
Aside from file size limit, Canva currently has limited support in uploading audio files. MP3, M4A, WAV, OGG, and WEBM are the only formats that the platform can handle. This means if your audio file is none of these formats, you need to convert them. Tools like AnyMP4 Video Converter Ultimate can help you with this purpose! Though the name suggests its focus on video conversion, it’s actually a versatile multimedia software. Aside from converting video files, it also excels at converting audio files across various formats. Impressively, it supports conversions for over 500+ digital media formats. This includes the audio formats used in Canva, like MP3, M4A, WAV, OGG, and WEBM.
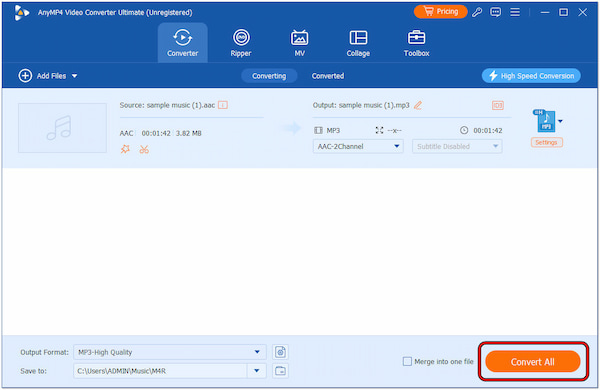
1. Initially, get the free download of AnyMP4 Video Converter Ultimate. Install the multimedia software and wait for the installation process to finish.
Secure Download
Secure Download
2. Navigate to the Converter tab and click the + Add Files button. This will open your file explorer window, allowing you to browse the audio file you want to convert.
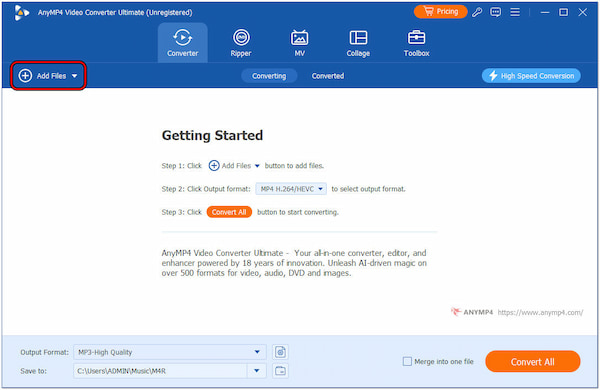
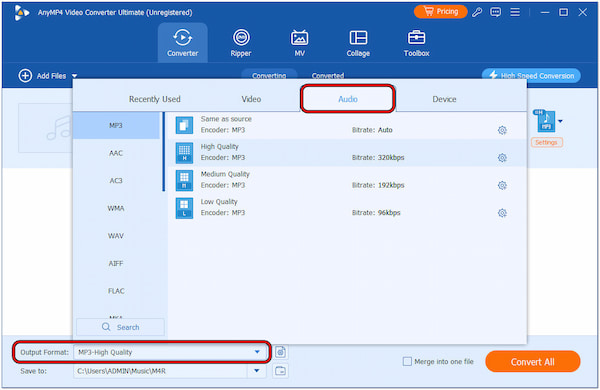
3. Once loaded, look for the Output Format section. Click the dropdown menu and head to the Audio tab. Choose a format compatible with Canva, like MP3, WAV, M4A, etc.
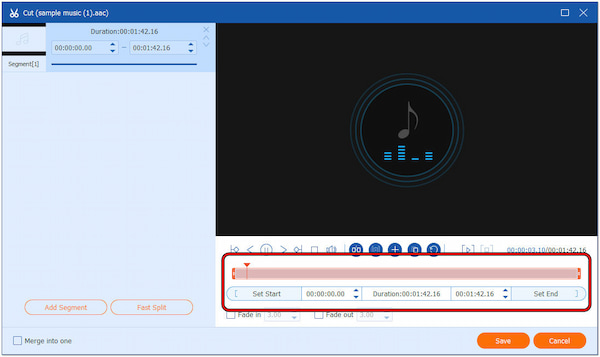
4. If you think your audio is too long for your Canva video, click the Scissors icon. Drag the sliders to define the section you want to keep. On the other hand, set a start and end points.
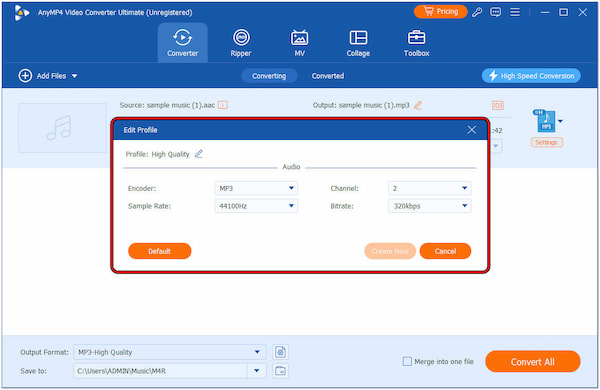
5. AnyMP4 Video Converter Ultimate also offers optional settings for customization. You can click Output Format Settings to adjust the audio encoder, bitrate, channel, and sample rate.
6. Click the Save To field to specify where you want to save the converted file. Moving forward, click the Convert All button to initiate the conversion process.
AnyMP4 Video Converter Ultimate is not just a video conversion tool. It can also be your companion for your audio conversion needs. It can convert your unsupported audio files into formats accepted by Canva.
Can you add music from Spotify to Canva?
Unfortunately, NO! You cannot directly add music from Spotify to Canva. Spotify music is copyrighted and isn’t licensed for use in video editors like Canva. Canva offers its music library and allows uploading your audio files.
Can you add music to Canva from YouTube?
Similar to the first response, NO! Adding music directly from YouTube to Canva is also not possible. However, you can download royalty-free music from YouTube and upload those files to Canva. Just ensure your downloaded files are in MP3, M4A, OGG, WAV, or WEBM formats.
How to remove audio from video Canva?
Removing audio from a video is simple. Right-click your uploaded video and press Ctrl+Shift+E keys to extract the audio. The extracted audio will be displayed below the video on the timeline. Right-click the audio track and select Delete Track to remove the audio from the video.
Knowing how to add music to Canva video allows you to create engaging videos with the perfect soundtrack. We have explored two main approaches: using Canva’s music library and uploading your own music. However, we found out that Canva has limitations in file size and file formats. In such cases, tools like AnyMP4 Video Converter Ultimate save the day. This multimedia software is programmed to convert not only videos but also audio files. It can help you to turn your unsupported files into Canva-supported formats.
 Posted by Angelica Liwanag to Edit Audio
Related Articles
 Best 2 Methods to Remove the Canva Watermark from Image
Having trouble because Canva doesn't give option to remove watermark? Fortunately, we have 2 easy ways to remove the Canva watermark.
 How to Remove Image Background in Canva Step by Step
How to erase the background from a photo in Canva? This page is a full guide to removing and changing the background in Canva and its alternative.
 How to Make Background Transparent in Canva [2025 Guide]
Want to make a transparent background on Canva? But need to know how? Come and learn the tutorial with the simple steps we will provide in this write-up.
 4 Actionable Methods to Add Music to TikTok Videos for Beginners
How to make your own sound on TikTok, or add music to your TikTok videos? Here is our concrete guide for beginners and advanced users.