Audio, such as music and sound effects, are important elements in videos to incorporate moving frames with additional layers of interactive elements. In fact, one can argue that skillful usage of audio may be proven more important than videos. With that in mind, one of the most important skills in video editing is to know how to fade audio and incorporate it into the videos. In this article, we will explore multiple ways to learn how to fade audio in Final Cut Pro, the flagship video editing software made by Apple. To learn more about this topic, please continue reading the article down below.

We will start this guide by providing a tutorial in applying audio fade using the Modify Menu in Final Cut Pro. This option may be considered as the manual option of adding the mentioned effect. To learn how to fade out music in Final Cut Pro, a quick guide is provided down below:
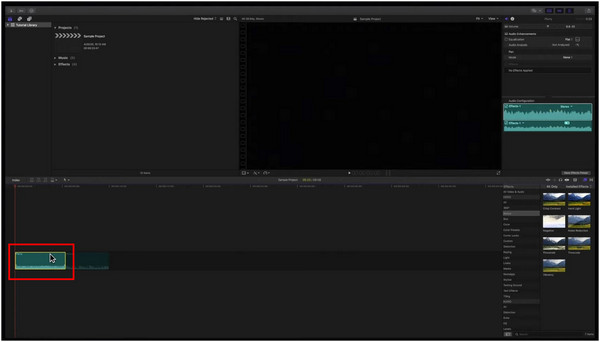
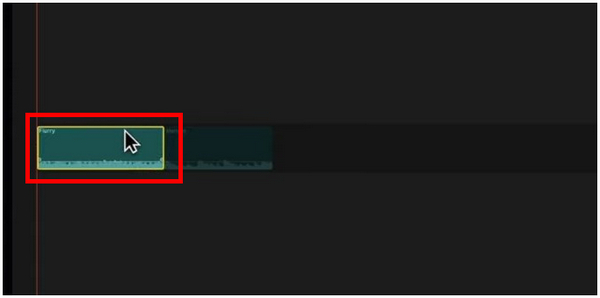
1. Click on the added Audio Clip in the editing timeline.
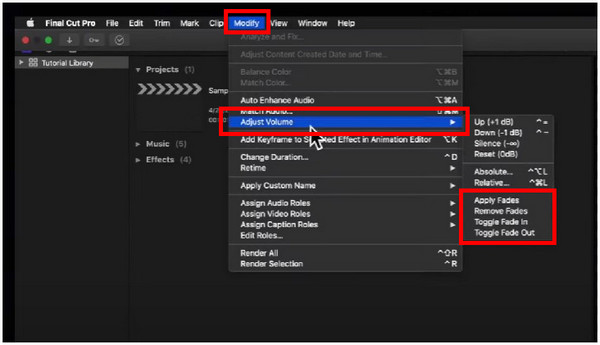
2. With the audio clip selected, click on the Modify menu, then hover your cursor to Adjust Volume. Under the Adjust Volume list, the options Apply Fades, Toggle Fade In, and Toggle Fade Out can all be selected to add a fade to the audio being edited.
3. After selecting the fade that you want to use, the audio in the editing timeline now has an audio fade in it.
The type of fade that will be applied will be based on the fade option that you selected in the adjust volume list. The Apply Fades option will add fade to the start and the end of the audio. In comparison, the Toggle Fade In or Out will add a fade in either the beginning or the ending of the sound.
Since the modify option is the more traditional way of adding audio fade, an easier option is also available in Final Cut Pro that is more convenient and faster to use than the manual method. This is none other than the Fade Handles, which can be found in audio files that are being edited in the program. To learn how to fade music in Final Cut Pro using this easier method of applying fades, please read the guide below:
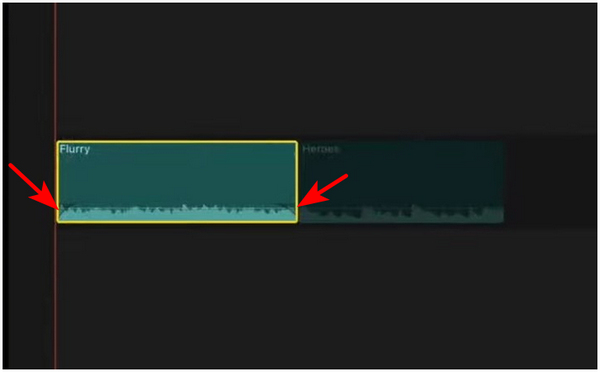
1. Move your cursor to the audio file that is being edited.
2. Next, click on the small dot that will appear at the beginning and end of the audio. These dots are the Fade Handles.
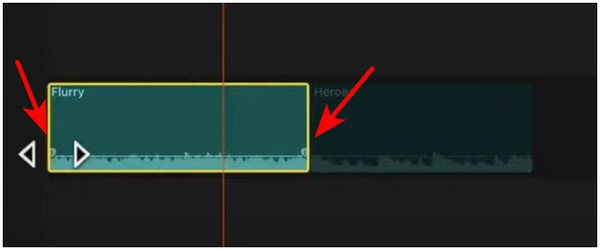
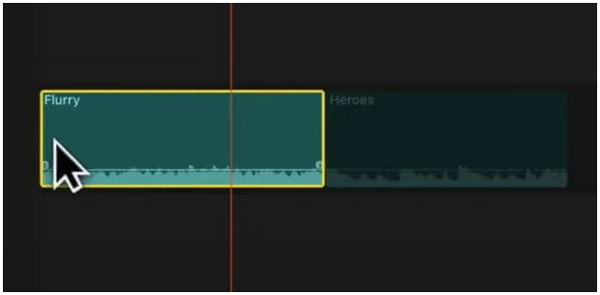
3. Click on the Fade Handles and click and drag them to adjust your audio fade.
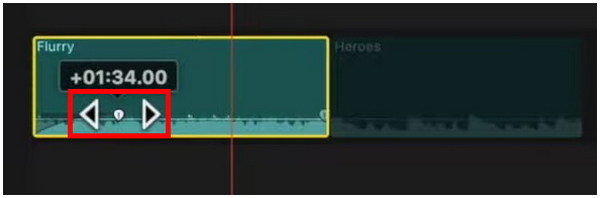
By using Fade Handles to apply audio fade, adjusting the way your fade will be applied to the audio will become much easier. It also helps that you can simply play the audio after adjusting the fade handles. This method is much simpler to use and adjust.
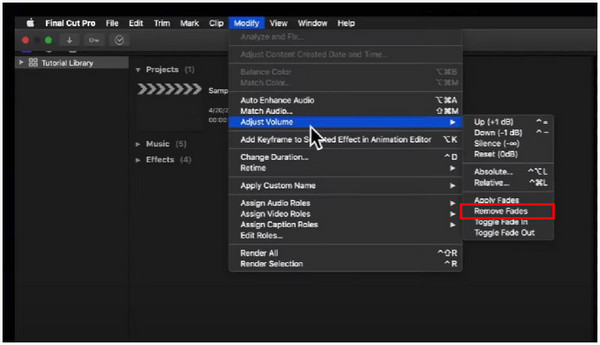
Sometimes, audio fades are not applicable to all types of video or audio editing needs. Because of that, an option to remove audio fades is also available to use for Final Cut Pro users. In fact, it is accessible in the same Modify menu where audio fades can be applied. To learn how to remove audio fade, please read our two-step guide below:
1. Select the audio that you want to remove the audio fade to.
2. Click on the Modify menu, then hover on Adjust Volume. In the adjust volume options, select Remove Fade from the list.
Because adding audio fade is simple to do in Final Cut Pro, it is a big help that removing the effect can also be done much simpler. With that in mind, editing audio is now much simpler to do since adding and removing fade can be done within the same menu.
For an easier way of adding audio fade in/out, a more convenient tool is available for Mac users with none other than AnyMP4 Video Converter Ultimate For Mac. Although initially built as a video converter tool, this software was developed to be versatile thanks to the countless multimedia features available in it. If adding audio fade-in/out is the adjustment that you want to apply, the tool’s MV Editor is the easiest to use in the market.
In addition to the MV Editor feature of AnyMP4 Video Converter Ultimate For Mac, it is also packed with more convenient tools that are ideal for editing multimedia files. The most notable being the following:
Features:
To learn how to add audio fade at the beginning or end of your audio files, please continue reading our step-by-step guide below:
Download the software first for an easier time of following each step.
Secure Download
Secure Download
1. Open the software and move to the MV Editor section. Click the Add Icon to insert the media file that you want to edit.

2. With the media file now added, click on the Clip setting icon.

3. Inside the Cut editing window, check the boxes beside the Fade In and Fade Out section. You can also adjust the duration of how long the audio fades. Click Save to confirm the option.
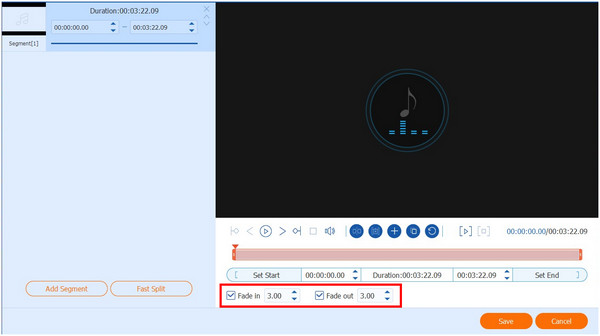
4. Back in the MV Editor menu, preview the music that has been edited to ensure that the audio fade has been applied correctly. Click on Start Export once you are satisfied with the results.

Clicking the export button will now save your audio with the added audio fade effect active. You can now enjoy the audio file with the clean fade-transition for video editing needs or simply listen to it for smoother playlist transitions. These four simple steps drastically make AnyMP4 Video Converter Ultimate For Mac the easiest tool to add audio fade among software available for macOS.
How do you gradually lower volume in Final Cut Pro?
Add audio fades. You can do this by using the modified menu and adjusting the volume. There are also multiple types of audio fades.
What is the shortcut for audio fade in Final Cut Pro?
Fade Handles are the shortcut feature to add audio fade in Final Cut. This is much faster than using the modify menu since it can be done by clicking and dragging. There is no keyboard shortcut for adding fades.
What is fade out in audio editing?
Fade is the effect of the audio volume slowly going down until it is muted. It is a smart way to add smoother audio transitions. Audio fade can also improve the overall listening experience.
Is it hard to add fade in Final Cut Pro?
No, it is not. It is actually easy. The easiest to use is by adjusting the fade handles in the audio that is being edited.
Is it complicated to fade out the sound of Final Cut Pro?
No, it is not. Adding audio fades in audio files is simple to apply. They can be done using the modified menu or through fade handles.
Now that the multiple solutions to add and remove fade in Final Cut Pro have been discussed, you can continue improving your edited videos by incorporating smooth audio transitions on your video projects. For an easier alternative, make sure to check our AnyMP4 Video Converter Ultimate For Mac’s much simpler procedure.
Please share this article online to help other people looking for solutions to add audio fade in Final Cut Pro.
 Posted by Angelica Liwanag to Edit Audio
More readings
 Final Cut Pro Change Aspect Ratio - Crop and Zoom in Video
Can you change aspect ratio in Final Cut Pro? How do I resize a file in Final Cut Pro? Here, you will learn how to crop a video in Final Cut Pro in details.
 How to Make 3D Films on Final Cut Pro 3D Editing
Create your 3D movies with one of the most innovative editing software, Final Cut Pro 3D Editing. Learn how to edit using this software by reading the article.
 Audio Fade Out - How to Use Audio Fade In/Fade Out Effects
How to fade audio online? How do you fade out sound? How does an audio fader work? What is fade out in radio? Learn 3 ways to make audio fade out and fade in.
 How to Fade in and out Audio in iMovie on MacBook Pro/Air/iMac
With your project opened, you can follow our comprehensive guide to fade audio in iMovie on Mac without damaging the video and audio quality.