As an inseparable element of Apple's video production suite, Final Cut Pro Compressor is an app you need to separately purchase at $49.99 from App Store. It is a powerful video encoder that cooperates seamlessly with Final Cut Pro and Motion to export projects in various formats using customized settings. The most amazing merit of it is that you can export multiple copies of a project using different presets, for example, one for YouTube, one as MP4, and one as MP3. Now let's see how to use Final Cut Pro Compressor to export videos in small sizes.

You can follow the steps below to downsize a video in Final Cut Pro Compressor.
Step 1: Make sure the video you want to compress is already imported to Final Cut Pro and selected. Then click File in the top left and select Send to Compressor.

Step 2: Final Cut Pro Compressor should show up now. You can drag the presets from the sidebar on the left to the task section and drop them. It allows you to add more than one preset to produce multiple versions of the video.

Step 3: Click on a preset you just added, then you can edit its detailed settings on the right of the interface. Here you can reduce the bitrate under the Video tab to reduce the size of the export video.

Step 4: When you finished the settings of the adopted presets, click the Start Batch button at the bottom of the window to let the program start handling the tasks. Then you can see the progress of the task(s).

That's how to use Final Cut Pro Compressor. As you see, it's not very easy to downsize a video with this compressor, and the export size is not intuitive. Is there any better tool that can be used to compress videos more efficiently? Of course. Read on to learn more about it.
If you want the quickest solution to downsize a large video, Final Cut Pro Compressor is not your best choice. AnyMP4 Video Converter Ultimate's video compressor can do the job even more efficiently. It enables you to compress a video in just 3 super easy steps without considering confusing parameters.
Key Features:
Secure Download
Secure Download
Step 1: Launch the program and go to the Toolbox tab for the Video Compressor in it. Then click the "+" button and import a video.

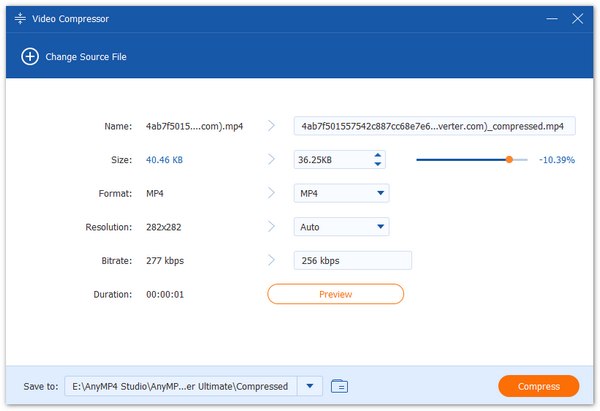
Step 2: In the Video Compressor interface, reduce the video size by adjust the Size slide bar or directly enter your desired export size. You can also decide the export video format and resolution using the corresponding drop-down menus.

Step 3: Preview the result using the Preview button. If the quality is satisfying, choose the output format. (Check the compressed format here.)
Finally, click Compress to get the compressor to start working. When the rendering is finished, you can find the exported file in the destination folder.
Does Final Cut Pro include Compressor?
No, the compressor is not included in Final Cut Pro. You need to purchase Compressor on App Store at $49.99.
Does Final Cut Pro include Motion?
No, Final Cut Pro does not include Motion. You have to buy Motion from App Store at $49.99.
Is Final Cut Pro a free built-in app in MacBooks?
No, it is neither free nor built-in. On a new MacBook, you need to log in to the App Store and purchase Final Cut Pro.
Final Cut Pro Compressor seamlessly integrates with Final Cut Pro to export your projects. In this post, we talked about how to reduce video size using this app. Honestly, though called compressor, Final Cut Pro Compressor is not focused on video compression but more on distributing multiple encoding tasks with different presets. If you need a convenient way to compress your videos, try AnyMP4 Video Converter Ultimate instead.