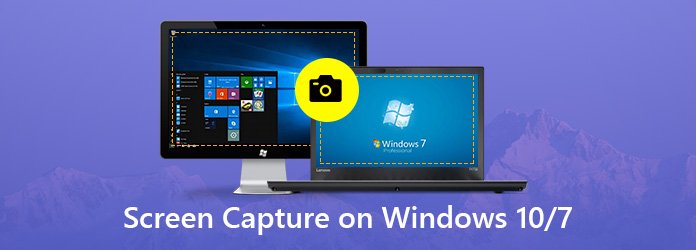
What are the best methods for screen capturing for Windows 10? Besides the traditional methods to record videos and take snapshots, such as key combination, snipping tool and DVR, Windows 10 has an introduced Snip and Sketch to capture screenshots with editing features.
The article provides the detailed process to get the screenshots and capture screen video on Windows 10 for the default solutions. Of course, when you need the all-in-one screen recorder to record video, capture audio and even take snapshots, you can learn more about the best solution from the article now.
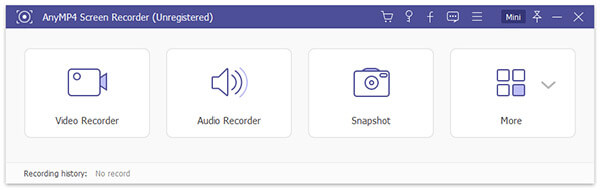
AnyMP4 Screen Recorder is a versatile screen recorder to record screen, capture audio files and take snapshots on Windows 10/8/7 with ease. It also enables you to make annotations and further edit the recording with ease. Moreover, you can also set the screen capture on Windows 10 as a scheduled task.
Secure Download
Secure Download
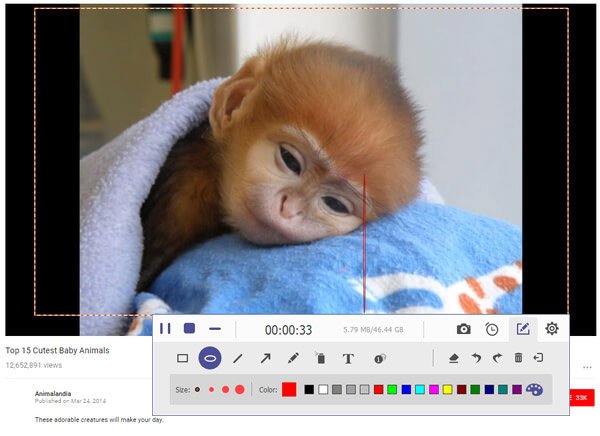
Step 1: Install PC screen recorder
Once you have installed the screen capture tool, launch the program from your Windows 10. Select the "Screen Recorder" button in order to record video file or "Snapshot" to take a snapshot for Windows 10.
Step 2: Select the recording area
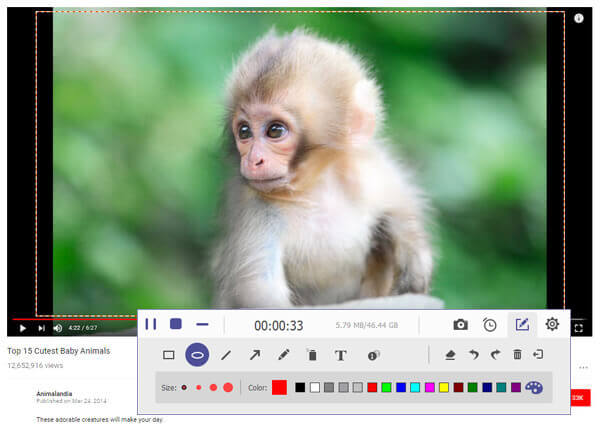
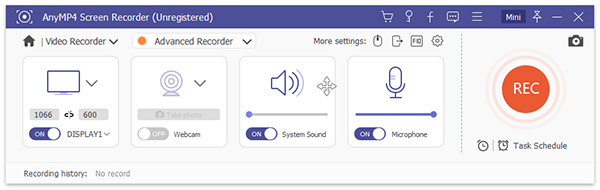
Select and custom the recording area or capture the entire screen with the control border. You can set a definite aspect ratio to record, or record in general aspect ratio like 1024×768 pixel.
Step 3: Record screen video on Windows 10
Click the "REC" button to capture screen on Windows 10 as video. After that, start the event you want to capture, such as an online video, your gameplay, the software, etc. Click the "Stop" button to get the recording.
Step 4: Capture screen on Windows as image
If you need to take some screenshots for some important screens, you can simply click the camera icon to take a snapshot. After that you can find the screenshots in the media library within the program.
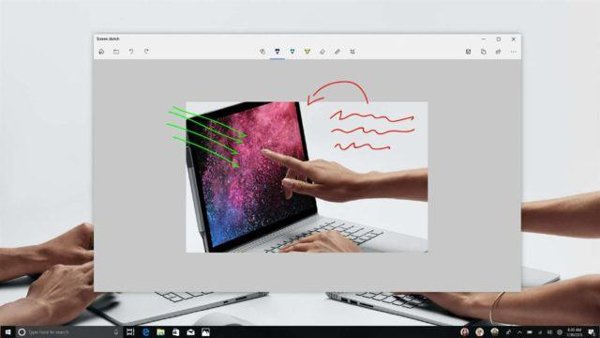
When you update to Windows 10, you can find the Snip and Sketch as the new screen capture method. It combines the screen capture and editing features of "Snipping Tool" and "Screen Sketch" in the previous versions.
Step 1: Go to Start on your Windows 10 and type the "Snip and Sketch" to locate and launch the program on the Windows Store. After that you can click on the "New" button to capture a screen on Windows 10.
Step 2: Choose the type of crop mode, such as Rectangular Clip, Freeform Clip and Fullscreen Clip. After that you can click and drag the Plus-Mouse icon to capture the desired area.
Step 3: Click on the pop-up at the bottom right of the screen, which enables you to select the screenshots, mark up and share the image to computer or social media sites.
Microsoft had developed a feature called Game Bar into Xbox One to capture video games. The feature had been migrated to Windows 10. You can take screen captures on Windows 10 without 3rd party screen recorders.
Step 1: Open the screen, video or software you want to capture on Windows 10. Click the "Start" menu at the bottom left corner, search for Xbox Game Bar and click on it, or press Windows + G keys to open it directly.
Step 2: Click the menu button with a three-line icon to open the settings dialog. After that choose the options you intend to use.
Step 3: Next, press the "Audio" icon and adjust the volume of Speakers, System sounds, and more. If you want to capture screen with your reactions, enable the Webcam option.
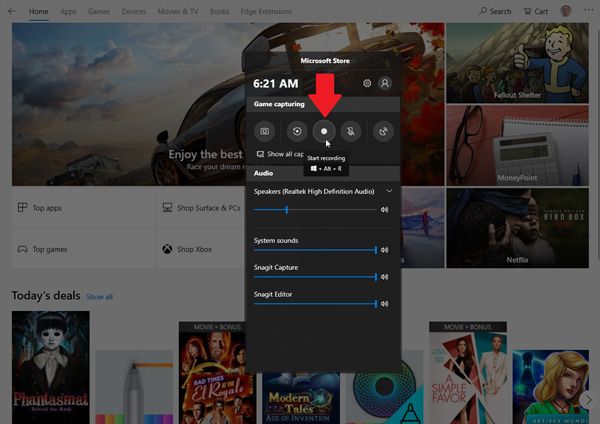
Step 4: Once click the "Record" icon on the Game Bar and start the event. For more settings, click the "Gear" icon.
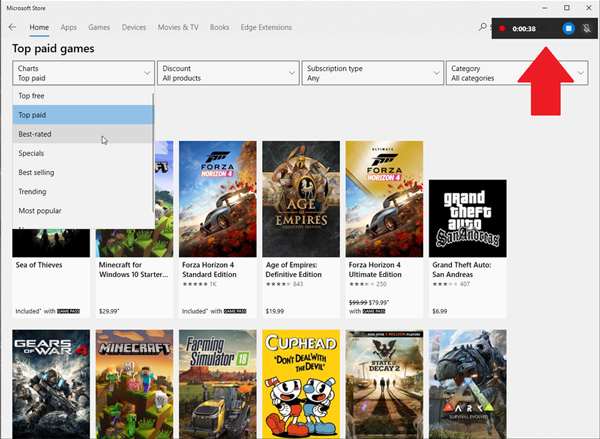
Step 5: While doing screen capture on your PC, a menu bar will appear on the top of your screen. When you capture screen on your Windows 10, click the "Stop" icon on the menu bar. Then the recording will be saved to your hard drive.
In addition to animated recordings, you can capture a screen on PC and save it as still images on Windows 10. The built-in Snipping tool on Windows 10/8/7 is a simple way to capture any screen quickly.
Step 1: Open the Snipping Tool from the "Start" menu.
Step 2: Click the Arrow icon next to the "New" menu, and select the shape of the screen capture, such as "Full-screen Snip". Then press the Arrow icon next to the "Delay" menu, and set the countdown.
Step 3: Launch the screen you want to capture, and click the "New" button. Then drag your cursor over the capture area.
Step 4: Finally, click the "Save" button to export the screen capture of Windows to your computer, or click the "Copy" icon to copy it to your clipboard.
Note: The Snipping Tool for Windows 7 and 8 has a limitation. It cannot capture screen involved with mouse movements, such as pop-up menus. In such cases, you have to use the "Print Screen" button.

Windows has the same method to take screenshots for both PC and tablet with different brands. When you need to capture screen of Windows 10/8/7 as image files, here are the default methods you should know.
The Print Screen (PrtScn) button is always the default method for screen capture for Windows 10. It might be labeled as "PrtScn", "PrntScrn", "Print Scr" or something similar, which depend on the keyboard you are using. When you are using a laptop without the key, you can press the "Function" or "Fn" to take a screenshot on Windows 10.
When you press the "PrtScn" key, the entire screen will be saved to your clipboard. After that you can save the screenshot in Word, Print and other programs. You can also hold down "Windows" + "PrtScn" keys to save the screenshot as a PNG file in the Pictures folder.

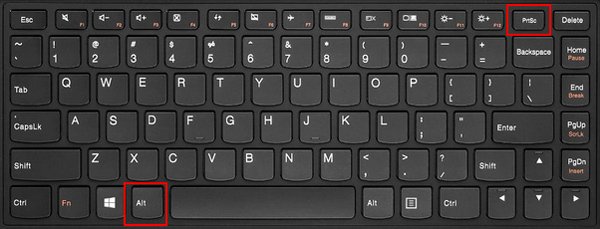
If you just want to capture a specific window on your screen, press "Alt" + "PrtScn" keys at the same time. Then the current active window will be saved as a still screen capture of Windows to your clipboard. As for the laptops, you can also press "Alt" + "Fn" + "PrtScn" keys to capture a window on Windows 10.
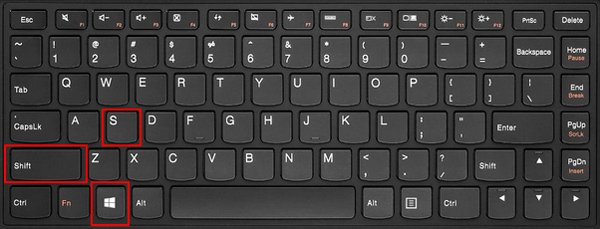
Once hold down "Windows" + "Shift" + "S" keys on your keyboard, a gray mask will appear on your screen. Click the starting point and drag your mouse to cover the desired area. Once release your mouse, a still screen capture of Windows will go to your clipboard.
When you are using the Windows Surface device, you can use the physical buttons to capture a screen of Windows 10. Just similar to take screens on phones and tablets, hold down the Windows Logo touch button at the bottom of your Surface screen and hit the physical volume-down button on the side of the tablet.
How to capture a screen on Windows 10/8/7? Whether you are using a Windows laptop, or a Windows surface device, you can find the methods to screen capture on Windows 10. Besides the default methods, such as the Windows default methods and key combinations, you can also take advantage of AnyMP4 Screen Recorder to record video, capture audio and take snapshots with ease.
 Posted by Riley Mitchell to Recorder
Related Articles
 11 Best iPhone Screen Recorder Apps
Don't know how to find a suitable iPhone screen recorder app? In this article, we list 10 best iPhone screen recorder app for you to refer.
 8 Best MP3 Music Players Download Free
Want to download the best MP3 player on Windows PC or Mac? What is the best free MP3 music player? This post lists 8 best MP3 players for you to download free.
 5 Amazing Lecture Recording Software for Better Learning
How to record class lectures playing on your laptop? In this post, we will show you the top 5 lecture recording software to solve this problem.
 The Best Way on How to Convert VLC Files to MP4
Have trouble in converting your VLC files to MP4 format? Read this passage then you will learn the best VLC to MP4 converters to solve your issue.