What is the best way to record class lectures? This is a common question among students and teachers as they adopt online learning methods. Recording class lectures helps students look back on lectures and deepen their understanding during self-study. As a teacher, it helps them to share the recorded lectures with students who were unable to attend class. In this post, we will show you how to record lectures in different approaches. Plus, we will provide essential tips for recording online lectures to produce high-quality recordings.

AnyMP4 Screen Recorder is a highly flexible recording software to record lectures online. It offers seven different recording modesScreen Recorder, Audio Recorder, Screen Capture, Game Recorder, Window Recorder, Webcam Recorder, and Phone Recorder. The Screen Recorder mode is optimized to capture the lecture window, system sound, and microphone.
For good measure, there are no restrictions on recording video and audio lengths. The only limit is your storage space. For high-quality lecture recordings, AnyMP4 Screen Recorder offers microphone noise cancellation and microphone enhancement features. Plus, you can export the recorded lecture in formats like MP4, MOV, MKV, MP3, AAC, FLAC, etc.
Here’s the best way to record lectures using AnyMP4 Screen Recorder:
1. Start by getting the free download of AnyMP4 Screen Recorder. Install the lecture recorder software and wait for the installation process to finish. Once the installation is complete, launch the AnyMP4 Screen Recorder on your laptop.
Secure Download
Secure Download
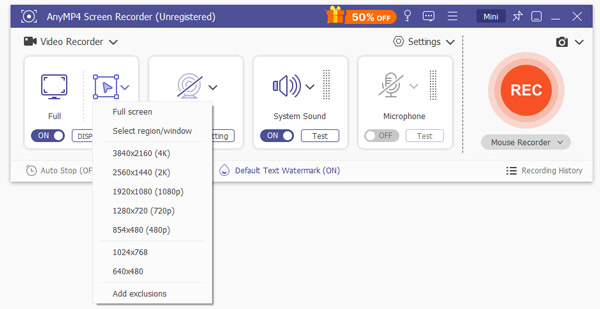
2. Upon startup, you will be taken into the Screen Recorder mode by default. Now, it’s time to decide what you want to record. In the Default tab, select the Full option to capture your entire screen. But if you prefer to focus on just the lecture window, select Custom.
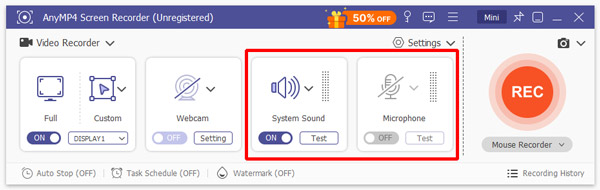
3. Once the recording area is specified, proceed to the audio recording configurations. In the same menu bar, toggle System Sound to capture the audio from your lecture. If you need to include your reactions or thoughts during the lecture, simply turn on the Microphone.
4. After setting everything up, click the big REC button to start the recording. A three-second countdown will give you time to prepare before the recording starts. During the lecture recording, a floating bar will appear with useful tools:
Camera: Take a screenshot to capture important lectures without pausing the recording.

Toolbox: Use the Whiteboard tool to jot down important topics in your lectures. Upon selection, your screen will turn into a white canvas. Change the display area to Full Screen, Left Screen, Right Screen, Top Screen, or Bottom Screen if needed.

5. Once the lecture wraps up, click the Red Square button to end the recording. The preview window will popup where you can review the recorded lectures. If needed, trim unnecessary clips, boost sound, compress file size, and more.

AnyMP4 Screen Recorder provides a hassle-free solution for recording lectures online. This software can deliver high-quality recording, both video and audio, effortlessly. Apart from online lectures, it can be used to capture meetings on various webinar platforms.
Equipment like a recording device or smartphone offers a practical solution for recording class lectures. They operate independently, freeing those devices for note-taking or other multitasking during lectures. Additionally, they can be easily carried and placed near the sound source for optimal recording quality.
Here’s how to record online lectures with a recording device:
1. First, decide on the equipment you’ll use; it could be a recording device or a smartphone. Here’s a brief description for your reference:
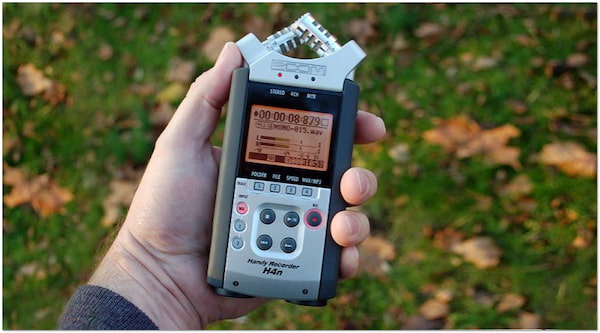
Recording Devices: If you prefer a recorder with a built-in hard drive, opt for AEKOMi. But if you have something like the Zoom H4n with at least 64GB of storage, it should be fine.
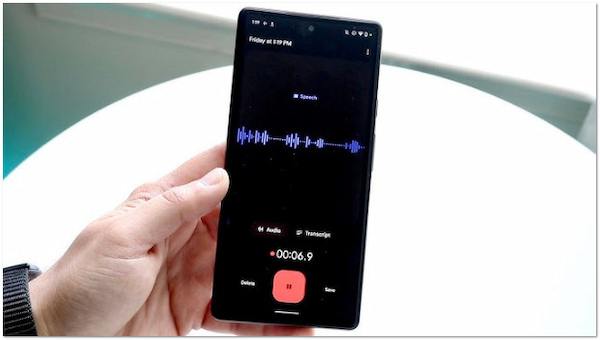
Smartphone: It’s hard to beat the convenience of a device you already carry. Most smartphones have excellent microphones for lecture recording with good sound quality. However, space can be an issue, so make room by clearing unused apps or photos.
2. Before the day of your lecture, test the sound quality of your recording equipment. Start a recording and speak a few words at different parts of the room. Close to your laptop and gradually move further back to observe how the sound quality changes.
3. Place your recording equipment near your laptop or speakers where the lecture audio will play. If using a smartphone, position it closer to the audio source to ensure no muffled sound. This ensures the microphone clearly captures the lecturer’s voice.
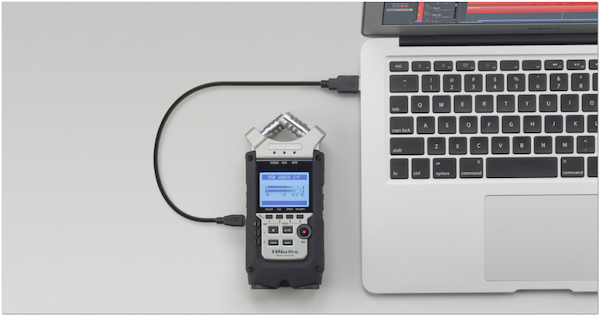
4. As the lectures start, press/tap the Record button on your recording equipment. Ensure you have enough storage space beforehand so you can capture the entire session. Once the lecture ends, press/tap the Stop button on your recording equipment to stop the recording.
Recording equipment often delivers clear audio capture with minimal distortion. However, recording devices aur audio-focused, which means they can’t capture visuals. Also, you have to transfer the recordings from your equipment to the laptop afterward.
Zoom’s built-in lecture recorder is a convenient tool for teachers/trainers/students who want to share lectures. Not to mention, Zoom captures not only audio but also video and shared screens. Recorded lectures can be easily shared with students, classmates, or colleagues who missed the session. However, you should be aware that capturing lectures notifies participants.
Here’s how to record lectures using Zoom’s built-in recording feature:
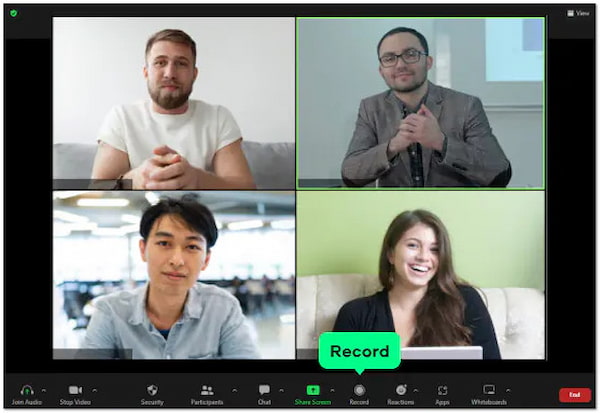
1. First, host or join the Zoom meeting as your class starts. Once you’re in, look for the Record button in the Zoom toolbar and click it. Both the hosts and the participants will be notified that the meeting is being recorded.
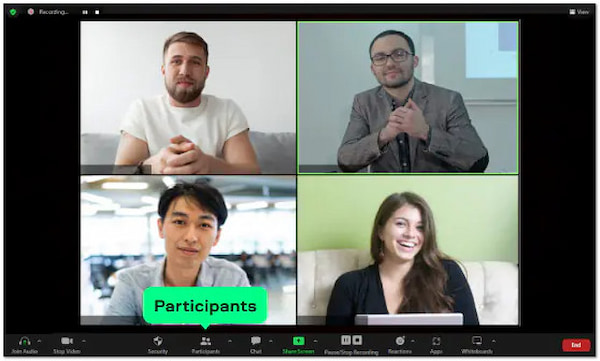
2. As the recording takes place, you can share your screen if they require you. Once the lecture ends, click the Stop Recording button to end the recording. Then, Zoom will convert the recorded clip to make it accessible to the other participants.
Zoom’s built-in recording feature makes recording lectures simple. But here’s the deal. As a student, you cannot record unless the host enables recording permissions. In addition, free Zoom accounts have limited storage, which can fill up quickly if you record multiple lectures.
Use a high-quality recorder like AnyMP4 Screen Recorder, which is accessible on both Windows and Mac systems. It lets you record the entire screen, a specific window, or fixed region. Plus, you can use the drawing and annotation tools to highlight points during recording.
Spend time exploring the software before recording a lecture. Familiarize yourself with the settings, features, and recording options to avoid confusion during the actual session. A test run will help you ensure everything is set up correctly, including the quality and recording area.
The best way to record lectures for students is to automate the recording process. Fortunately, AnyMP4 Screen Recorder includes a Task Schedule feature to capture your classes automatically. This allows you to catch up on the lecture even when you didn’t attend.
Once the lecture is recorded, edit the clip by trimming unnecessary parts. Not to mention, AnyMP4 Screen Recorder offers built-in editing tools. Beyond advanced trimmer, it also offers a video compressor, sound extractor, sound booster, file merger, and more.
If storage space is a concern, consider external lecture recording devices or equipment. These options function without requiring downloading additional software or even using internet connectivity. However, recording equipment nowadays is rare to find as they are outdated.
Knowing how to record lectures enhances accessibility and learning efficiency for both students and teachers. In actuality, there are many ways to capture high-quality lecture recordings. But there is only one that truly stands out, AnyMP4 Screen Recorder. This flexible software allows you to capture lectures in full, specific windows, or fixed regions. Additionally, it gives you the option to include both system sound and microphone input in the recording. On top of that, you can add your webcam feed if needed.
 Posted by Riley Mitchell to Record Video
Related Articles
 Top 10 Skype Call Recorders to Capture HD Audio/Video with Ease
What are the best Skype call recorders to capture audio files and videos in a high quality? The article shares 10 best Skype recorders to save your calls.
 Top 5 Messenger Call Recorder Apps for iPhone and Android
How to record Messenger audio or video calls and keep them archive? Here are the best Messenger call recorder apps you can use on mobile and computer.
 Top 6 Audio Recording Software to Record Audio Files with High Quality
Looking for proper audio recording software to capture the desired audio on your computer? Here are 6 best audio recorders for Windows and Mac from the article.
 3 Effective Methods to Record Audio from Browser
Discover three easy and reliable ways to record audio from browsers. Learn how to record streaming music, webinars, podcasts, and more effortlessly.