Adobe Premiere Pro is one of the most powerful video editing programs used by numerous professionals. Being an expert in PR sounds like very cool a thing. However, when you really get started learning how to use it, you are very likely to be disappointed by how sophisticated the program is. No pains, no gains. Keep up your enthusiasm and get back on the way by figuring out how to shrink video size in Adobe Premiere Pro.

Adobe Premiere Pro allows you to tweak various settings before exporting a video. This leaves a vast space for you to control the video size. The video format, bitrate, and many other parameters greatly affect the size of the export video. Let's see how to downsize a video in Adobe Premiere Pro.
Step 1: Launch Adobe Premiere Pro and click New Project. In the next window, just leave everything as default and click OK.

Step 2: Double-click the project window in the bottom left corner of the program and import the video you want to compress.

Step 3: Drag and drop the imported file on the small New Item icon to open the project on the timeline.
Step 4: Select the imported video on the timeline and go to export it. Click File > Export > Media.

Step 5: Set the Format to Windows Media, and make sure the Export Video and Export Audio boxes are checked.

Step 6: Under the Video tab, lower the average video bitrate to reduce the PR video size. You can try 4000 Kbps to start. The estimated file size is shown below.

Step 7: Set the export destination folder and name the export file, then click the Export button in the bottom right corner of the window to compress the Adobe Premiere video.
Above you have seen the brief process of shrinking an Adobe Premiere Pro video. Perhaps you have noticed that many settings that appeared during the process are skipped. Explaining all of them will take a 10000-word essay. If you just need a quick and practical video compressor to compress a video, you don't have to figure out how things work in Adobe Premiere Pro. Below is another video compressor that is much easier to use yet powerful.
AnyMP4 Video Converter Ultimate has a built-in video compressor. Using this tool, you don't have to go through all the complicated settings like in Adobe Premiere Pro. Just simply focus on format, resolution, and bitrate to control the video size.
Key Features:
Secure Download
Secure Download
Step 1: Install and launch the program. Move to the Toolbox tab and open Video Compressor.

Step 2: Click "+" and import a video.

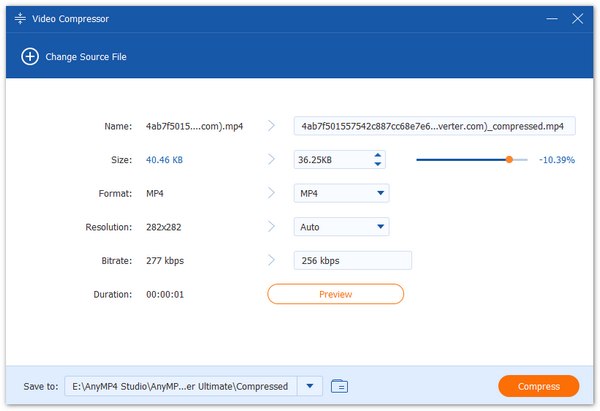
Step 3: Customize the settings to downsize the video. First, choose MP4 as the output format. Then, decide the resolution you want. At last, drag the dot on the size slide bar to adjust the video size.

Step 4: Use the Preview button to preview the result. If everything is OK, choose a place to save the exported video, then click Compress to start the compression.
1. Can WinRAR compress videos?
Yes, you can compress videos with WinRAR. However, video files are often on high entropy. Thus, videos compressed by WinRAR hardly get any smaller.
2. How to compress PPT video?
You can extract the video from the PowerPoint document and compress it with AnyMP4 Video Converter Ultimate. Then just insert the compressed video into the PPT document.
3. Does Airdrop compress videos?
No, Airdrop will not compress any file you transfer via it.
In this post, we introduced how to downsize videos in Adobe Premiere Pro. The process is kind of complicated, but you can simply finish it following the instruction above. If you are looking for a video size reducer to reduce video size, the most recommended tool is AnyMP4 Video Converter Ultimate.