Jitsi Meet is a video conferencing solution that lets you build and deploy secure meetings. It allows hosting virtual meetings, real time collaborations, and communicating with features like screen sharing, chat, and customizable meeting links. Recording a meeting is essential to capture important discussions, presentations, or decisions for future reference. Recording Jitsi meetings can serve multiple purposes, such as documentation, accessibility, training, learning, and review. In this post, we will show you how to record a Jitsi meeting. This way, you can document any discussion or agreements and share it with those who couldn’t attend. In addition, it is a smart way to revisit important points or ideas discussed during the meeting. By recording your meetings, you can maximize the value of your session and ensure nothing important will be missed or lost.
Before we get into our main discussion, let us first gain insight into what Jitsi is. Jitsi is an open-source video conferencing platform built to bring people together effortlessly. It lets you securely stay in touch with your teams, be they colleagues, friends, or family. Jitsi conference allows virtual meetings and invites participants through shareable URLs. During the conference, you can share your screen, making it perfect for classes, meetings, or webinars. In addition, Jitsi offers a built-in chat for exchanging messages and emojis during video calls. Notably, it enables you to record computer screens and audio to keep track of important discussions.
Jibri is a specialized feature for recording or streaming Jitsi Meet conferences. It serves as a mystery participant in the meeting, recording everything. By default, the recordings are stored in the server as a video file for easy playback and sharing. In addition, it can broadcast meetings to YouTube and other supported streaming services.
Here’s how to record Jitsi meetings using Jibri:
1. Before recording, schedule your Jitsi Meet session and share the link with participants. Then, you will need to set up Jibri on your Jitsi Meet server to enable recording. Most importantly, make sure Jibri is correctly configured and integrated with your Jitsi Meet instances.
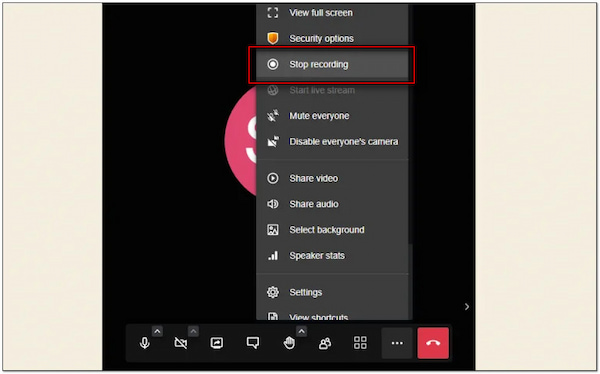
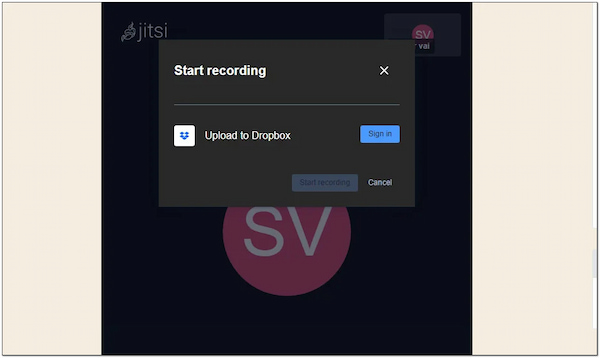
2. At the meeting start time, click the meeting link to join the Jitsi Meet session. Once all the participants have joined the meeting, click the More Actions button. From there, click the Start Recording option to trigger Jibri to start recording the meeting.
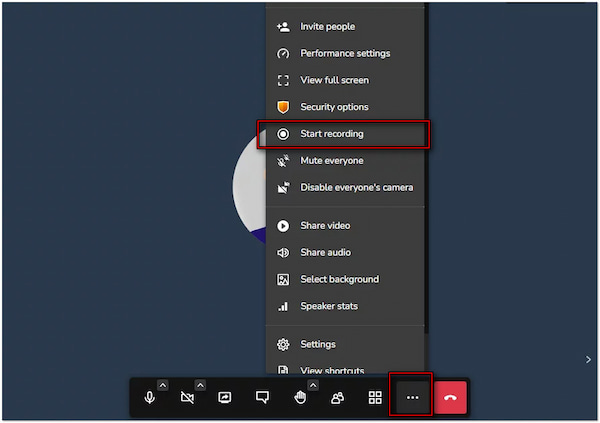
Pro Tip: Inform participants that the meeting is being recorded to ensure everyone’s comfort.
3. Now, proceed with your Jitsi conference as usual. Jibri will then capture the entire session in the background, recording both video and audio. At the end of your meeting, click More Action again, but this time, select the Stop Recording option.
Note: If Jibri is unavailable, you can use Jitsi’s local recording feature. This feature allows participants to record meetings without needing server-side tools like Jibri. It is particularly useful for personal backups or when server resources are limited. Meanwhile, Jitsi auto recording can be applied by modifying the server configuration of Jitsi Meet.
Jitsi Meets allows saving Jitsi call recording directly to Dropbox for easy access and sharing. By integrating Dropbox with Jitsi Meet, it will upload the recording to your account automatically after the session. Also, you will be able to distribute the recordings to the participants easily. In addition to Dropbox, you can also sync recordings to other external and cloud storage.
Here’s how to save the Jitsi conference recording in Dropbox:
1. To save your Jitsi Meet recording to Dropbox, you first need to link your Dropbox account to the platform. Log in to your Jitsi Meet credentials and proceed to the settings section. Find the option for Dropbox integration and allow Jitsi Meet to access your Dropbox account.
2. After successfully integrating Dropbox with Jitsi Meet, launch the meeting and start recording. Now that the meeting is being recorded, let’s proceed to save the recording to Dropbox. Once the meeting concludes, select the option to save your recording to Dropbox.
3. Now that the recording is successfully saved to Dropbox, open your Dropbox account. Be it the Dropbox web, desktop, or mobile app, access the folder where you saved the recording. From here, you can download, share, or organize it as needed.
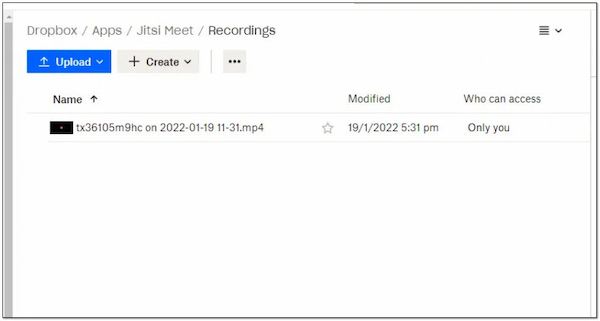
Note: Jitsi recordings are stored locally when using server-side tools like Jibri. Once a session is recorded, files will be saved directly to the server’s designated destination. So, it is important to select Dropbox as the destination to save your Jitsi recording.
Jitsi doesn’t support client-side recording natively, but dedicated tools like AnyMP4 Screen Recorder can fill this gap. It is a multifunctional screen recording software to record Jitsi meetings. It provides different recording modes, enabling you to capture video, audio, or both. It provides options to capture the screen in full or specify the recording area to focus only on the Jitsi window. Best of all, it hides the main interface when you take screenshots or recordings.
Furthermore, AnyMP4 Screen Recorder supports setting hotkeys to ease the recording process. Plus, it includes built-in annotation tools for highlighting important points during the recording. Some of the tools you can use are Rectangle, Brush, Text, Callout, Whiteboard, Focus, etc. But what makes it truly remarkable is the inclusion of editing features. It provides essential tools for trimming, boosting sound, compressing video, and more.
Here’s how to record a Jitsi meeting using AnyMP4 Screen Recorder:
1. First things first, let’s get the free download of AnyMP4 Screen Recorder. Install the screen recording software and allow the installation process to finish. Once the installation completes, run the AnyMP4 Screen Recorder on your computer.
Secure Download
Secure Download
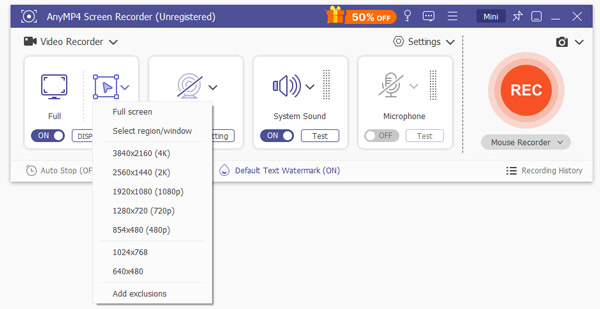
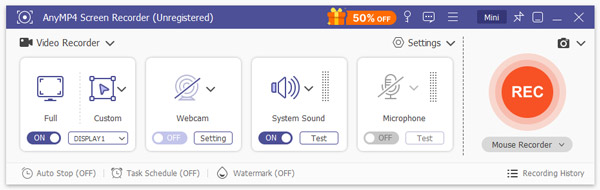
2. Now that you’re in the software, you’ll be redirected to the Screen Recorder mode by default. At this stage, set the recording area to capture your Jitsi meeting. Select the Full option if you want to capture everything on your screen. Meanwhile, use the Custom option to focus only on the Jitsi session while excluding distractions.
3. Afterward, continue by turning on the toggles for the System Sound and Microphone. This is to ensure your Jitsi Meet session is recorded with sound. By turning these options on, you will be able to:
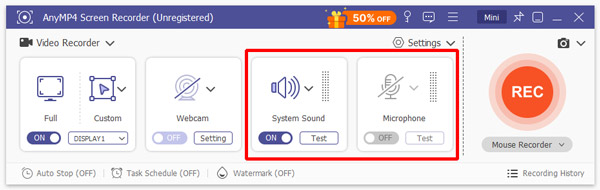
System Sound: Capture meeting participants’ voices.
Microphone: Capture your voice in the recording.
4. After setting the recording area and other preferences, open the Jitsi Meet in your browser. Switch back to AnyMP4 Screen Recorder and click the big REC button to start the recording. You will see a countdown indicating the screen recording is about to begin.
Pro Tip: During your Jitsi Meet session, you can use the smart toolbar to access real-time editing tools. If you need to note important topics during the meeting, you can add callouts, text, shapes, focus, magnification, drawing, and more.
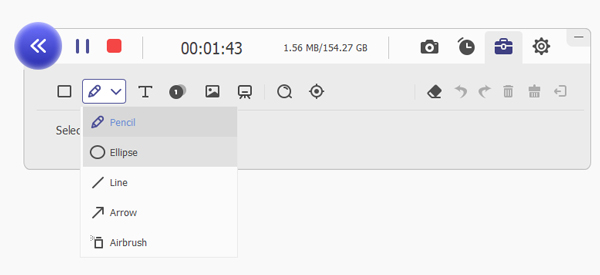
5. Once the meeting ends, click the Stop button on the toolbar to end the recording. Then, you will be taken into a preview window where you can review the recording. Before saving the recording, you can trim, adjust playback speed, boost sound, and more.
Using AnyMP4 Screen Recorder to capture Jitsi meetings is a reliable solution for recording every single detail of your conference. It enables you to customize recording modes, add annotations, and edit post-recordings. It ensures everything is recorded, and no moments will be missed. If you like such software, check out some of the best free screen recorders here.
Knowing how to record Jitsi meetings is an essential practice for documenting important discussions. Be it for professional purposes or personal use, having a record ensures you can revisit and share important points with those who couldn’t attend. Through built-in tools like Jibri, you will be able to efficiently capture recordings of your Jitsi meetings. Options to save recordings locally or in cloud storage like Dropbox add flexibility to how you manage your content. If you’re looking for a powerful recording solution, AnyMP4 Screen Recorder offers more advanced recording features. This includes multiple recording modes, annotation tools, high-quality recordings, and editing features. So, you shouldn’t miss AnyMP4 Screen Recorder to maximize your productivity and never miss a detail.
 Posted by Riley Mitchell to Record Video
More readings
 [Review and Download] Best 7 Voice Recorder Apps for Android Phone
How do I record a meeting on Android phone? Here is the review of the best-7 list of Android voice recorder apps for Samsung, Huawei, Xiaomi, Motorola, etc.
 Easy Ways of How to Record Screen on iPhone Without Effort
Have you ever been very frustrated because you don't know how to record screen on iPhone? Want to master this technique easily? Just read this guide to learn!
 3 Proven Ways to Record FaceTime on Mac and iPhone XR/XS/X or Earlier
In this article we show you how to record a FaceTime call on your iPhone, iPad or Mac. With our guide, you can save important video conversations simply.
 Best 11 Screen Recorders for Chrome to Record Video with Audio
How do I record video running in my Chrome browser? Get the best Chrome screen recorder from the best-11 list and start recording video with audio in Chrome.