The demand for screenshots has increased drastically for mobile devices and computers. Today, learning to take a screenshot on Mac has become valuable knowledge for users looking to produce tutorial videos or those who want to share data through screenshots for work or academic-related reasons. With that in mind, this article provides a complete guide on screen capture on Mac using the default options available in the platform and an alternative software that can provide more advanced screenshot annotation options.
Since the demand for the importance of taking screenshots became widely popular on Mac, Apple implemented multiple keyboard shortcuts for screenshots on Mac. In total, five options are available by default in the platform.
To help our readers learn how to screenshot on MacAirr, Pro, or Book, a detailed guide will be provided below to help them understand the keyboard commands required to take different screenshot modes. The guide will include a thorough visual aid to clarify what buttons must be selected to take a specific screenshot mode.
The first option explored in this guide is the standard fullscreen capture. As its name suggests, this screenshot mode will immediately capture the entire screen. This option is widely helpful for sharing data requiring a large screen section to capture—some examples of displays where full-screen capture will benefit are spreadsheets and slideshows.
To learn how to screenshot in full-screen mode, you must press the keyboard combination of Shift + Command + 3. Be careful when using this option since the full-screen capture may not be saved due to an error. Moreover, displays where smaller icons or letters are available may look too small and more challenging to spot if they were captured full-screen.

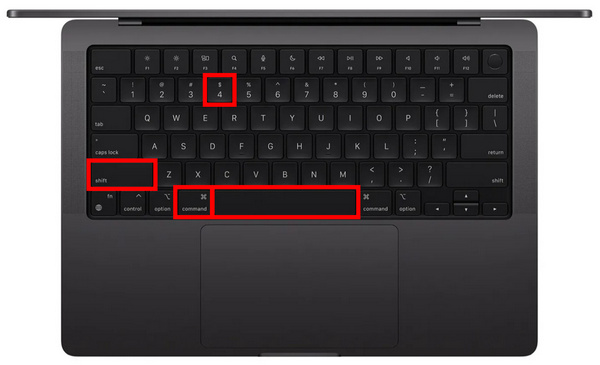
The selective screen capture mode is optimal for users who only want to share a specific portion of the screen. This screenshot mode uses your Mac computer’s cursor as the selection agent on which part of your screen will be captured. As a result, you can use your mouse to select the section of the screen that will be screenshotted. Using this option is similar to the cropping tool of most image editing applications.
The keyboard combination to use the selective screen capture mode is Shift + Command + 4. Although selective capture may seem customizable, the lack of annotation tools and an editing menu is not present in this mode. As a result, this will make selective screenshots harder to adjust and add necessary details to.

Finding which window you want to capture might be tricky if your computer runs multiple tabs. Fortunately, Mac computers have a screenshot mode that precisely captures a specific window. This makes this tool a good option to capture multiple spreadsheets or slides in your presentations. It can also take a screenshot of your browser without changing your displayed window. As a result, the specific window capture mode is an excellent efficiency tool.
The keyboard command is Shift + Command + 4 + Space for users using this screenshot option. The spacebar is used to switch from window to window. Although it can theoretically help with work efficiency, using this option is less practical when compared to the standard full-screen or selective portion mode. As a result, this mode is the least-used option among the available screenshot settings on Mac.
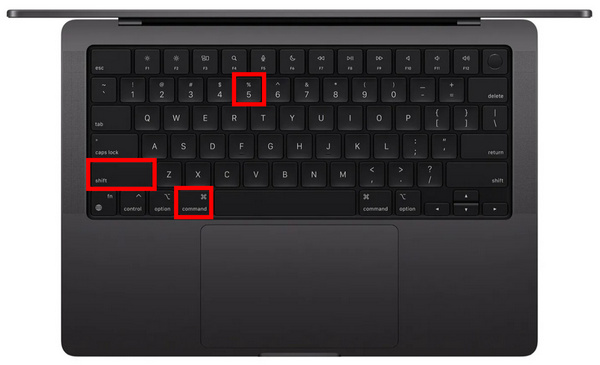
In contrast to the previous screenshot options, the fourth option in this list is not a screenshot command itself. Instead, this is the keyboard shortcut that can unlock the list of screenshot options available on your computer. This menu can be used to select the screenshot mode that you want to use. Simply click on its icon, and then you can use full-screen mode, selective screen mode, and specific window mode. This menu also contains the screen recording modes readily available on modern Mac computer releases.
To open the advanced screen options overlay, use the keyboard combination Shift + Command + 5. Although the advanced options menu may seem practical, the easy access to keyboard combinations has ultimately made it inferior. This option is only helpful for beginners of the Mac platform who want to learn how to screenshot on a Mac laptop. Over time, knowing the keyboard shortcuts will ultimately make the advanced screenshot option useless.
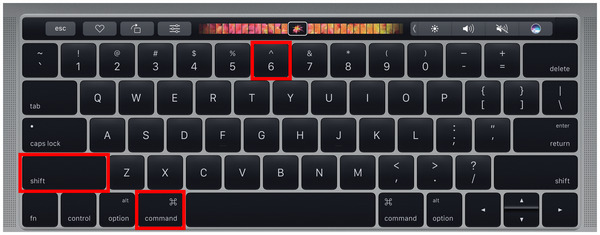
Modern releases of the MacBook Pro launched from 2016 to late 2023 are equipped with an exclusive Touch Bar display—a touch-screen section located on top of the keyboard of portable MacBook laptops. The touchscreen hardware is completely adjustable depending on the adjustments applied by the user. Typical uses of the touch bar are application shortcuts, color panels for image editors, function keys, and Siri-based buttons.
Since the Touch Bar is still a screen-based hardware, it can be captured by a specific screenshot option on your Mac computer. To screenshot this section, use the keyboard combination of Shift + Command + 6.
Despite looking shiny and advanced, Apple discontinued the Touch Bar option. The MacBook Pro M2 was the last unit that had this option. Because of that, learning how to take a screenshot on the Mac Pro touch bar has become impractical, especially for modern MacBook computers.
Compatibility: MacOS 10.12 or later versions
Image Quality: Standard 720p to 4K UHD, Native Resolution
Editing Tools: Rectangle tool, Brush tool, Text tool, Blur tool, Numbered icons, etc.
If you want to use a screenshot tool that may improve your work efficiency, using one with a built-in image editing tool will be the most practical option. In that case, AnyMP4 Screen Recorder for Mac is the best option.
This versatile third-party software is equipped with a fully functional Screen Capture tool that can be used to take a screenshot of different portions of the screen. The software is also equipped with various tools that can be used to apply essential image editing elements, such as a rectangle tool for adding shapes, a brush tool, a text tool, a blur tool, and a numbered icon tool.
These image annotation tools simplify sharing screenshot-based data because these editing elements can be used to highlight screenshot sections. For example, adding a rectangle shape to critical information in spreadsheets will drastically improve accessibility.
Moreover, a unique screenshot mode is also available in this third-party tool. With its Scrolling Screenshot, a mode that can capture full-scale web pages no matter how long they are. This option is ideal for sharing web page screenshots or social media timelines.
Finally, the tool also has a sticky-note function that can pin captured screenshots on your screen. This means the program can be used as a digital sticky note software.
To learn more about AnyMP4 Screen Recorder for Mac as a screenshot tool, we have provided the main features of its screenshot mode below and a detailed guide on how to use it.
Main Features
Before proceeding to the detailed screenshot tutorials, download AnyMP4 Screen Recorder first to make it easier to follow each step.
Secure Download
Secure Download
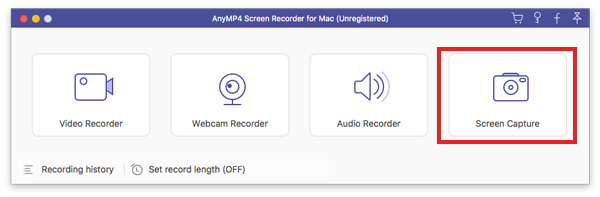
1. Once AnyMP4 Screen Recorder has been installed on your Mac computer, select the Screen Capture option in its main menu. This option will unlock the program’s screenshot mode, and you will notice that your cursor will change.
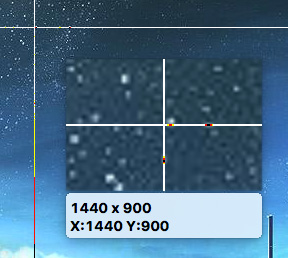
2. With your cursor adjusted to be a screenshot capture tool, you can select the screen section you want to capture. Due to the crossed pattern shape, capturing accurate screenshots will be seamless in this tool.
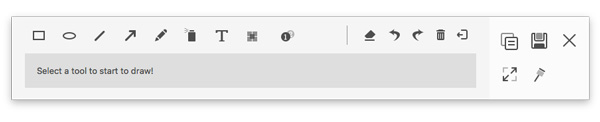
Now that you have captured the screen section you want to screenshot, the program's Image Editor menu will appear on-screen. This menu is where you can access the annotation tools available in the program, such as the brush tool, blur tool, numbered icon tool, etc.
Alternatively, you can immediately select the Save icon to export the screenshot on your computer.
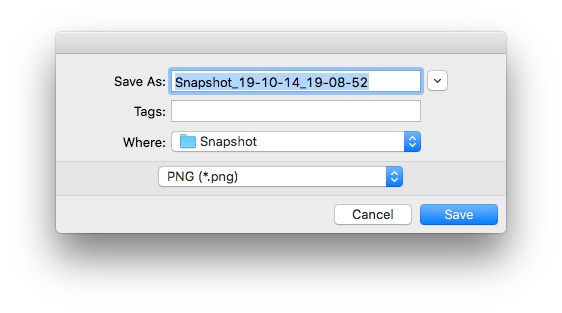
3. Once you have accessed the Save button, a menu will pop up that you can use to customize the file’s name, where it will be saved, and what output format it will be saved on. Simply click on Save once the settings are well-adjusted.
Following this simple step-by-step guide, you can now take a screenshot from your Mac computer while instantly accessing an image annotating tool. AnyMP4 Screen Recorder is essential software that can help your work efficiency through practical features. It is also the best screen recorder for Mac in the competitive recording market.
If you are unsure where your Mac screenshots are saved, proceed to your main desktop since this is the default save location of screen-captured images on Mac computers. The file should be named as a screenshot with the date you captured.
Simply add the Control button when using the default screenshot command to add the screen capture to your clipboard. For example, combining Control + Shift + Command + 3 will save the whole screen captured on the clipboard. Then, simply use Command + V to where you want to paste the screenshot.
Mac screenshots are limited by the display resolution currently active on your computer. This means that the default resolution of Mac screenshots is the 1:1 ratio of your default computer screen.
Now that we have provided a complete guide on screenshots on Mac computers, this article has helped you decide which screenshot option suits your needs. Try the alternative screenshot tool in AnyMP4 Screen Recorder for Mac’s Screen Capture mode for additional practicality and in-app editing options. Make sure to download the software using the link provided below.
Secure Download
Secure Download
 Posted by Riley Mitchell to Screenshot
More readings
 A Step-by-step Guide to Screenshot on Alcatel Mobile Devices
Users can easily take screenshots on their smart phones, such as Alcatel One Touch screenshot. Read this article and then you will get at least three methods.
 3 100% Working Ways to Screenshot on Toshiba in Various Situations
If you need to capture an image of your Toshiba laptop's desktop, you'd better read this guide since you can find multiple ways to do the task in various cases.
 3 Ways to Screenshot on HP Desktop and Laptop of Any Screen Size
This is the complete tutorial to screenshot on HP step by step. You can use both the tools to take a screenshot on all HP models and OS versions.
 Tutorial to Screenshot on Lenovo Laptop/Desktop of Any Screen Size
This is the complete guide to screenshot on Lenovo laptop or desktop. You can take a full-screen, active or custom screenshot on Lenovo on Windows with ease.