In many situations, you need to take screenshots on Mac computers, like sharing information with others, taking notes, and others. You may try to use professional recording tools to take screenshots. But we want to introduce you to the shortcuts that enable you to easily take screenshots. This article will show you the Mac screenshot shortcuts for you to facilitate your work, study, and entertainment.

Let's see the Mac screenshot shortcut to capture the entire screen.
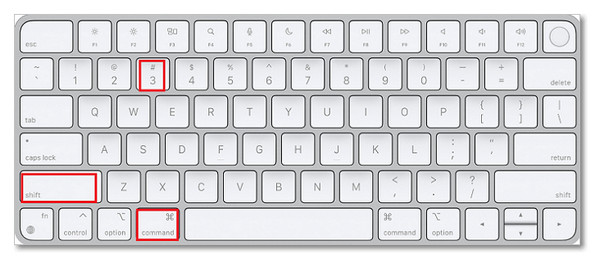
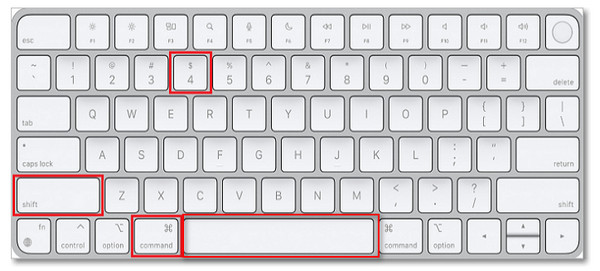
1. Press Command + Shift + 3. This feature captures a screenshot of the entire page displayed on your screen.
2. The system will automatically save the captured image as a PNG file either on your desktop or in your default screenshot storage location.
Here is a guide to using keyboard shortcuts for screenshots on Mac to capture the whole screen to the clipboard to facilitate your use.
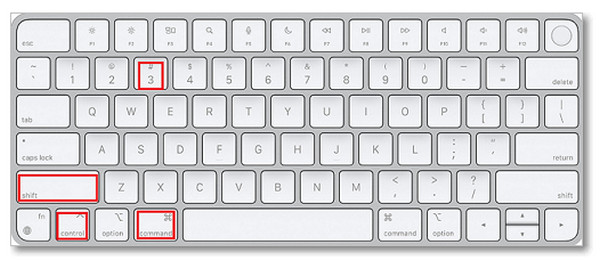
1. Tap the Command, Control, and number 3 keys on the keyboard. The screenshot will be automatically saved to the clipboard.
2. Open the software you want to apply this screenshot, and press the Command + V keys to paste it.
Next, it is the macOS screenshot shortcuts to capture the part of the screen.
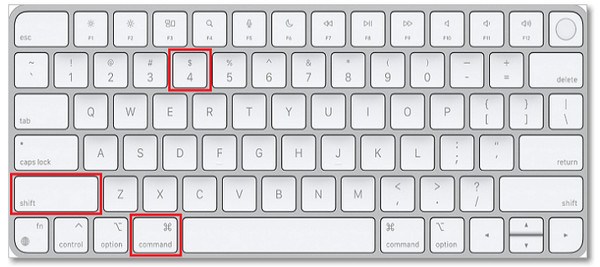
1. First, press Command + Shift + 4 on your keyboard. This action will change your cursor into a crosshair.
2. Drag the cursor to select the area you want to capture. After selecting the desired area, release the mouse button. The system will capture a screenshot of that section and save it as a PNG file.
To copy a portion of the screen to the clipboard, follow these steps.
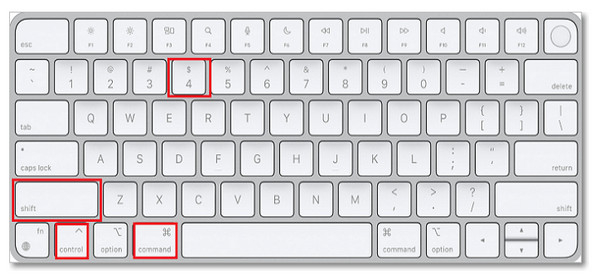
1. Press Command+Control+Shift+4 at the same time.
2. Select the area you want to retain, which will be saved to the clipboard.
To capture a screenshot of an active window, follow these steps:
1. The Mac screenshot keyboard shortcut for capturing one specific window is Command + Shift + 4 + spacebar. Press Command + Shift + 4 and the cursor will transform into a crosshair.
2. Press the spacebar key and this action will transform the cursor into a camera icon.
3. Move your cursor to the active window and click the mouse to capture this window.
The last Mac screenshot shortcut is for capturing one active window to the clipboard.
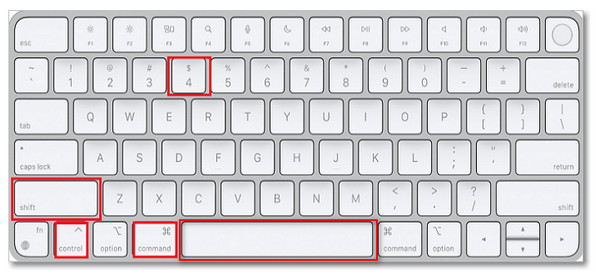
1. Press Command + Control + Shift + 4 to change the pointer into a crosshair.
2. Choose and press the spacebar to change the crosshair to the camera shape.
3. Locate your cursor on the window you want to capture, and click on it to get a screenshot.
OK, you have known all the shortcuts to screenshots on Mac computers. It is a pity that there is no shortcut to take scrolling screenshots on Mac.
It's important to know where screenshots are saved after using shortcuts to capture screens. By default, the screenshots will automatically saved to your desktop. Their names follow the format 'Screen Shot [year]-[month]-[day] at [time].png'.
Sometimes, it may also not show up on your Mac desktop. You can explore the following file paths to locate your screenshots on a Mac device. For most Mac users, the path is Finder > Go > Home > Pictures > Screenshots. If you're using macOS Catalina, like MacBook Pro, MacBook Air, iMac Pro, etc., you'll find your saved screenshots at Finder > Go > Home > Library > Pictures > Screenshots. These steps will help you easily access your screenshots.
If you are still unable to locate your screenshots, it may be because you have altered the default save location. To revert the save location to the desktop, you can utilize either the Screenshot application or Terminal.
Now, we want to introduce you to one of the best tools to capture screenshots on Mac. AnyMP4 Screen Recorder is a professional recording tool that can capture high-definition screenshots on Mac computers. It provides a Screen Capture mode for you to take screenshots. You can use it to capture the whole screen, the specific screen area, one window, and, most importantly, scrolling screenshots. Moreover, during this process, it offers you many additional tools to facilitate your work, including some editing tools, copy, pin to screen, etc. Download AnyMP4 Screen Recorder on your Mac and follow us to see how to use it to take screenshots.
1. Install the software on your computer, and open it.
Note: This tool is compatible with macOS 10.13 or later, including MacBook, MacBook Air, MacBook Pro, and other Mac devices.
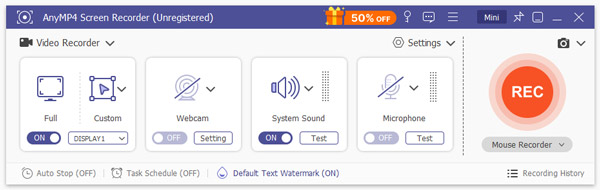
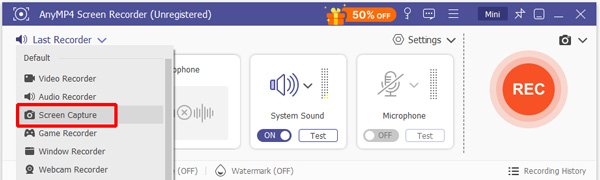
2. Click the Last Recorder option and switch to Screen Capture in its drop-down option. Then you will automatically enter the screenshot interface.
Note: Before starting to screenshot, you can click Menu > Preference to set some parameters, like output formats. It provides PNG, GIF, JPG/JPEG, BMG, and TIFF formats.
3. Your mouse cursor will appear as a crosshair. To select an area, simply drag the cursor over the desired region.
You can manually select the whole screen to take the entire screen snapshot. Or, you can randomly drag and select an area. It will subsequently present some tools, and you can choose the Full screen icon to capture the entire screen. Moreover, you can also click the Scrolling Screenshot icon to take a scrolling screenshot.
Note: It also provides many real-time editing tools for you to edit the screenshots, such as rectangle, brush, text, etc.

4. Finally, you can click the Save icon (2) to preserve the screenshots in the download folder.
Note: You can also save the screenshots to the desktop for subsequent use.
The steps are clear and even beginners can master this method. Download this software and try it.
Do you think this article about Mac screenshot shortcuts helps you? We respectively introduce the shortcuts of taking the entire screen, part of the screen, and the active window. The steps are easy and everyone can learn them quickly. If you want to take scrolling screenshots on Mac, AnyMP4 Screen Recorder is a good choice, and you can download it to try it.
 Posted by Riley Mitchell to Screenshot
More readings
 Capture Still Image from Video – Screenshot in Windows Media Player
Get the 3 easy ways to capture a still image on a video in Windows Media Player. You can extract frames from a video and save as JPG and other formats easily.
 2 Ways to Take a Long Screenshot on iPhone (iOS 18 Included)
Learn how to take a long screenshot on iPhone with this comprehensive guide. Discover the best methods to capture extensive content on your iPhone effortlessly.
 Screenshot Not Working on Mac – 6 Efficient Ways You Should Know
Why you are not able to take a screenshot on Mac and how to fix the problem? Here are the 6 most efficient methods to fix the screenshots not working on Mac.
 How to Screen Capture on Mac: 4 Unchallenging Ways
Want to know how to screen capture on Mac using various methods? If yes, you’ve landed in the right place! Check the four ways to capture your Mac screen.