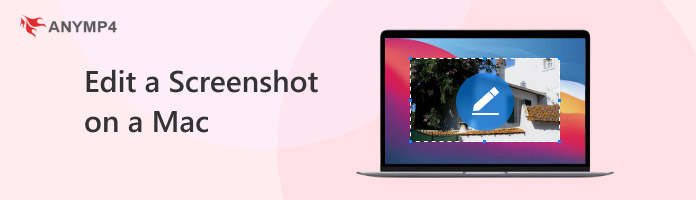
Can you edit a screenshot on a Mac? In many situations, we need to take and edit screenshots. With the help of diverse editing tools, we can make them clearer, more concise, and more effective, ultimately improving communication and productivity. Some people may still be confused about how to edit screenshots on a Mac. Today, this tutorial will show you how to edit a screenshot on a Mac in 3 effective ways.
| Type | Output Formats | Ease of Use |
|---|---|---|
| Real-time editing tools for making notes on screenshots. | JPG, PNG, GIF, and more. | 5 stars |
| Crop, rotate, flip, etc. | JPG, PNG, HEIC, and others. | 4.5 stars |
| Crop, rotate, flip, etc. | Same as the source. | 4 stars |
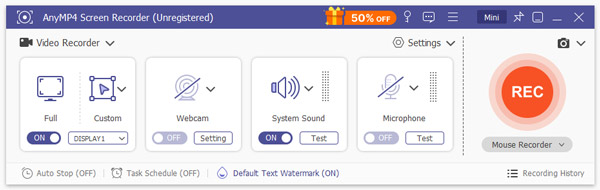
The first method of editing a screenshot on a Mac is to use AnyMP4 Screen Recorder, which provides real-time editing tools for you to edit screenshots on Mac. The editing tools include rectangle, text, brush, blur, callout, and picture, which can meet your diverse editing needs. You can use these editing tools to facilitate your study and work. In addition, it provides a Copy feature for you to paste and share the screenshots with your family and friends. Sometimes, you may require some specific format image, and you can choose the output image format from PNG, JPG, GIF, TIFF, and BMP. It also has the Watermark feature that enables you to add watermarks to the screenshots you take.
Secure Download
Secure Download
Here is a detailed guide to show you how to edit a screenshot on Mac.
1. Download and install the AnyMP4 Screen Recorder on your Mac computer. Then, launch the software.
Note: You can go to the Menu to adjust settings before taking screenshots, like the output image format.
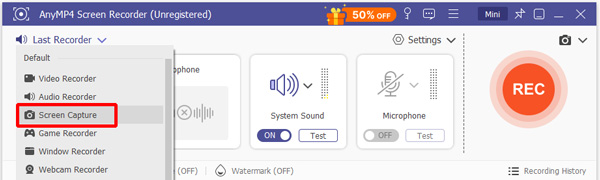
2. In the upper left corner, switch the default Screen Recorder to Screen Capture. Once you click the Screen Capture option, your computer screen will dim and your mouse will turn into a crosshair, which you can then use to select areas.
Note: You may find that when you move your cursor to one certain window, the window will be selected, and you can click on it to quickly screenshot that window.
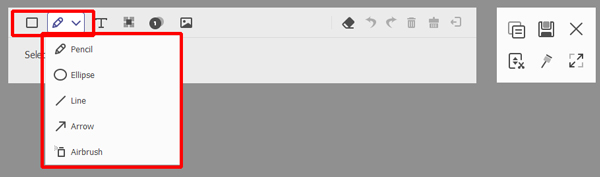
3. After you capture the screen area you want, editing tools will automatically emerge. You can use the Text to add notes, the Callout to de-label the serial number, the Brush to paint as you like, and the Blur to obscure information.
Then, you can click the Save option to preserve the screenshots.
Note: The provided settings include the option to take scrolling screenshots, copy screenshots, and pin the screenshots to the Mac computer screen.
OK, here is the complete process of using AnyMP4 Screen Recorder to edit screenshots on Mac computers. It is really practical in your study or work process. Download it to try it for free.
Preview is a built-in screenshot editor on Mac computers. It is highly popular because it enables Mac users to edit screenshots with ease. It provides multiple editing and annotation features through an intuitive interface, allowing you to easily crop, annotate, and manipulate your screenshots. Moreover, it provides multiple output formats, and you can choose from JPG, PNG, etc.
Now, follow us to see how to edit screenshots on Mac with Preview.
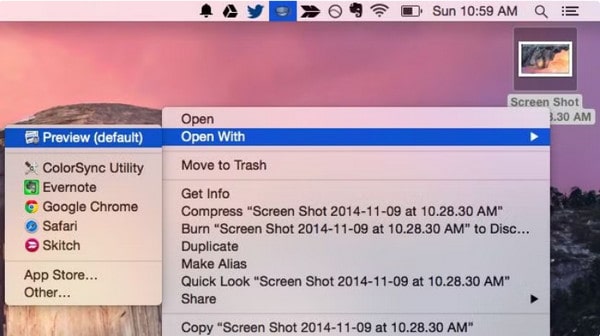
1. Double-click the screenshot and choose Preview to open the screenshot you want to edit.
Note: You can also open Preview first and load your screenshots onto it.
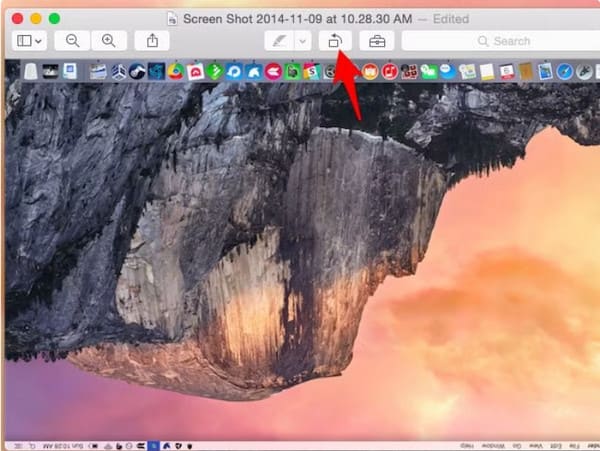
2. Choose the Markup Toolbar in the top right corner of the Preview window. You can see many editing tools and you can choose them to customize your images.
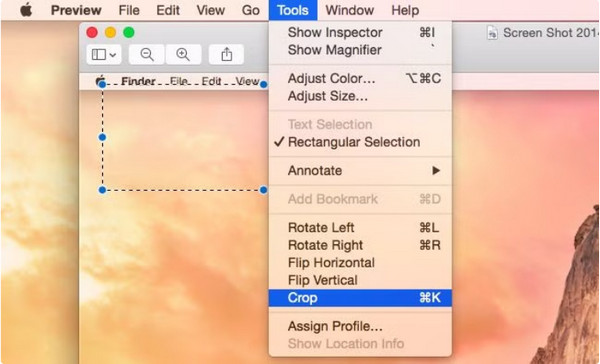
3. In addition, you can select the Tools option in the top menu bar, and there are multiple tools in its drop-down options, such as Show Inspector, Show Magnifier, Adjust Size, Crop, etc.
If you are a Mac user, Preview is quite a good choice for you to easily edit the screenshots to fit your needs without downloading another software. Follow this guide to try it.
Canva is a well-known editing software that enables you to edit a screenshot on a Mac online. It allows you to load your screenshots on it and use its diverse editing tools to edit them, including Crop, Adjust, Filters, and Effects. In addition, it provides a Compare feature to compare the screenshot effects before and after editing.
Follow us to see how do you edit a screenshot on a Mac with Canva online.
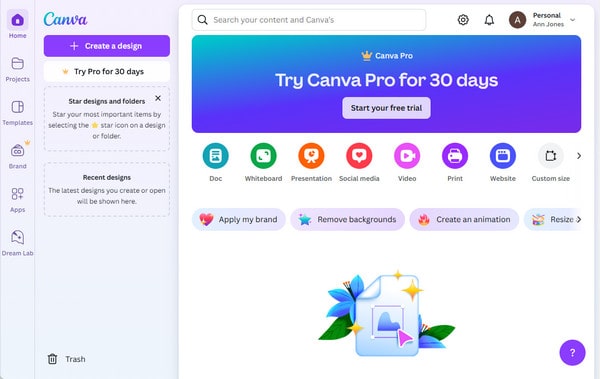
1. Search Canva on your browser and launch its official website. Sign up and log in to it. Click the Create a design option at the top left corner to enter the next webpage.
Note: Prepare the screenshots in advance and edit them with this tool.
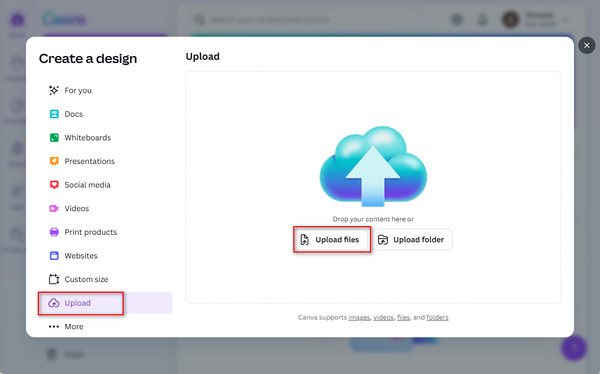
2. Choose Upload from the pop-up window and click Upload files to add the screenshot you want to adjust.
Note: You are allowed to input one or more pictures into this tool.
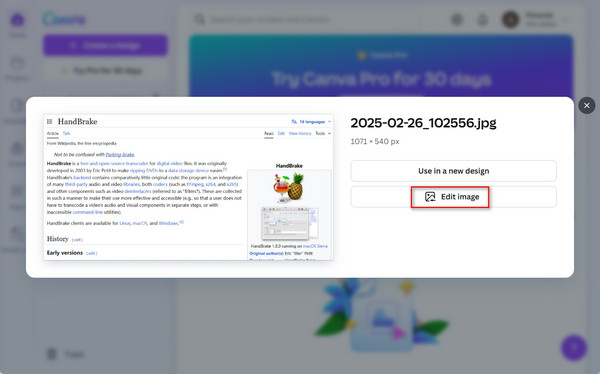
3. Then, it will show Use in a new design and Edit image two choices. You can select the Edit image choice to enter the editing webpage.
Note: If you add more than one image, you can click the three-dot icon at the top right corner of each picture and choose Edit image to adjust each picture.
4. There are various editing tools for you to edit screenshots, like Crop, Adjust, Filters, and Effects. After editing the screenshot, click Save > Download to export the screenshot.
Note: The screenshot will saved in your default download folder.

These steps are clear and easy to master with the easy-to-understand introduction and illustrations. With the user-friendly interface, you can learn how to use it easily. It is an easy-to-use online editor, and you can try it to edit your screenshots.
Today, we introduced you to how to edit a screenshot on a Mac in 3 easy ways. Each way has unique features. AnyMP4 Screen Recorder is an excellent tool that enables you to take screenshots and edit screenshots with it, and it provides diverse editing tools to meet your various needs. Preview is Mac built-in editing software that has multiple editing tools to facilitate your editing screenshots needs. Canva is an online editing tool that enables you to edit screenshots with ease.
You can try them and share your user experience with us.
 Posted by Riley Mitchell to Screenshot
More readings
 How to Blur the Background in Photo: Explained in 3 Ways
Want to add aesthetic beauty to your photos? Then, blur the background to highlight the subject. Learn here how to blur the background in a photo in three ways.
 Edit CapCut Background: Add, Remove, Blur, and White
Do you want to edit your image background with ease? Learn how to use CapCut tools with this full guide to add, remove, blur, or change the background to white.
 How to Crop in Preview to Edit Images Seamlessly
This article will serve as your guide to learning cropping in Preview on the Apple devices that you use. Additionally, we will explore one alternative for it.
 How to Remove Glare from Photo: 3 Tools to Clean Light Glare
Learn how to remove light glare from a photo using three different software in this detailed guide about cleaning pictures with overpowering light flares.