Are you curious why the error message Error: 50 - DISM appeared on your screen? This post will explain why you should run DISM in the Windows 10 recovery console and how to do it without getting this issue. This error message appears because you attempted to execute DISM from the Windows 10 recovery console with the /Online option selected. Only Windows operating systems that are currently running can be used to execute the DISM command with the Online parameter.
As a result, the command fails when executed from Windows 10 or any other Windows recovery console because the OS is not active there. This article will demonstrate two fixes for this problem message and how to run DISM correctly. The first approach demonstrates how to resolve this problem message without a Windows 10 installation disc.

Deployment Image Servicing and Management, also known as DISM, is a command-line utility. It can prepare, alter, and repair Windows installation images, including the images for Windows Setup, Windows PE, Windows Preinstallation Environment, and Windows RE or Windows Recovery Environment. System crashes and other issues are frequently fixed using DISM. However, upon executing any of the DISM commands listed below, some users saw an error 50 DISM does not support servicing Windows PE with the /Online option message:
Why does this mistake occur? The DISM utility mistakenly believes you are running the commands under Windows while using the program on a live operating system. A registry key that was misplaced is to blame for this. Furthermore, when customers attempt to run specific commands using this tool included with Windows 10, they receive the DISM 50 error. The operating system assumes that the location from which the command is executed is inside WinPE, which is the primary source of this issue or Windows environment pre-installation. A misplaced registry key is actually to blame for this Windows assumption.
You are all aware that DISM is typically used to prepare and refresh a Windows image, but it also aids in file repair when a system inspector identifies corrupted files based on the scan results. However, DISM error 50 hasn't been the subject of many recent user complaints. They have been running the DISM command on their machines, but they keep getting the same error message.
Refreshing the DISM tool is the first thing you may attempt if you encounter DISM error 50 on Windows 10. It's pretty simple
1. First, open the Run window by pressing Win + R. To launch Command Prompt as administrator, type cmd into the box and hit Shift + Ctrl + Enter. Copy the following command line and paste it into the Command Prompt. Dism.exe /image:C: /cleanup-image /revertpendingactions should be run by pressing the Enter key.

2. To start System Configuration, open the Run dialog and enter MSConfig. Then choose Network under the Boot menu, and tick the Safe Boot box. You'll need to restart the computer after clicking OK. You only need to click Restart to enter Safe Mode.
3. Open Command Prompt with administrator privileges in Safe Mode. Enter the command sfc /scannow after that. You must be patient as this may take some time.
You can exit Safe Mode with your computer when it's finished and see if the DISM error 50 has been resolved. If it still exists, you should try the next fix.
Deleting the related registry key is another remedy for DISM error 50 on Windows 10. Here are the specific actions.
1. First, open the Run window. After that, type regedit and press OK to open Registry Editor. Find the following path by navigating to it: HKEY LOCAL MACHINE\SYSTEM\CurrentControlSet\Control.
2. Right-click the MiniNT folder in the left pane and choose Permissions. In the pop-up dialog box, under the choice of Group or user names, choose your username. The Full Control permission should then be checked.
3. To save the changes you've made, click OK. Next, choose Delete by right-clicking the MiniNT key once more. In the confirmation window, select Yes.

Your computer can now be restarted, and you can use Command Prompt to see if DISM problem 50 has been fixed.
As an additional solution, you might need to restore BIOS to the original settings if you have tried all the remedies but still receive the message that error 50 DISM does not permit servicing Windows PE with the /Online option. You should always reset the BIOS by following the manufacturer's documentation and instructions because the specific processes vary from computer model to model. Additionally, exercise caution when carrying out the process to prevent data loss. If you are unfamiliar with the BIOS, seek assistance from a qualified individual.

In the next solution, which most users preferred to follow. They say we need a great tool to assist you in scanning and quickly to recover the missing or inaccessible data if they are lost due to system damage, system crash, or system format like the DISM error-50 in Windows. Therefore, we can use AnyMP4 Data Recovery with this issue if we are talking about a tool. That is because this tool possesses any feature we need to ease the problem on your Windows computer. Let us continue reading to learn the things it can offer to us.
Recommendation
1. Please download the AnyMP4 Data Recovery on your Mac.
Secure Download
Secure Download
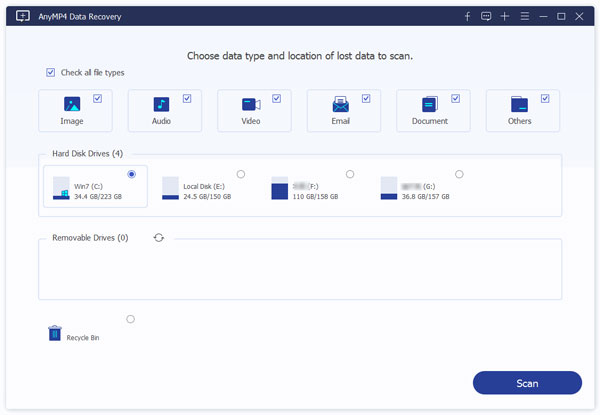
2. After that, tap the hard drive and the data you wish to recover. Select Scan to proceed after that.

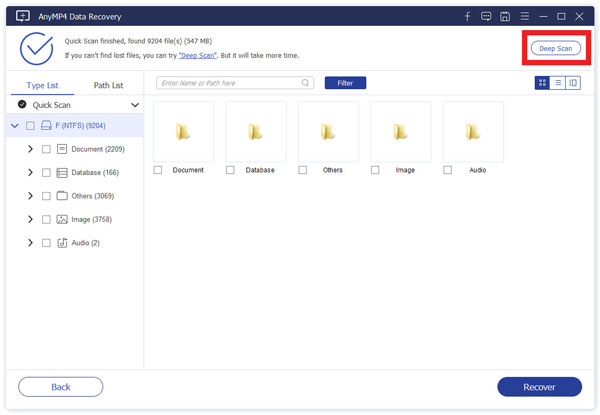
3. The preliminary scan happens quickly. If you can't discover the necessary files, click Deep Scan. Additionally, our program will locate the files more precisely a second time. Make sure to locate the corrupt file that has to be recovered on your PC.

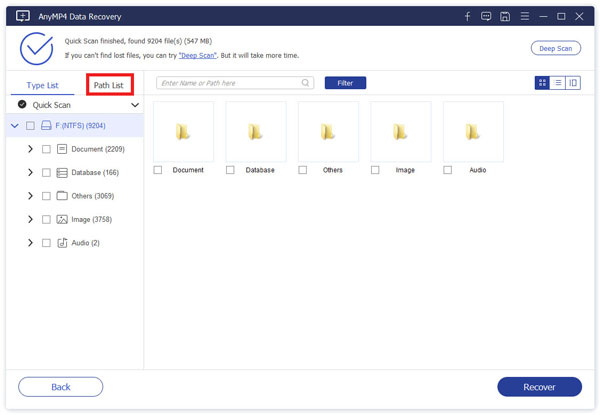
4. The information will soon be displayed and arranged by kind on the left bar. Additionally, you can view them by choosing the Path list option in the path's order menu.

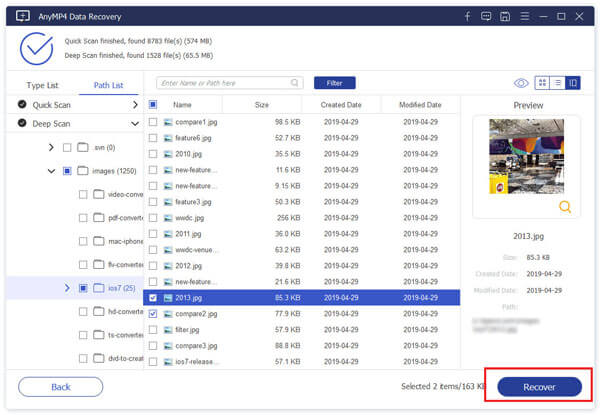
5. After double-checking the files, you want to recover, click Restore to download them to your computer.

Using AnyMp4 Data Recovery to fix DISM Error-50 on our Windows involves just a few easy steps. We can see that using it is simple. Because of this, you can use it right away to address your issue.
1. How can you fix DISM such that the online option is not supported when servicing Windows PE?
The error message DISM does not support servicing Windows PE is typically connected to a particular user account. You can create a different user account and log into your computer to prevent this problem. It is only one of the solutions you can apply and is also common yet practical for many users.
2. Are files deleted via DISM?
As it is being installed, the DISM utility checks your machine for errors and corrects them. Any problems that the tool discovers or resolves are recorded in a log file that is created. None of your apps or data will be impacted.
3. SFC or DISM, what should I run first?
According to the experts, we need to execute SFC first, and only run DISM if SFC identifies a problem. Run SFC initially, and DISM should follow, regardless of what SFC reports.
4. How long will DISM require?
Depending on your system and the number of corrupted files, it may take up to ten minutes or longer to begin working after you put it to work. After the scan is finished, you can restart your PC for a clean start.
The DISM component actively refreshes and prepares the image to repair damaged files. Because of this, any malfunction of this instrument is unacceptable. As a result, we talked about how to fix DISM error 50 on a Windows 10 machine. We hope they work for you, so you may resume enjoying DISM operation.