User Guide
Get Started
Download & Install
Download Video Converter Ultimate software from the official page and then follow the on-screen instructions to install it on your Mac. After the successful installation, you can add it to your Application folder on Mac, and launch it and start the next process.
Register
The free trial version of AnyMP4 Mac Video Converter Ultimate has limited features. To enjoy this software fully, you are recommended to register it.
Click the Help menu and choose Register… from its drop-down menu to enter the Registration window.
Alternatively, you can click the Register icon (a lock image) in the top menu directly.
Then just enter your email address and registration code in the register window and click Activate to register it successfully.
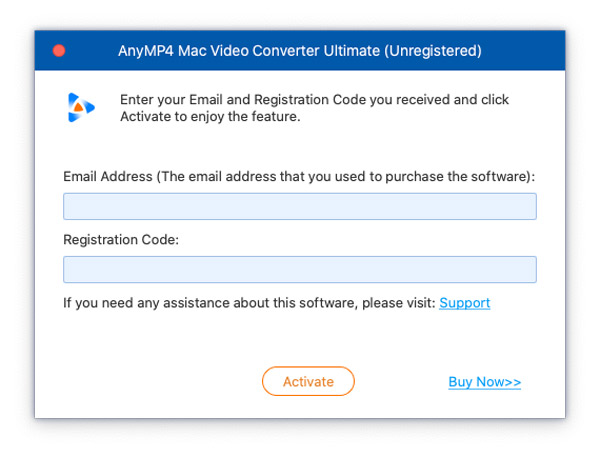
Email Address: The Email address is the email that you used to purchase this product.
Registration code: A string of characters marked as Activation key, registration code or others, license code, or KEYCODE(S) in the order confirmation letter you received after the successful purchase.
Update
AnyMP4 Mac Video Converter Ultimate always updates to fix some bugs and brings new features to users.
Check the following 2 methods to update Mac Video Converter Ultimate to make it up to date.
Update Mac Video Converter Ultimate manually
Go to the Help menu and select Check Update… If there is an updated version, this software will detect it automatically and you just need to download and install it.

Update Mac Video Converter Ultimate automatically
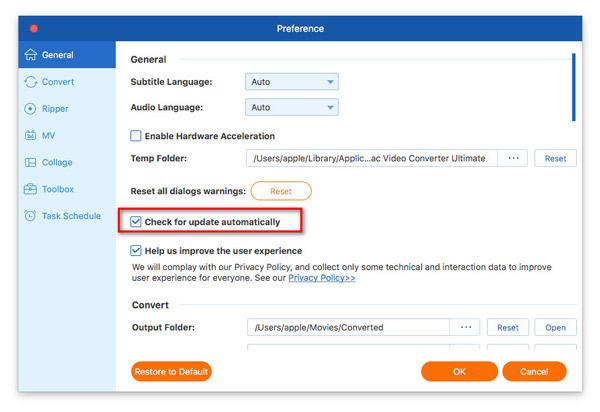
Mac Video Converter Ultimate can also update automatically if you enable the option. Click the product icon, and find Preferences from the drop-down option, check the box of Check for updates automatically in the General tab. Then, you’ll get a message when an update is available.
Preferences
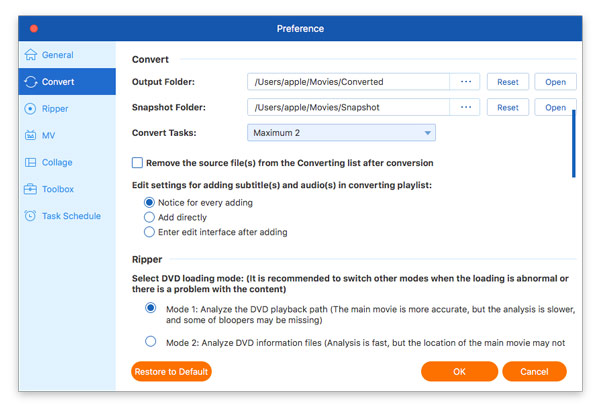
AnyMP4 Mac Video Converter Ultimate offers you some preferences to use this software. Click the product icon menu, and find Preferences. Then you can make the preferences for General, Convert, Ripper, MV, Collage, Toolbox, and more.
Convert Video/Audio
AnyMP4 Mac Video Converter is a one-in-one video converter. It can convert over 500 formats on Mac easily.
Step 1 Click Add Files to choose to add the media files or the whole video or audio folder. This software also supports the drag-and-drop feature, which lets you import the media files into this program directly.
Or directly drag multiple video and audio files to this program.
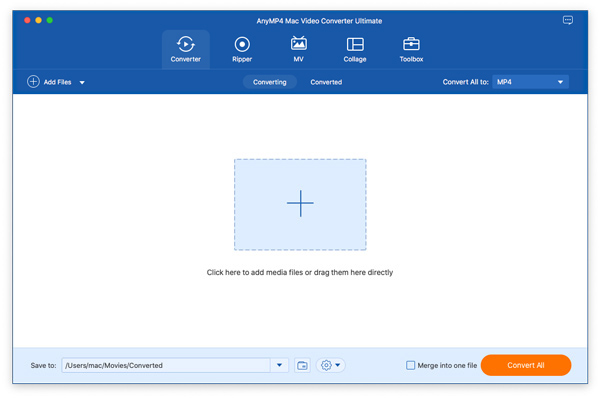
Step 2 Select the drop-down option of Convert All to, and find the output video or audio format you need.
Step 3 Confirm or change the path of the converted files at the bottom-left corner, and click the Convert All button to start converting video and audio on Mac.
Rip Homemade DVD
AnyMP4 Mac Video Converter Ultimate works a DVD ripper to convert DVD to ISO, folder, and other digital formats. Now, check the steps.
Please DO NOT use our software to rip rental DVDs or back up DVD for commercial use!
Step 1 Load DVD file
Run Mac Video Converter Ultimate on your Mac, and make sure it is located in the Ripper tab.
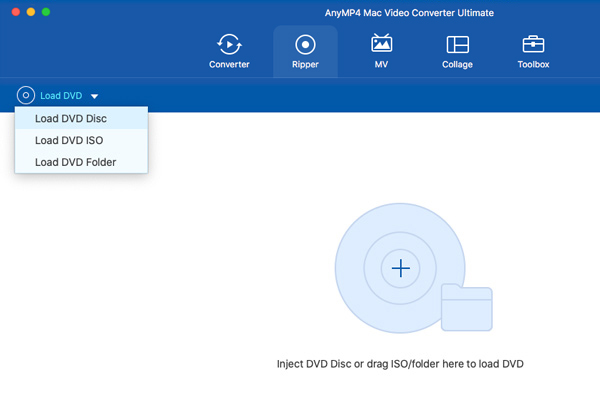
Click the Load DVD drop-down to choose to load the DVD disc, ISO file, or DVD folder.
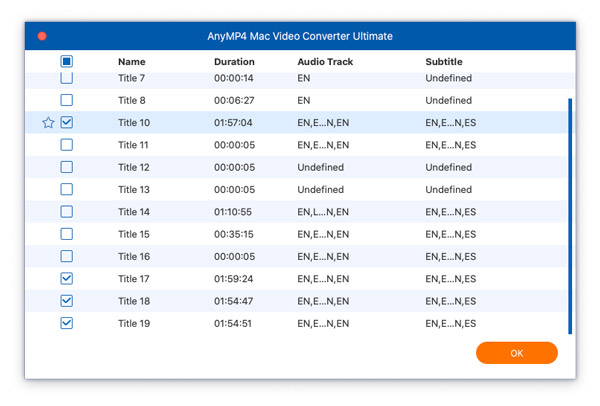
Then this software will load the main title from your DVD file automatically. You can click the option of Full Title List to select the DVD titles as you wish.
Step 2 Select output format
The default output format for this DVD ripping is MPG Lossless, which can preserve the lossless output quality, and keep the original structure of your DVD.
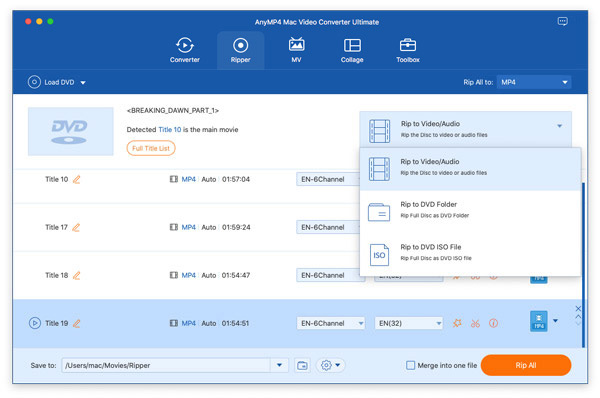
If you want to rip DVD to digital formats for easy playback on devices, just find the drop-down option of Rip All to to select the output format you need.
It offers you 3 options: Rip to Video/Audio, Rip to DVD Folder and Rip to DVD ISO File.
Rip to Video/Audio: It means this software will convert DVD to other digital video and audio formats like MP3, MKV, MP4, MOV, MKV, etc.
Rip to DVD Folder: It shows you will save your DVD disc as a DVD folder.
Rip to DVD ISO File: It will export your DVD disc to an ISO file.
The recommended digital format is MPG Lossless, which can save all the original quality and factors of DVD movie.
Step 3 Edit DVD movie optionally
Before you rip a DVD movie, you can use the Edit function optionally.
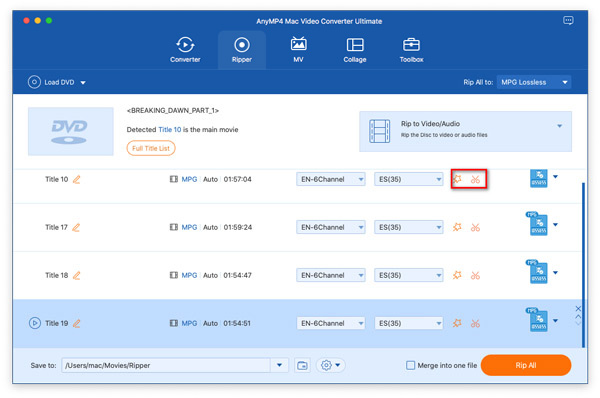
Then you can clip, merge, rotate, crop, filter, watermark, edit audio tracks, edit subtitles, and more for your video file.
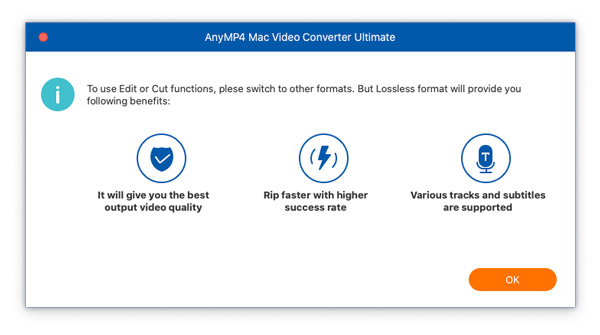
But you should also notice that you will have to convert DVD to other digital formats for further editing.
Step 4 Rip DVD to video/audio
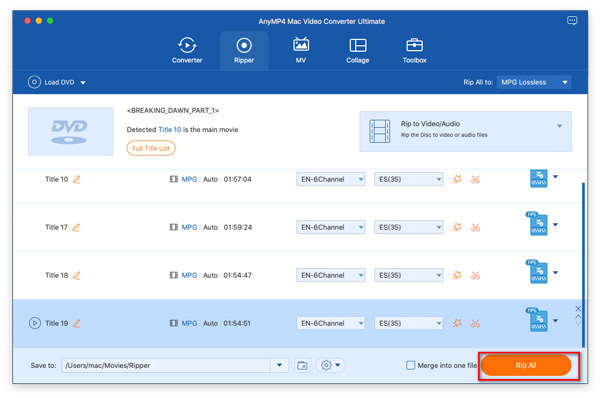
Once you make all the settings for the DVD movie, just click the Rip All button at the bottom-right corner to start ripping.
Make Movies
Creating MVs with photos and videos is what AnyMP4 Video Converter Ultimate can help you exactly. With it, you can put your videos, photos, and audio into a movie quickly with the ready-made templates.
Step 1Add files
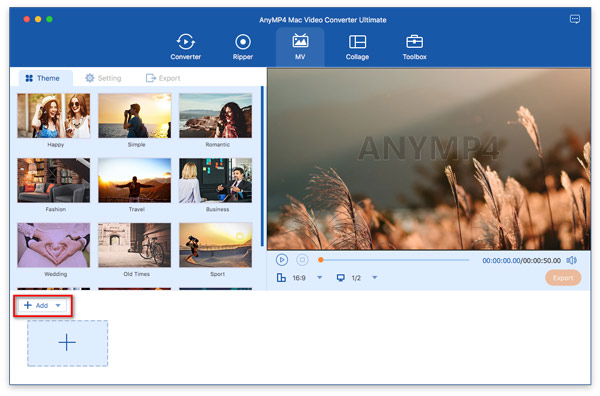
Open Video Converter Ultimate on your Mac, navigate the MV tab and click the Add button to import photos and video clips from your Mac. You can drag and drop the files from your drive into the timeline editing.
Step 2Edit the videos
After loading the files, you can start editing your files with the tools above the timeline.
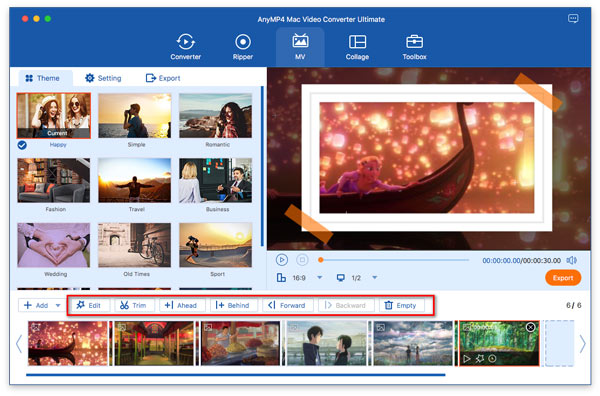
Edit video effects
The Edit icon lets you rotate, crop, watermark, edit subtitles, edit audio tracks, and adjust the effects and filters for the files you added.
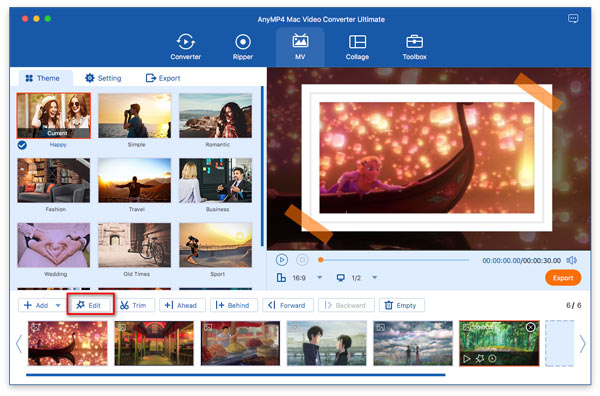
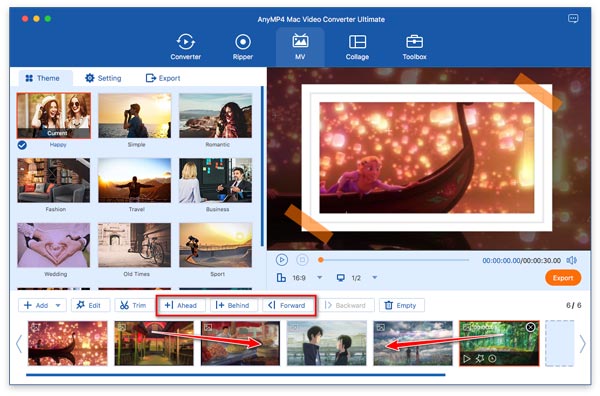
Rearrange the order
rearrange the order of the videos and photos by hitting on the Behind or Forward button, or just drag and drop them to place in the right order.
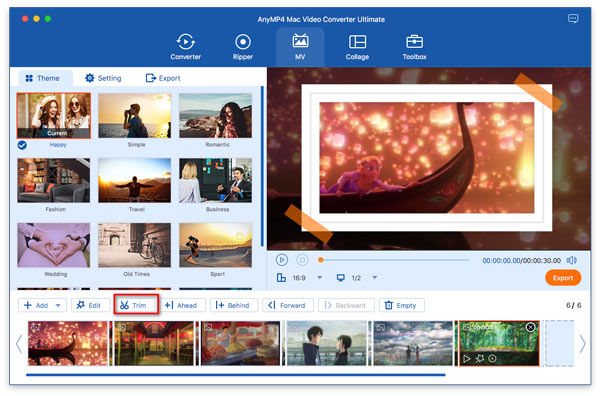
Trim videos
If you need to short a video file, just select the video you want to trim, and click the Trim or Edit button to make adjustments.
Step 3Choose an MV theme from the templates
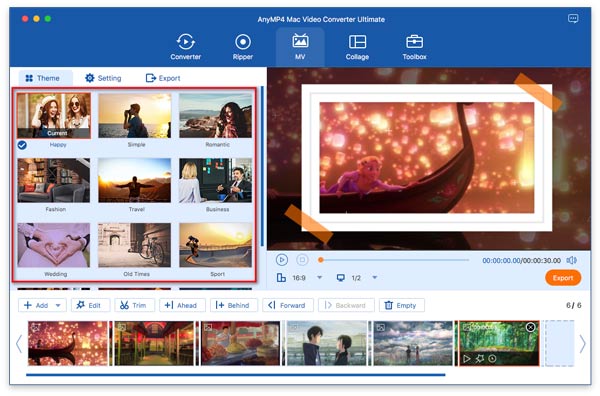
Then, choose a theme for your project by going to the Theme section from the left pane. You can preview the MV effect through the real-time window on the right side.
Step 4Make output settings
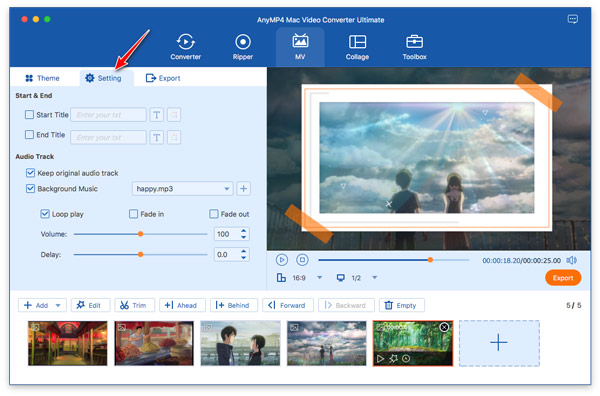
Head to the Setting section, where you can edit the MV starting and ending title, background audio track, playback settings, and more.
Step 5Export MV
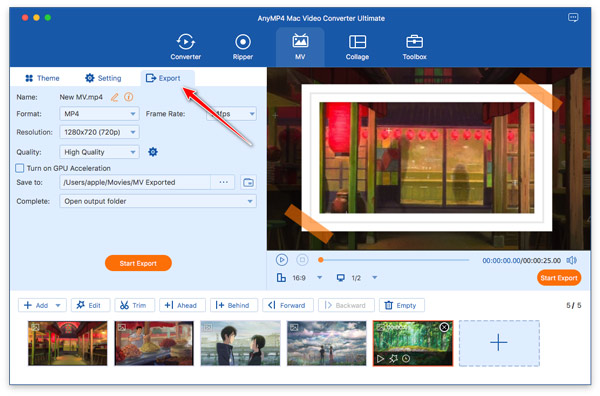
Finally, go to the Export section. Here you should give the MV file a name, choose the output format and resolution, select the location to store the file, and enable GPU Acceleration optionally. Once the configuration is done, click Export to produce your movie.
Collage Videos and Photos
To create multi-screen for a video by putting more videos and photos together. You can create the split-screen side by side easily.
Step 1Go to Collage
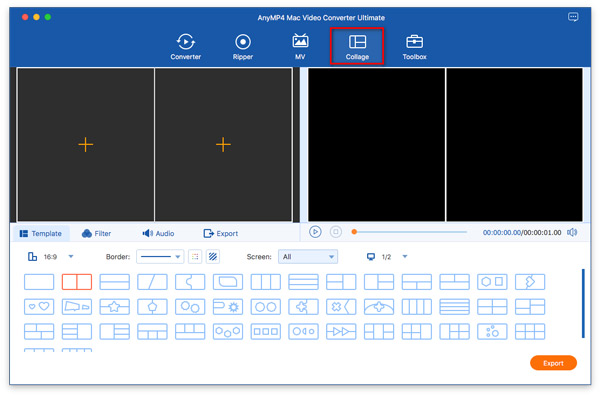
Launch Video Converter Ultimate on your Mac. Head to the Collage tab.
Step 2Choose split-screen mode
Then over 44 split-screen templates are available for you. It lets you add over 12 videos at one time to combine one screen. Click the split-screen mode to use it.
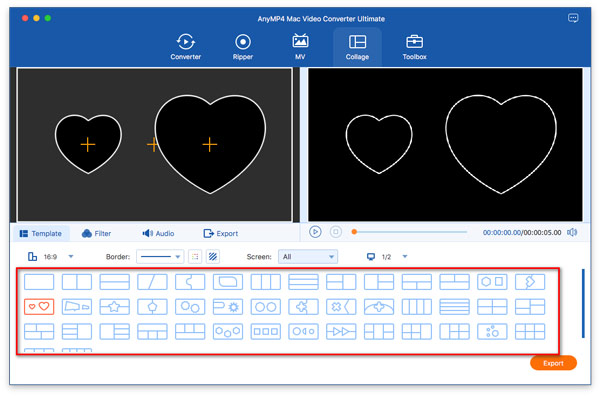
Step 3Add the videos and images
Add the video or photo one by one on the screen by dragging and dropping, or clicking the Add button (a plus icon). Then you can move the item to adjust the position by dragging it.
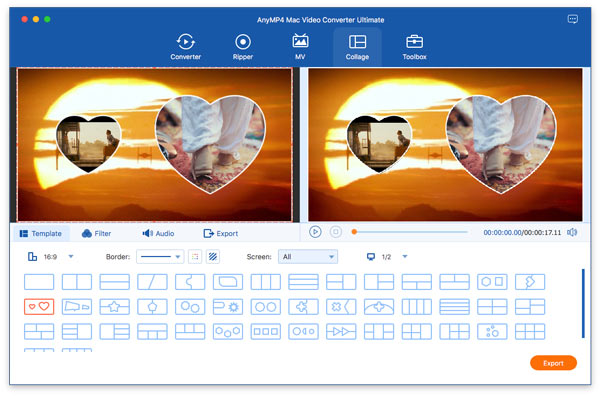
Step 4Edit videos and pictures for each screen
To create a quick split-screen video file, just move to step 5. Or you can edit the video effects in details for each separate screen.
Edit each video file
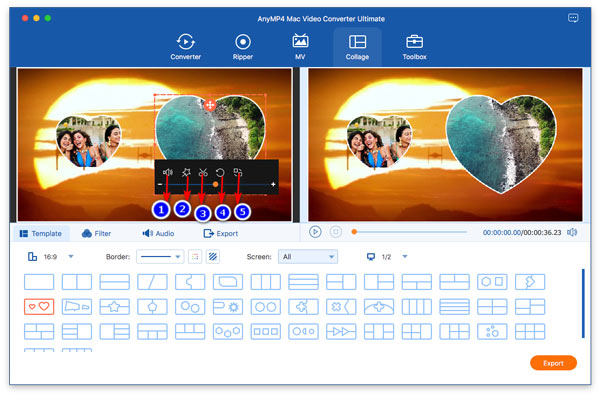
1. Disable Audio Track: Once you select the option, the background audio of the screen video you selected will be silent.
2. Edit: Once you click the option, you will be directed into the video editing window, where you can crop, rotate, watermark, add filters, and edit subtitles and audio tracks.
3. Cut: This option will trim a video file into clips and cut unwanted parts from a video file.
4. Reset: This option will reset all the changes you made to the original one.
5. Replace: Change the select file and replace it with the other file.
Edit picture before splitting screen
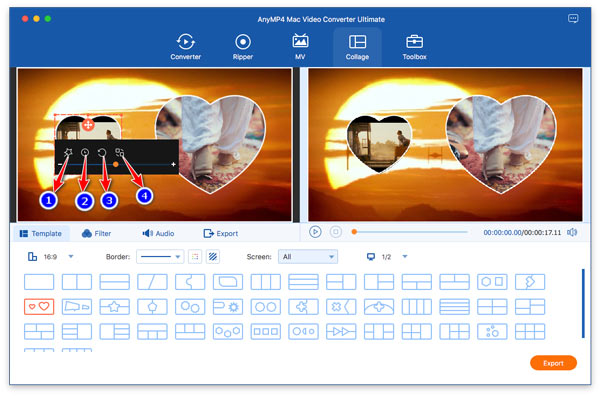
1. Edit: This option will let you edit your picture to crop, rotate the photo, crop it to suit your screen, and add the filter and effects.
2. Duration: You can set the photo duration time through this option.
3. Reset: This option will reset all the changes you made.
4. Replace: You can replace it with another image on the selected screen.
Step 5Edit the whole screens
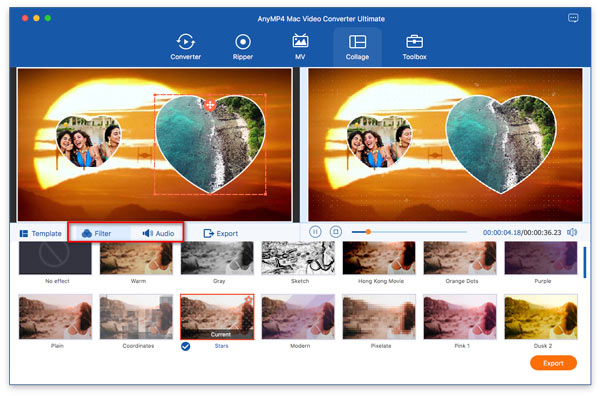
If you do not have any needs to customize every separate screen, just click the Filter and Audio options to edit the filter effects and choose the audio track for the one video file for all the screens.
Step 6Export a split-screen video
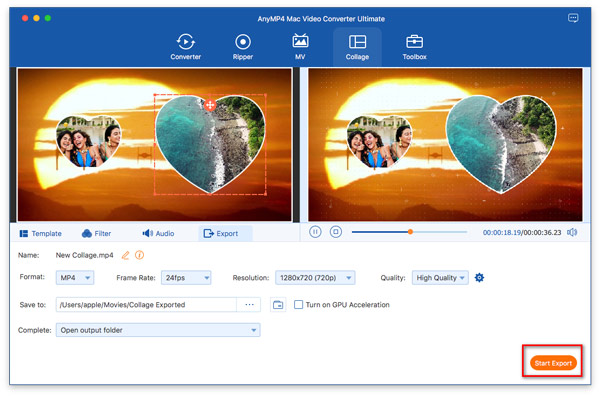
While all the settings are made well, just go to the Export tab.
Here you should select the output format, resolution, quality, and location to save the split-screen video. Finally, click Start Export to create a video file with multiple screens.
Edit Video/Audio
AnyMP4 Mac Video Converter Ultimate offers you some versatile video editing features.
Trim & Split Video/Audios
You can trim a video to keep wanted parts or split one video file into several clips.
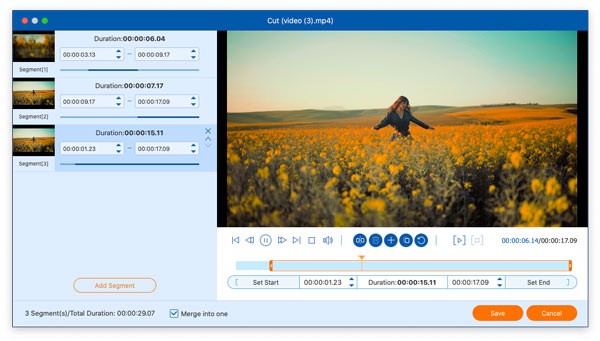
Step 1 Select a video file in the main interface and click the Cut icon.
Step 2 Choose the starting and ending time by moving the progressing bar or set the time value.
Step 3 Click the Add Segment button to add the current clip to the list. Or click the Split button to split one video file into 2 clips. You can use the copy and paste feature to paste a new clip.
Step 4 In the end, click the Save button to confirm the changes you made.
Rotate & Crop Video
If you have a sideways video recording, let Mac Video Converter Ultimate rotate it correctly.
Step 1 Find the Edit icon in the main interface of the video file, and click it to enter the Rotate & Crop window.
Step 2 Here you can rotate a video in 90 counterclockwise and 90 clockwise to make a sideways video correct.
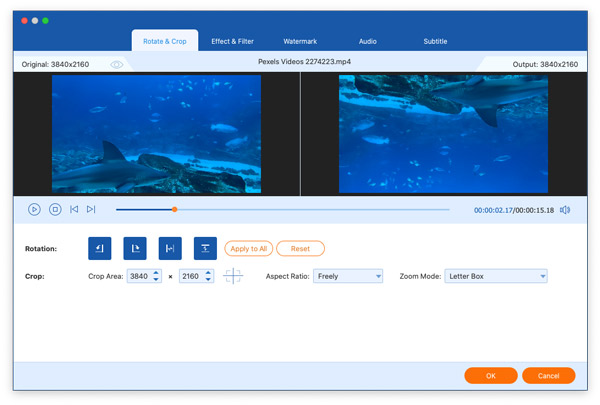
Besides, this software lets you flip a video vertically and horizontally to watch a video according to your habits.
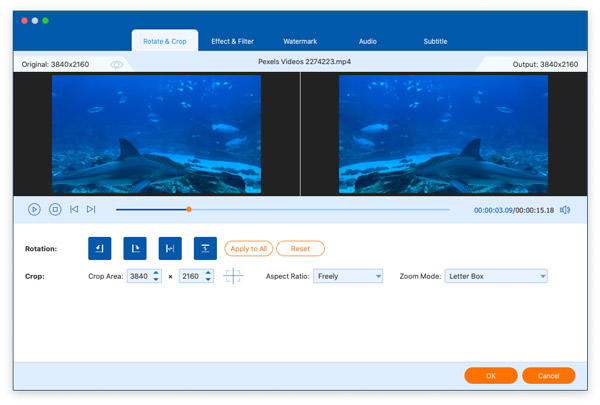
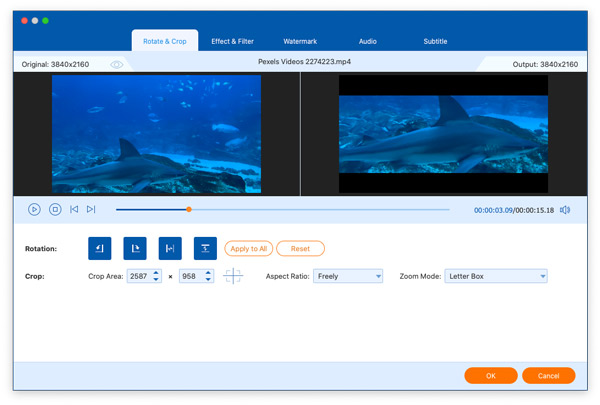
Step 3 For a video with a black edge, you can use the crop feature to zoom in it. Just drag the yellow frame or adjust the Crop Area value to confirm the cropping area.
You can set the crop ratio in 4:3, 16:9, 21:9, 16:10, 5:4, 1:1, and 9:16. Moreover, 3 zoom modes are available for you, Letter Box, Pan & Scan, and Full.
After making all the settings, click OK.
Adjust Video Effect & Filter
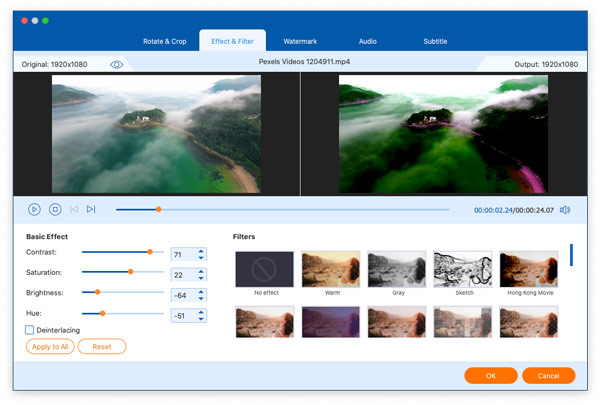
You can change brightness, contrast, saturation, hue adjustment and apply the filters to your videos.
Step 1 Click the Edit icon and find Effect & Filter.
Step 2 Move the slider in the section of Basic Effect to adjust the video Contrast, Saturation, Brightness, and Hue.
Besides, the filter effects on the right pane are optional for you to apply.
Step 3 Click the OK button to save the changes.
Watermark Videos
To specify your video, you can add a text or image watermark to it.
Step 1 Click the Edit icon and then choose Watermark.
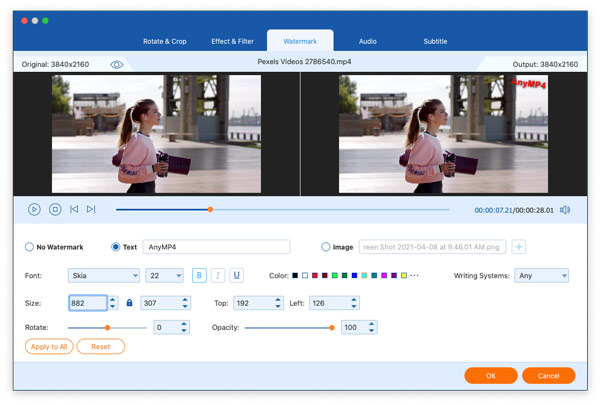
Step 2 Check the box of Text or Image to enter the text or upload an image to set your video watermark.
You can adjust the text fonts, colors, size, position, opacity, and styles. Then place the text watermark anywhere on the video.
Edit Video Subtitles
Mac Video Converter Ultimate can also let you adjust the video subtitles for the video files.
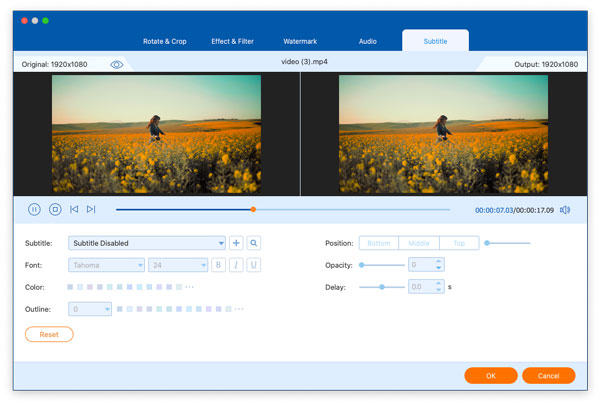
Step 1 Click the Edit icon and then choose Subtitle.
Step 2 To remove the subtitle from a video file, just select Subtitle Disabled from the drop-down option of Subtitle.
You can select one subtitle for the video from the drop-down list. The plus button allows you to add the subtitle file (*.srt; *.ssa; *.ass) from your Mac.
Do not forget to adjust the position, font, color, transparency, delay time, outline, and more for the subtitle.
Step 3 Click OK to save the adjustments.
Edit Audio Tracks
For those videos without a synchronized music file, you can edit the background audio and replace it with the one you want.
Step 1 Click the Edit icon and then choose Audio.
Step 2 Select the drop-down option of Audio Track to select one from the multiple audio tracks.
If you do not want them, just select Audio Track Disabled, which can silence your video.
Besides, you can click the add icon to add one or more audio tracks from your local drive.
The volume and delay time are also feasible for you to adjust.
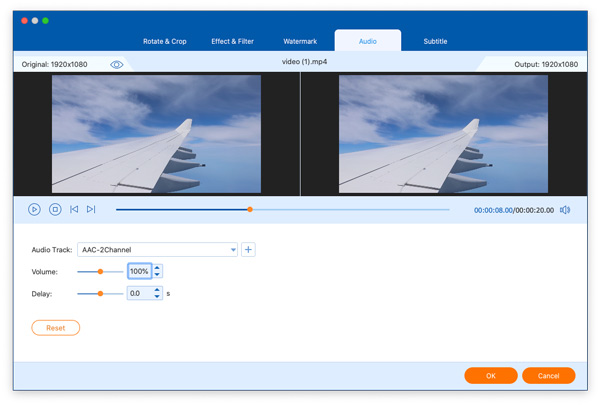
Step 3 Click the OK button to save your settings.
Merge Videos
For short video clips, you can use the merge feature to combine them into one long file.
Step 1 After adding all the video clips into this software, move the file to put it in order.
You can also click the arrow-down or arrow-up icon to move their order.
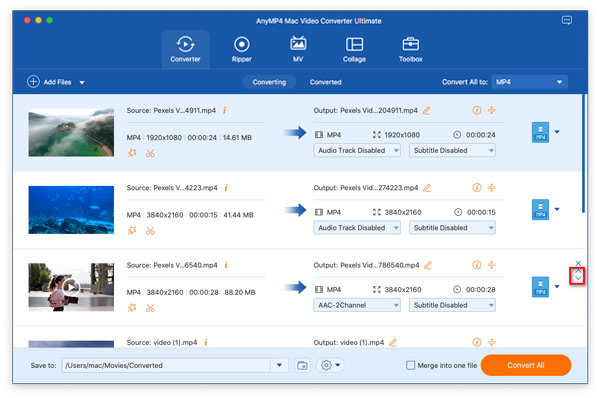
Step 2 Select an output format for the merged video by clicking the drop-down option of Convert All to.
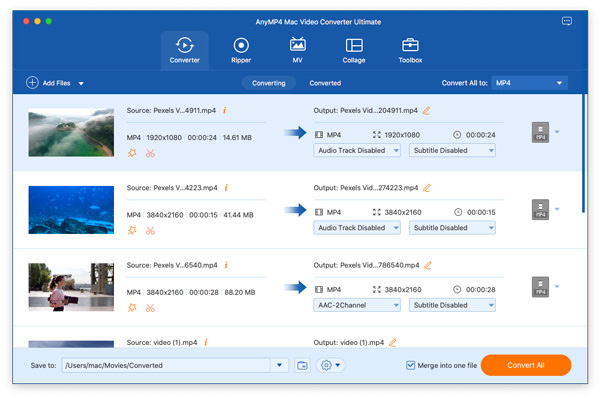
Step 3 Check the box of Merge into one file, and click Convert All. Then the software will convert and combine all the added files into one.
Toolbox
Media Metadata Editor
Media Metadata Editor is the tool that lets you edit your video and music information as you like.
Step 1 Click the Toolbox tab, and select Media Metadata Editor.
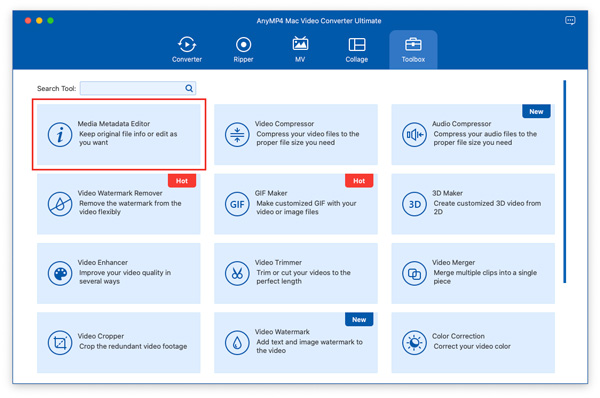
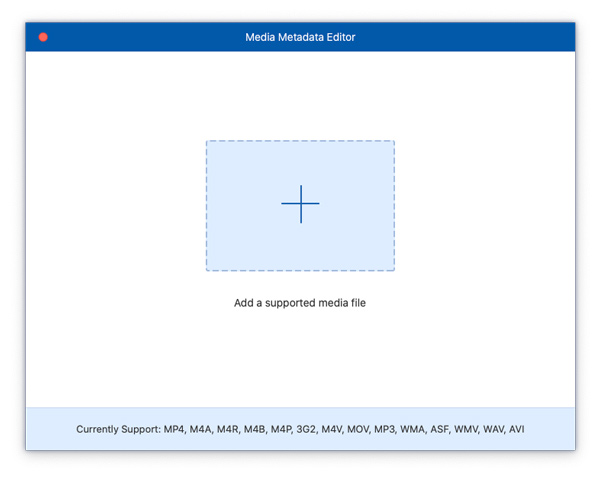
Step 2 Add a video file like MP4, M4A, M4R, M4P, 3G2, M4V, MOV, MP3, etc.
Step 3 Edit the video or music information like title, artist, album, composer, genre, track, comments, and upload or snapshot from the video file.
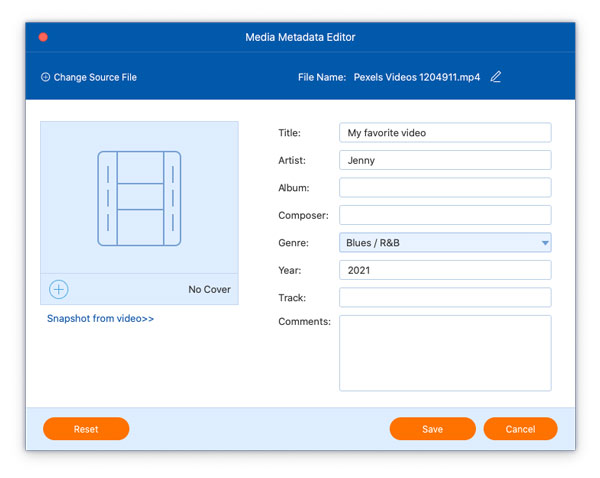
Finally, click Save to create a video file with metadata information edited.
Video Compressor
You are able to compress a large video file into a smaller one for Email, messenger, and other services.
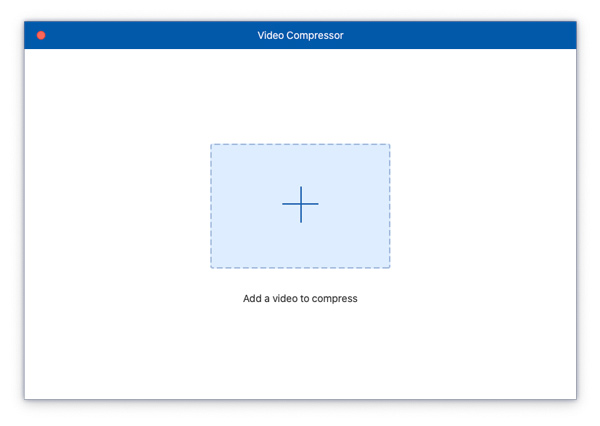
Step 1 Select Video Compressor in the Toolbox tab.
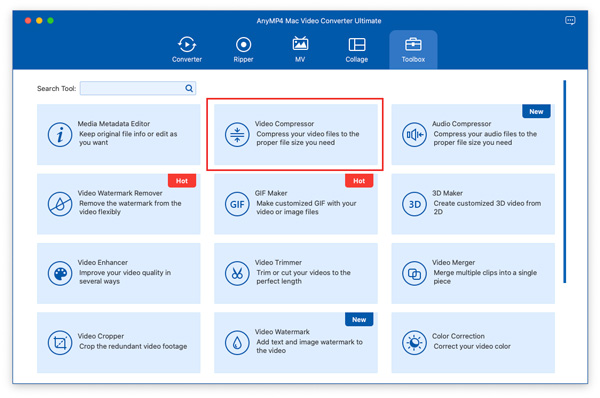
Step 2 Click the plus button to add one video file.
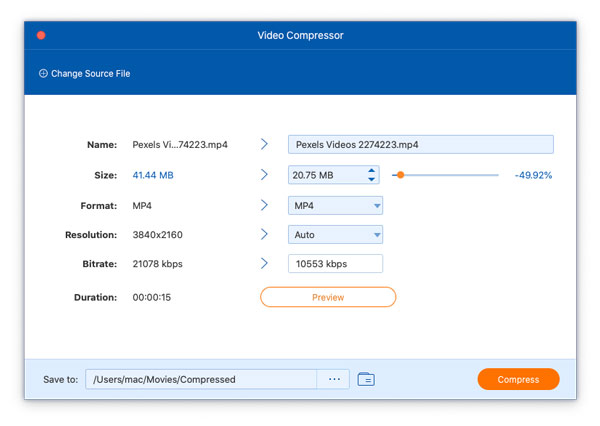
Step 3 Adjust the video size, format, and resolution to compress your video file.
The Preview button lets you watch the compressed video effect in real-time.
Step 4 Choose the path to save your compressed file, and then click the Compress button to start reducing a video file size.
GIF Maker
To create interesting GIF animation, you can try GIF Maker.
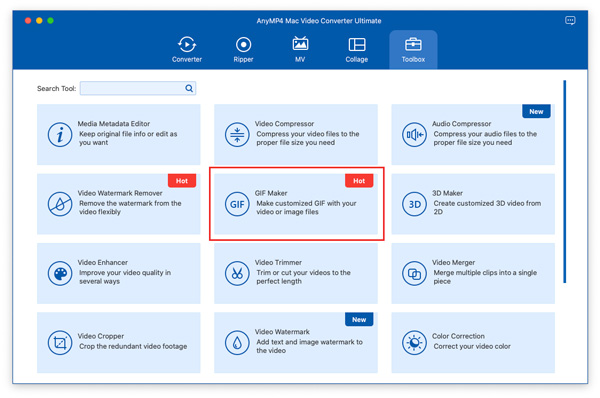
Step 1 Select GIF Maker from the Toolbox tab.
Step 2 Add a video or a picture to GIF Maker.
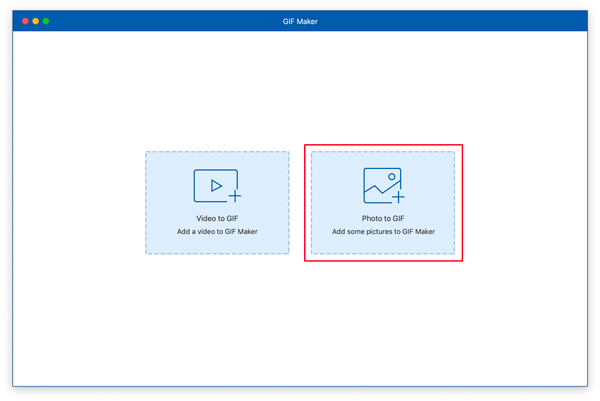
If you want to create a GIF from a video, you can choose Video to GIF.
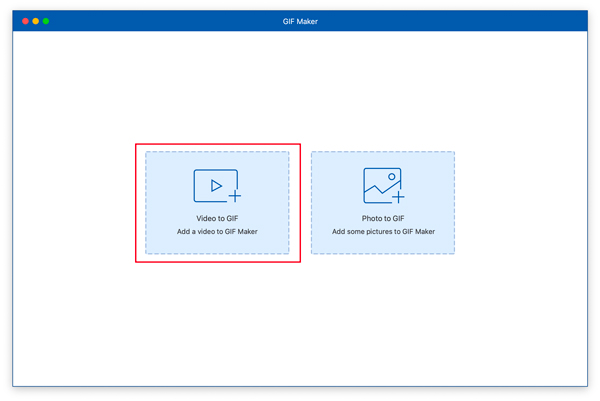
If you need to make a GIF from photos, you can select Photo to GIF.
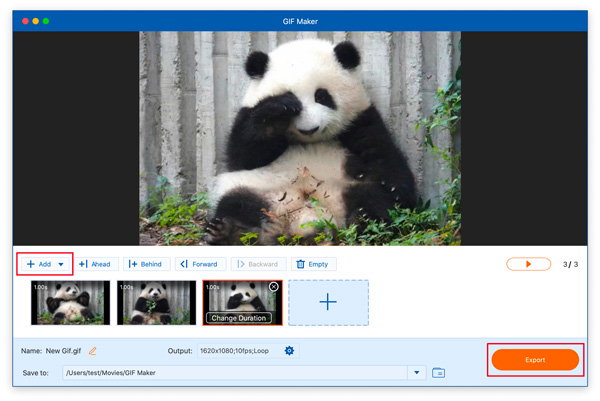
Step 3 When you make a GIF from a video, you can set the output video size, frame rate, loop option, and use the Edit or Cut feature optimally to create a short-length GIF image.
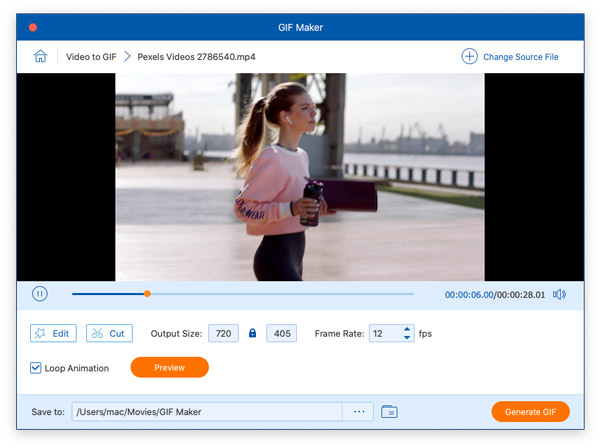
When you make a GIF from photos, you can click the Add button to add more photos.
Step 4 Click Generate GIF to create your animated GIF from a video. Click the Export button to make your GIF from photos.
3D Maker
To make 3D movies for your VR, Mac Video Converter Ultimate can help you exactly.
Step 1 Select 3D Maker from the Toolbox tab in the main interface.
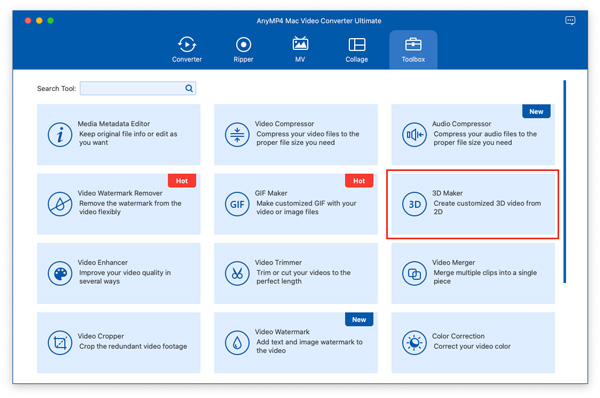
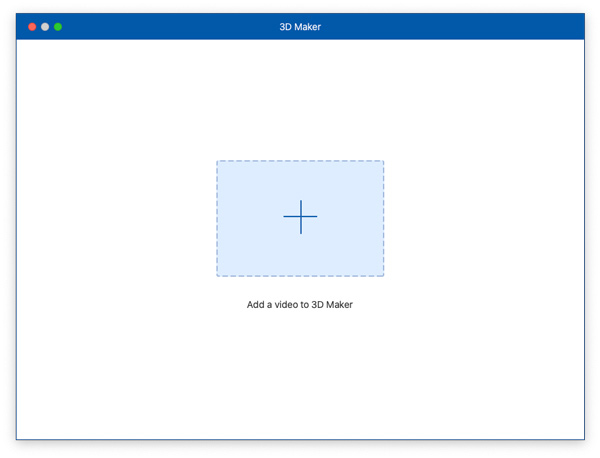
Step 2 Click the big plus button to add a video file.
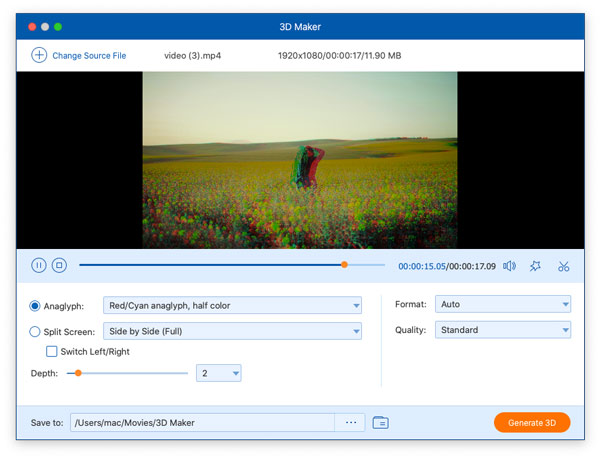
Step 3 Then, you can either choose to apply anaglyph to your video, or split the screen of your file. After that, select your preferred format and quality, and then click on the Generate 3D button to create an amazing 3D movie.
Video Enhancer
To optimize the video quality, you should try Video Enhancer.
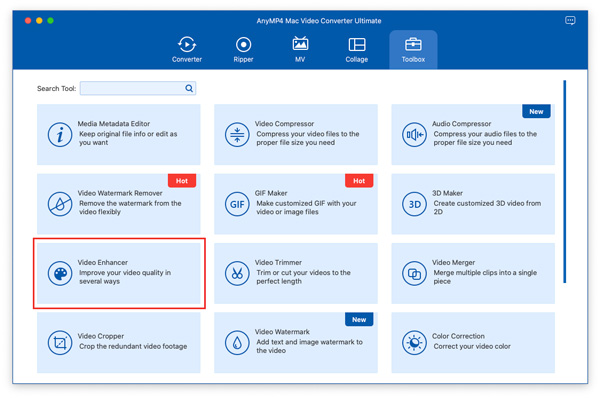
Step 1 Select Video Enhancer from the Toolbox tab.
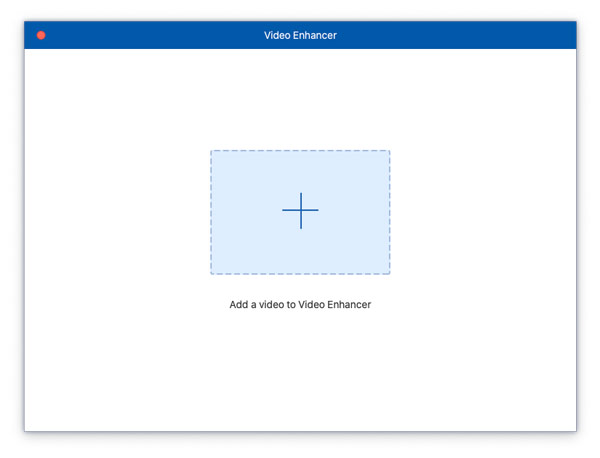
Step 2 Click the big plus button to add one video file that you want to improve the video quality.
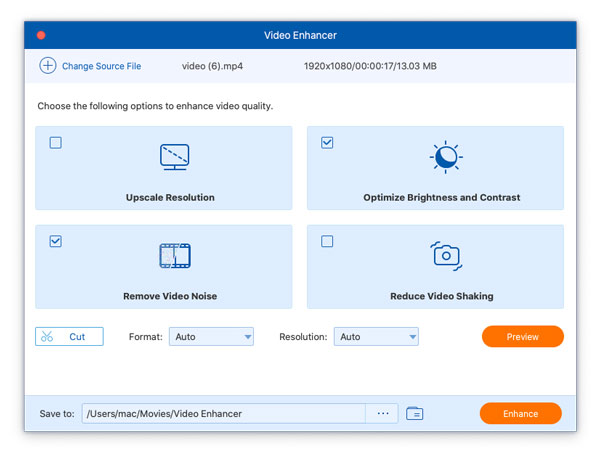
Step 3 The feature can improve video quality in 4 ways: Upscale Resolution, Remove Video Noise, Optimize Brightness and Contrast, and Reduce Video Shaking.
Enable some of the options above to boost your video quality depending on your needs.
Step 4 Choose a video output format, resolution and preview its effects optionally.
In the end, click the Enhance button to save it to your computer.
Audio Compressor
You can use Audio Compressor to compress audio without quality loss and format limitation.
Step 1 Choose Audio Compressor from Toolbox.
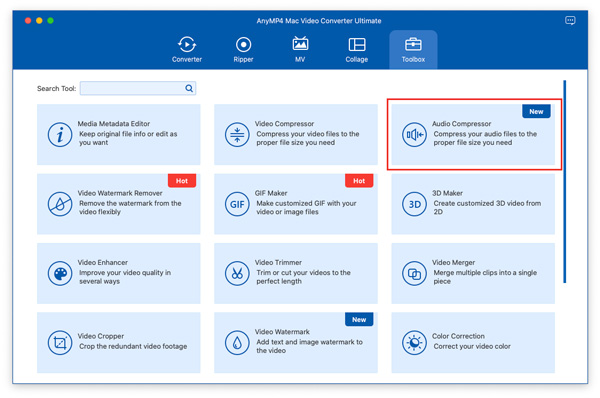
Step 2 Click the plus sign to import the audio you want to compress.

Step 3 Then you can slide the Size bar or input the size number you need to compress your audio.
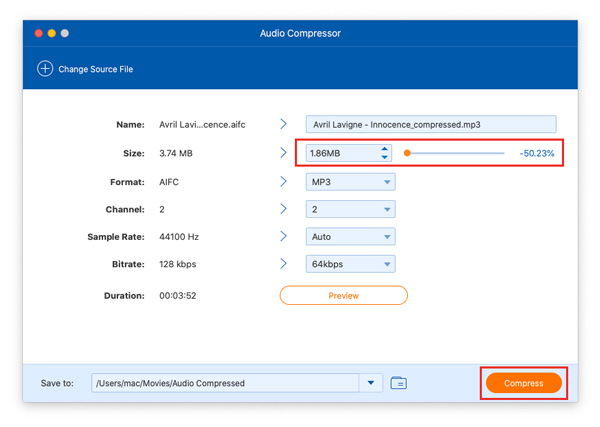
Step 4 Finally, click the Compress button finish the audio compression.
Video Watermark Remover
Video Watermark Remover enables you to erase any watermarks from videos with ease.
Step 1 Go to the Toolbox tab and select Video Watermark Remover.
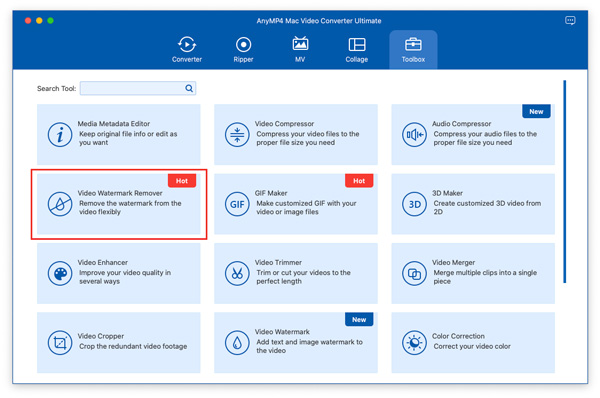
Step 2 Import the video by clicking the central plus sign.
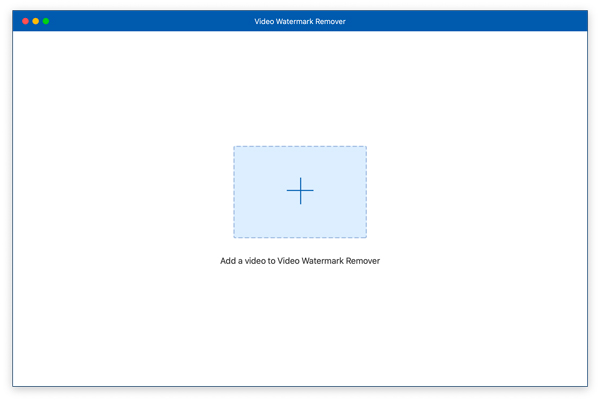
Step 3 Click on the Add watermark removing area button to select the area of the watermark on your video.
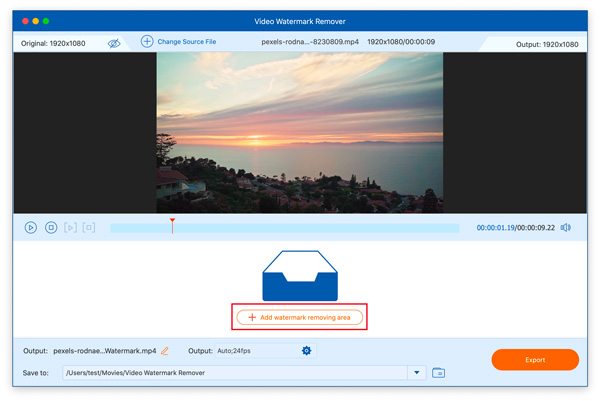
Step 4 When selecting the watermark area, you can change the area size and position based on your needs.
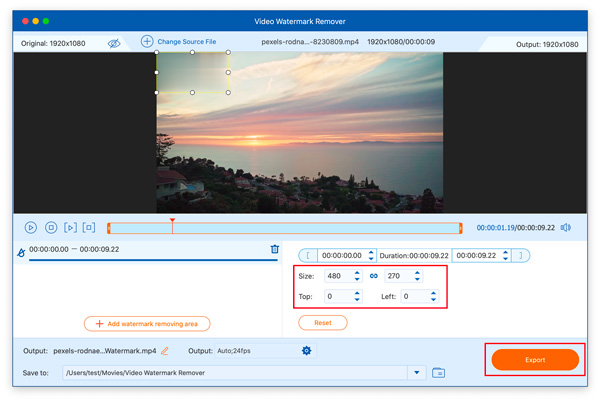
Step 5 Click the Export button to output the video without watermarks.
Video Trimmer
In this function, you can cut off the unwanted part from your video easily.
Step 1 Enter Toolbox and choose the Video Trimmer function.
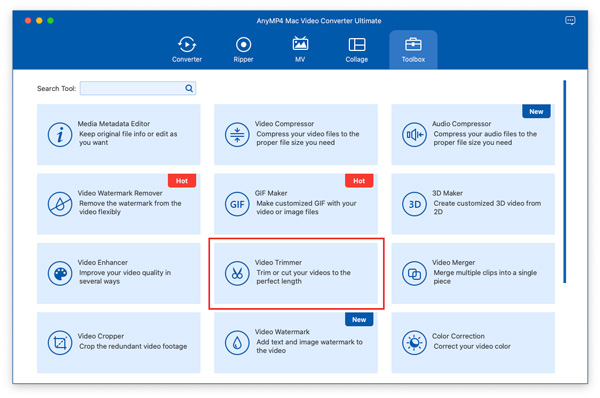
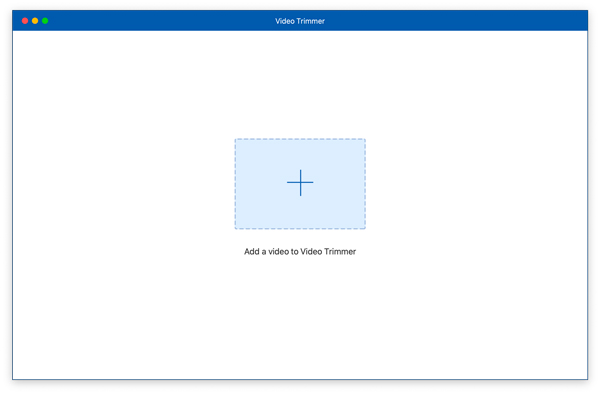
Step 2 Click the central plus sign to add a video to this tool.
Step 3 You can move the beginning and ending of the video time bar to cut your video. You also can click the Split icon to divide your video into two parts. To divide your video into multiple parts at once, you click the Fast Split at once.
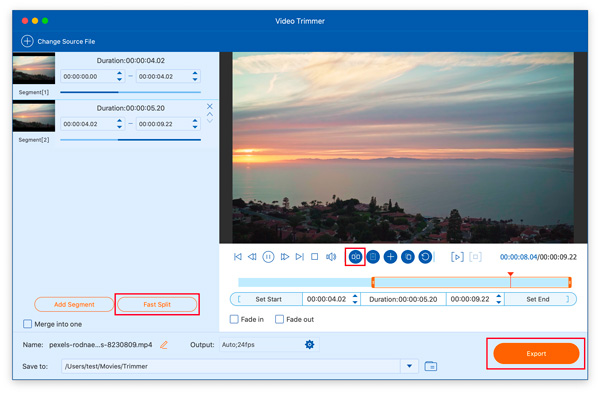
Step 4 Later, click the Export button to save the final result to your computer.
Video Merger
You can combine multiple videos into one file together by using Video Merger.
Step 1 To begin, please select Video Merger in the Toolbox tab.
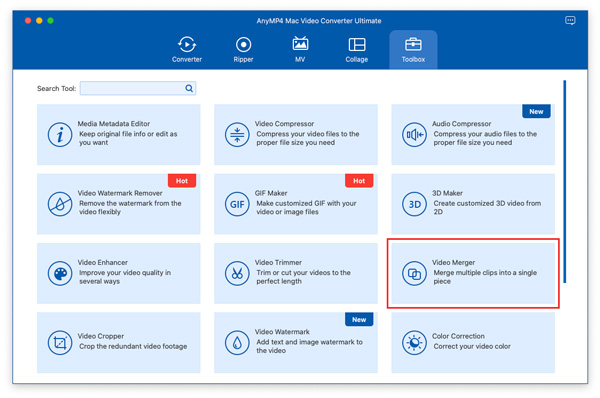
Step 2 Click the big plus sign to import a video to this function.

Step 3 Click the Add button to import more video files. Then you change the location of each video by clicking the Forward or Backward button.
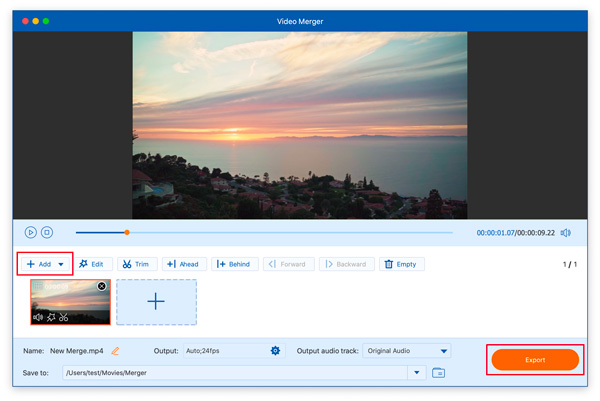
Step 4 After that, you can output the final video by clicking the Export button.
Video Cropper
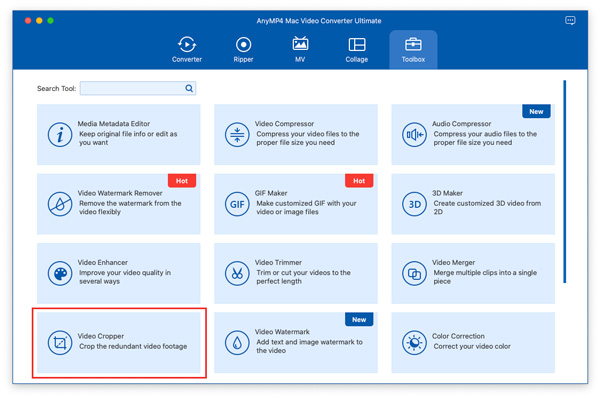
Video Cropper is a tool that you can use to crop video screens if your videos have black borders.
Step 1 You need to click the Video Cropper button in Toolbox first.
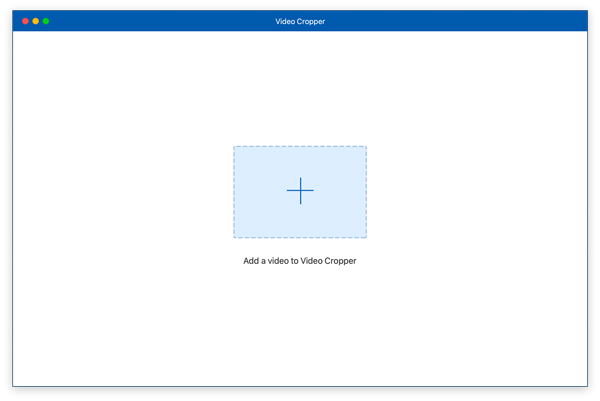
Step 2 Add your video by clicking the central plus sign.
Step 3 Then you can your mouse to move the border line of the video for selecting the area to keep. If you need to change your video to an exact aspect ratio, you can click Aspect Ratio to select. And you can click the Preview button to watch the final effect before exporting.
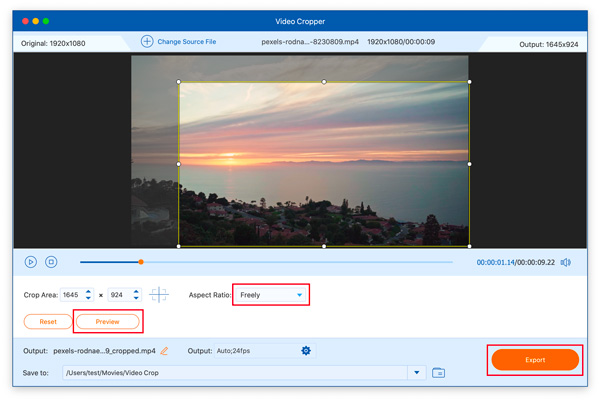
Step 4 Lastly, click the Export button to save the cropped video to your desktop.
Video Watermark
Video Watermark can help you add text watermarks and image watermarks to your videos quickly.
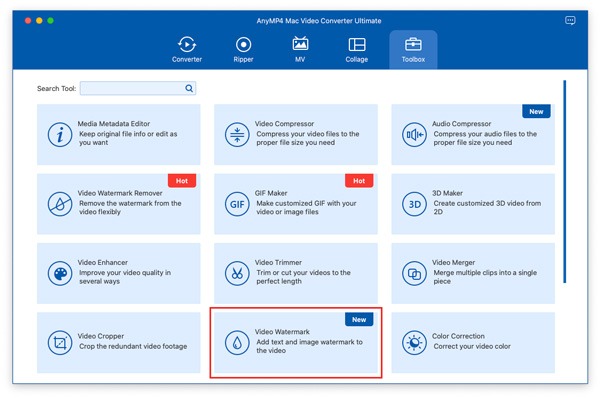
Step 1 Click the Toolbox tab and select the Video Watermark tool.
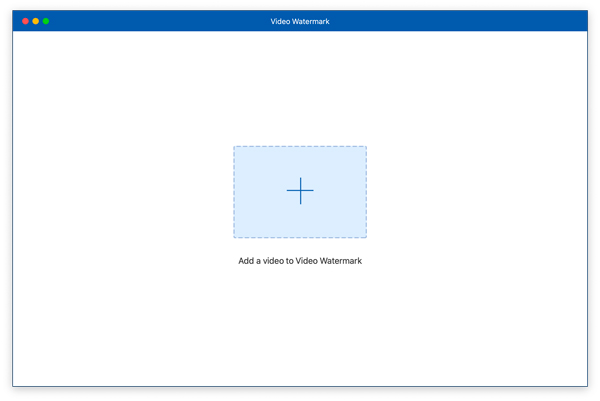
Step 2 Click the central + to add your video.
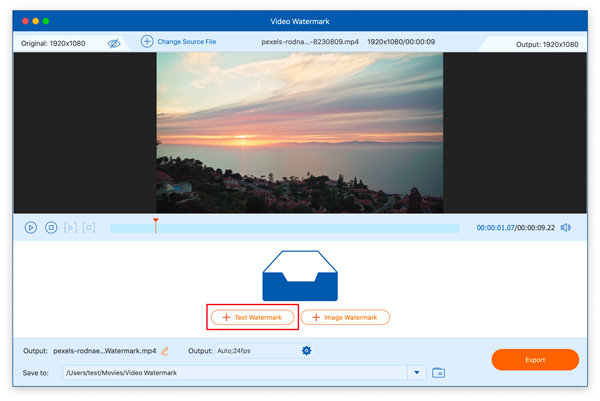
If you want to add the text watermark to your video, you should choose the Text Watermark button.
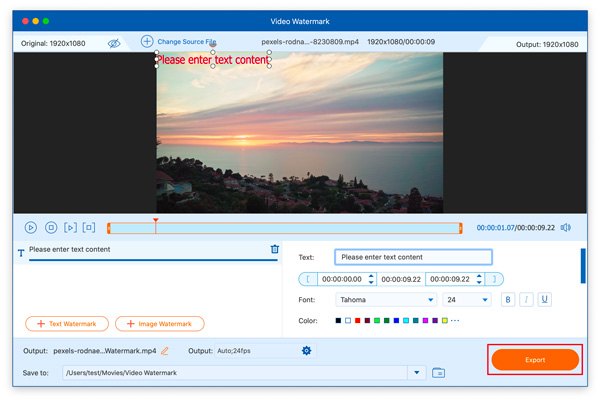
Here you can input the text, change the text color, font, size, etc.
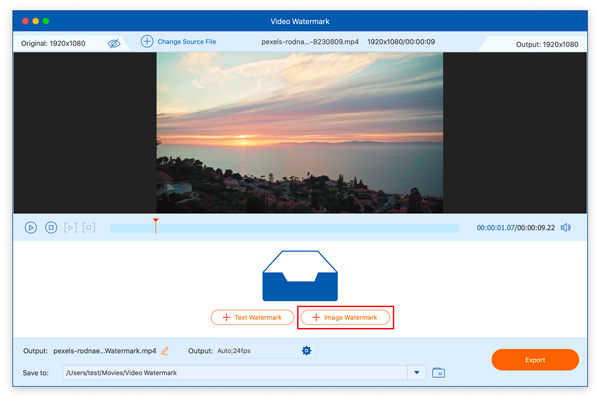
If you would like to add the image watermark to your video, you can choose the Image Watermark button.
Here you should click the Add icon to choose the image watermark. Next, you can adjust the opacity, size, position, etc. of your image watermark based on your needs.
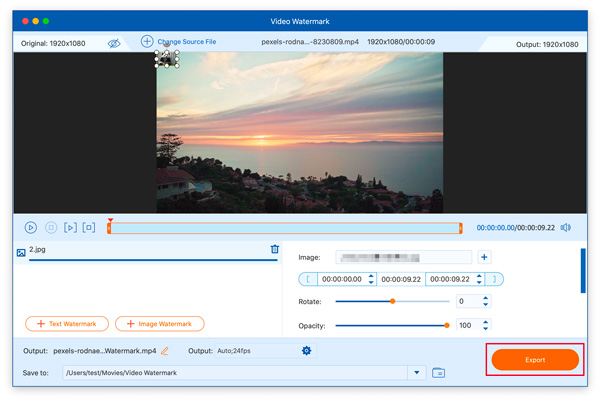
Step 4 Finally, click the Export button to output your video with a watermark.
Color Correction
Using Color Correction, you can adjust your video effects like brightness as you like.
Step 1 Firstly, please choose Color Correction in Toolbox.
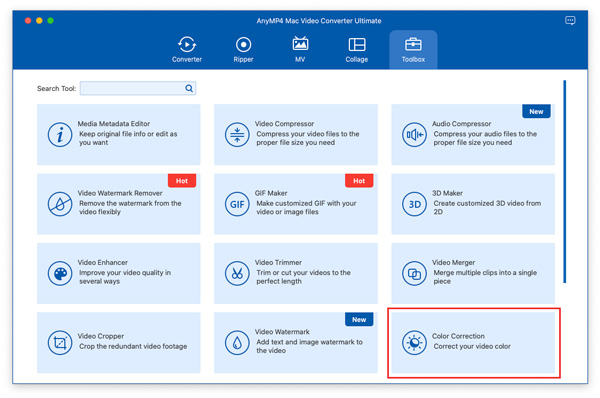
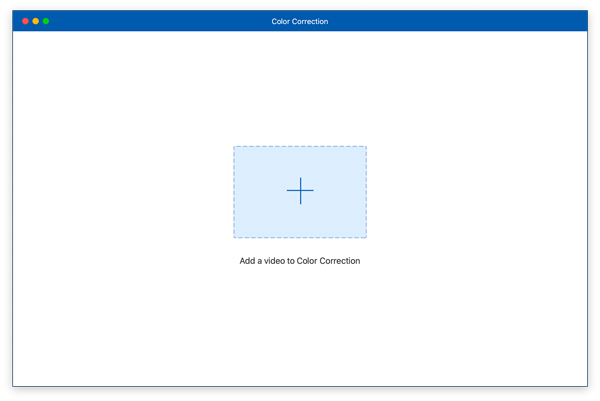
Step 2 Then, you can add your video by click the central plus sign.
Step 3 Next, you can adjust your video effects by sliding bars of Brightness, Contrast, Hue, and Saturation.
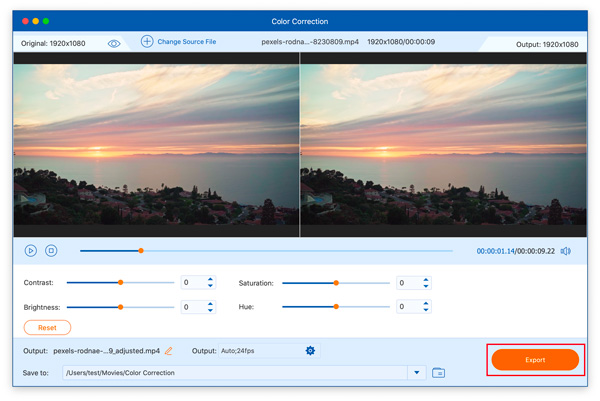
Step 4 Finally, if you are satisfied with the result, you can click the Export button.
Video Speed Controller
You can speed up or slow down you video’s playback speed with Video Speed Controller.
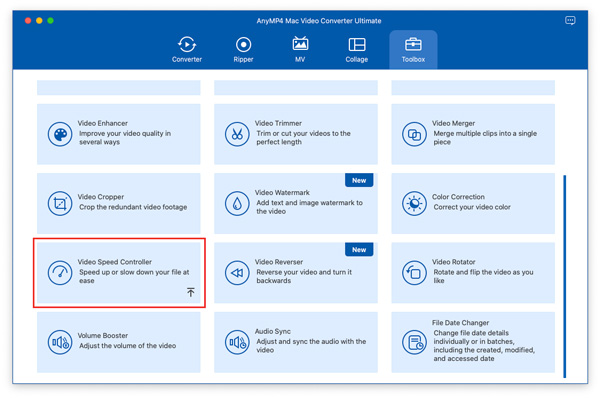
Step 1 Enter the Toolbox tab and select Video Speed Controller.
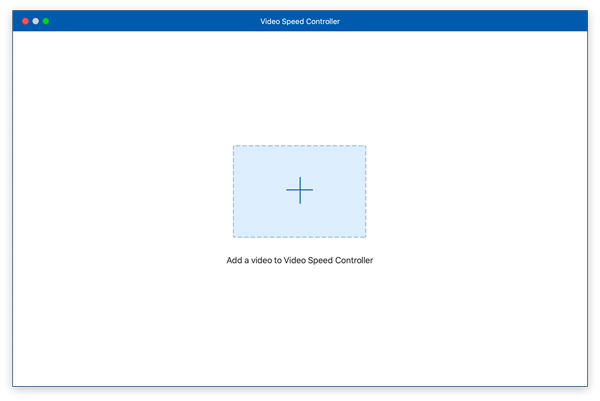
Step 2 Click the central + to add the video you want to change speed.
Step 3 There are multiple times of playback speed you can pick. If you want to speed up your video, you can choose the 1.5X button.
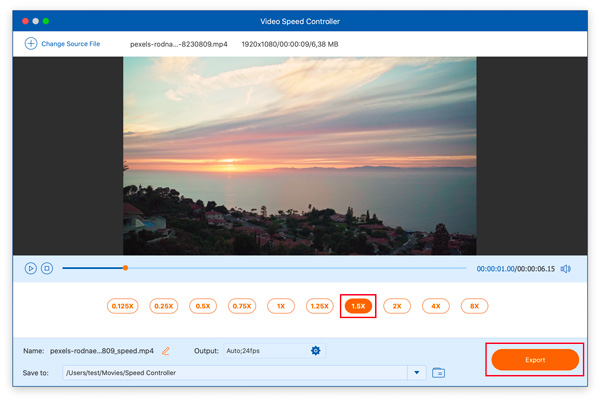
Step 4 After that, you can output your video by clicking the Export button.
Video Reverser
If you want to make your video to appeal more people, you can use Video Reverser and have a try.
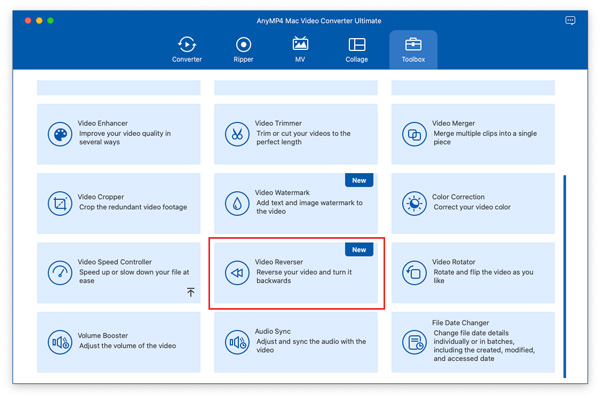
Step 1 Go to the Toolbox tab and click on the Video Reverser button.
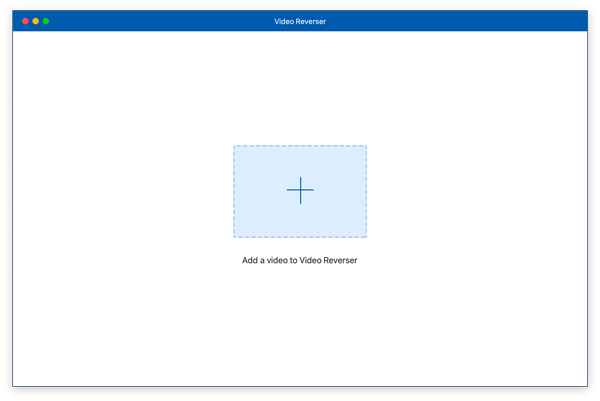
Step 2 To import your video file, you need to click the central plus sign.
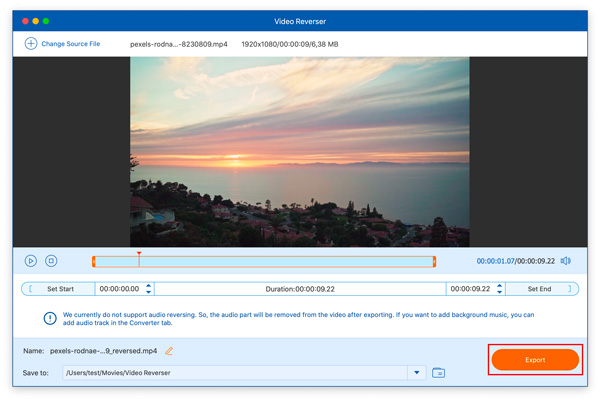
Step 3 Then you can choose the duration you want to reverse of your video. After that, you should click the Export button to save your reversed video.
Video Rotator
If you use the portrait mode of your mobile phone to shoot videos and want to change these videos’ orientations, you can use Video Rotator.
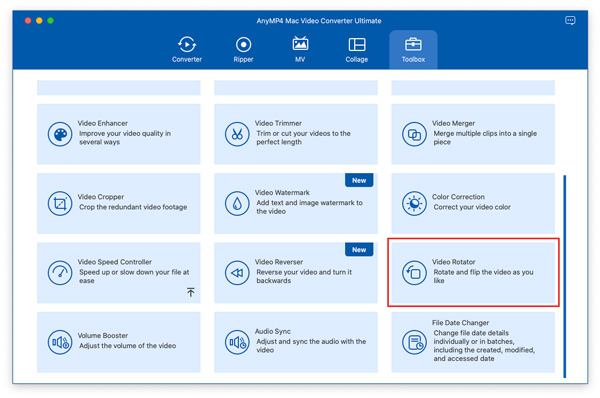
Step 1 Click the Video Rotator button in the Toolbox tab.
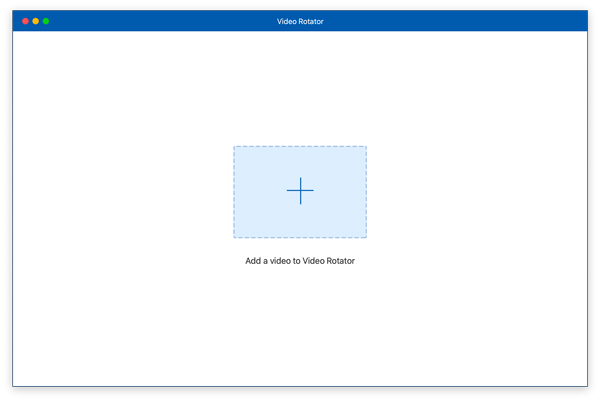
Step 2 Click the big plus sign to add the video to this rotating function.
Step 3 Choose the Left Rotate, Right Rotate, Vertically Flip, or Horizontally Flip button to change the video orientation.
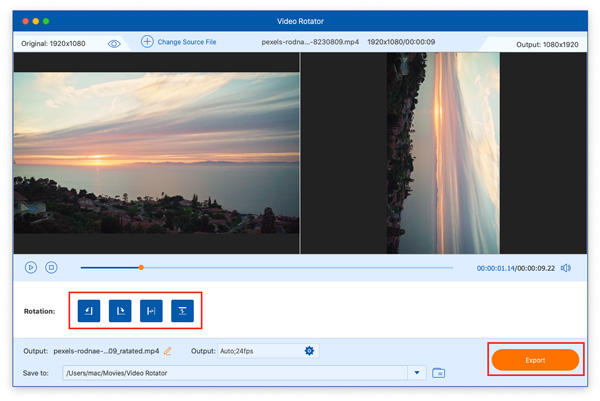
Step 4 Click the Export button to save the video to your computer.
Volume Booster
You can use Volume Booster to turn up or turn down your video volume according to your needs.
Step 1 Enter the Toolbox tab and choose the Volume Booster function.
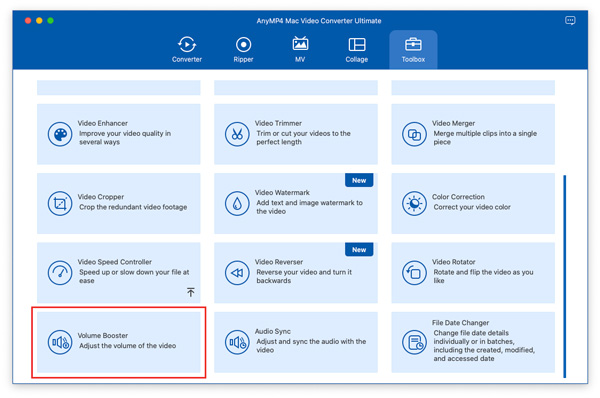
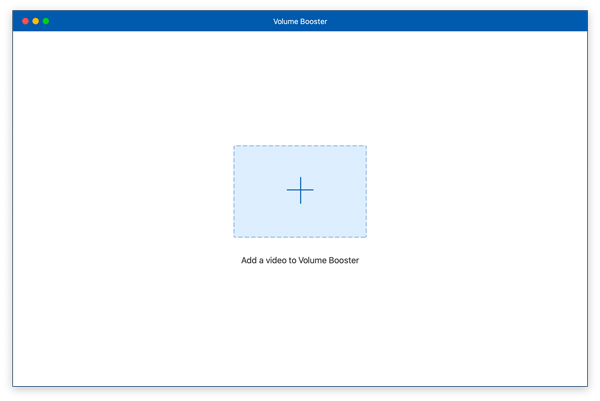
Step 2 Then you need to click the central plus sign to add the video.
Step 3 Later, you can slide the Volume bar from the left to the right to boost your video volume.

Step 4 If you are satisfied with the editing video, you can click the Export button to finish.
Audio Sync
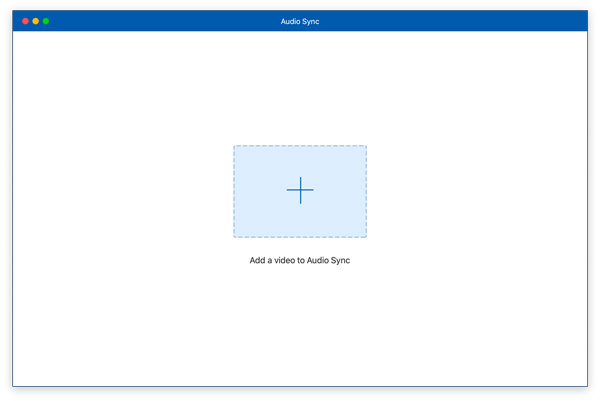
If your video and audio are out of sync, you can use Audio Sync to fix this problem.
Step 1 Click on the Audio Sync button in Toolbox.
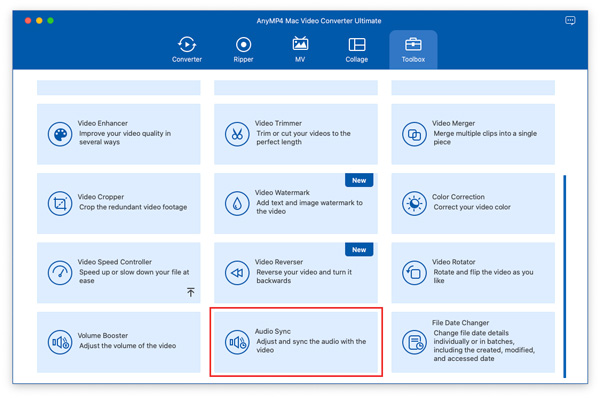
Step 2 Next, please click the big plus sign to import your video.
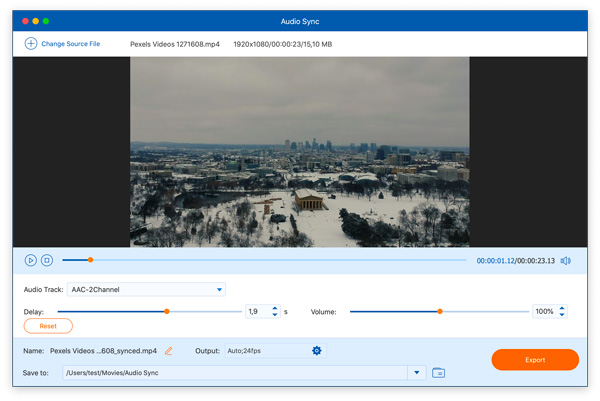
Step 3 Slide the Delay bar to fix the audio out of sync problem and click the Export button.
File Date Changer
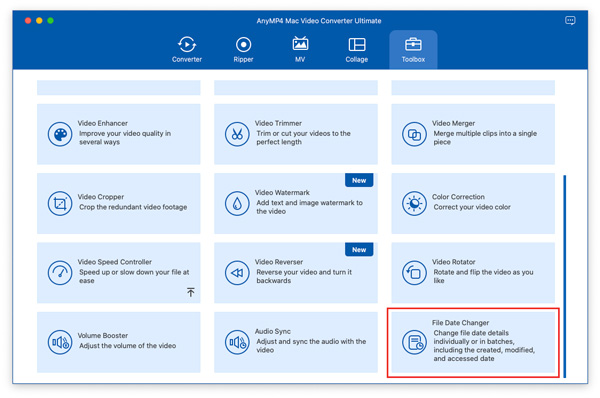
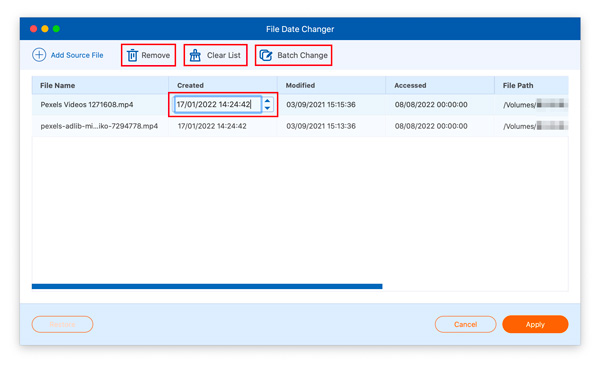
File Date Changer can help you modify the creates, modified, and accessed dates of your files.
Step 1 Select File Date Changer in the Toolbox tab.
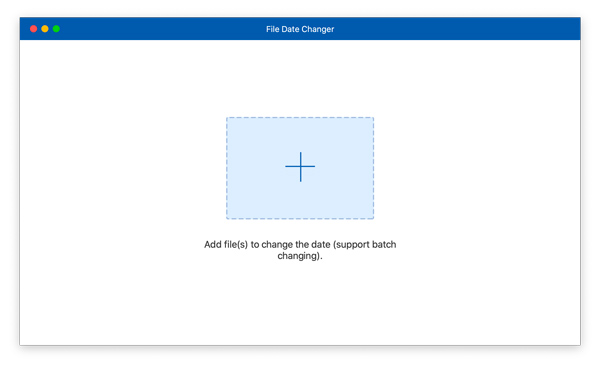
Step 2 Click on the central + to add your file..
Step 3 After that, you can click on the date of each category and change it to modify the file date. You can click the Add Source File button to import more files into this tool. If you want to remove one file, you can choose the file and click the Remove button. If you want to delete all files, you can click the Clear All button. If you want to change the three dates of your file at once, you can click the Batch Change button.
If you regret changing dates, you can click the Restore button.
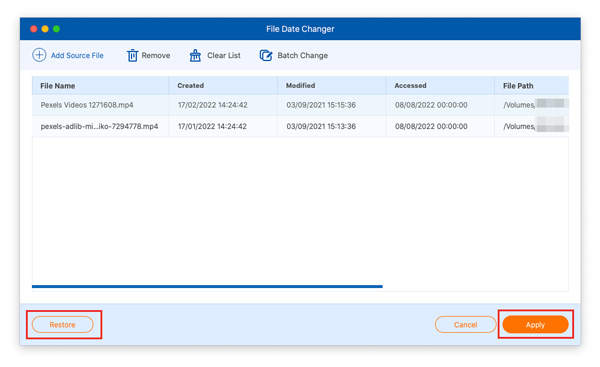
Step 4 Finally, click the Apply button to complete.

