Multimedia editing has picked up popularity over the years. This is even more evident due to the accessibility of editing software that can be used to edit videos, images, and audio on computers. When it comes to audio files, GarageBand is one of the most popular and seasoned in the music engineering industry. In this article, we will provide a full guide about how to speed up audio on GarageBand to help our readers learn how to adjust the tempo of their music projects. We will explore two different methods that are available on GarageBand, together with general tips for new users once they learn how to apply more advanced adjustments. Finally, we will also explore an alternative that can be used as a beginner-friendly substitute for GarageBand.
We will start this guide by defining what tempo is since this is the measurement that defines the speed of audio when it comes to music production or traditional music composition. Tempo, when it comes to music, is basically the speed of the audio playback itself. Commonly, low-tempo music is gloomy or calming. Meanwhile, high-tempo music is fast, electric, and usually upbeat.
To measure tempo beats per minute (BPM) is the usual measurement that was used to define them. As its name suggests, BPM is determined by the amount of beats that play every minute. Learning what BMP is will be very important since this measurement could define the objective value of the tempo or speed of the audio.
Now that tempo and BPM have been defined, we can move on to the section of this article where the first tutorial can be found. We will first provide a tutorial on how to adjust the speed of a song in GarageBand. Although this option is the easiest to do, there are two options where this adjustment can be changed, and the tutorial below will explore both adjustments.
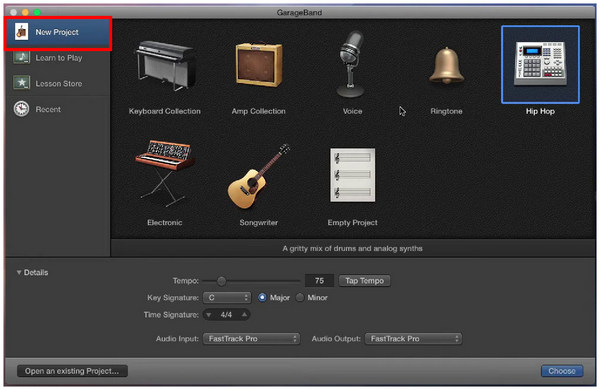
1. Open GarageBand and select the New Project option. Clicking on this menu will provide you with details that can be adjusted for the initial setup of the new project. This includes the instruments that will be used and the more specific details that are technical and adjustable.
2. Under the Details section, you can slide the Tempo bar or change the numerical value beside it to set a specific tempo for the new project.
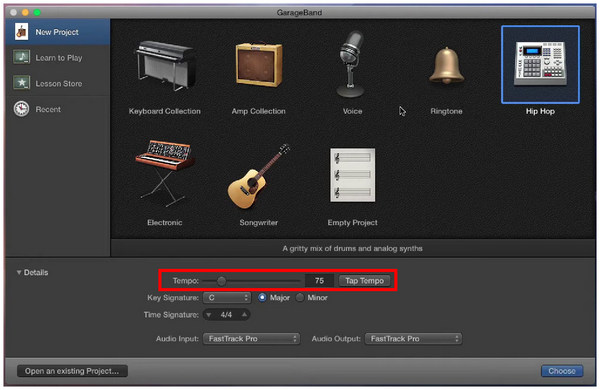
After setting this adjustment, the tempo of the music project that you will start will now be set to the value in the tempo bar. However, this value is still very customizable even if the tempo has been set during the initial project details. Please proceed to the next guide below to learn how to adjust tempo in the editing menu.
1. Click on Tempo in the upper section of the music editing menu’s interface.
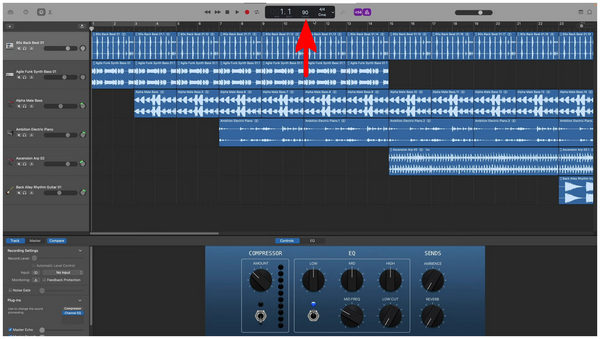
2. Once the tempo value has been selected, you can type the specific BPM that you want to use. You can also slide the cursor up or down to adjust the BPM accordingly.

This option is very accessible for instant audio speed adjustment, especially for GarageBand users who want to use audio editors to convey specific emotions on the music projects that they are working on. To learn how to change audio speed in specific sections of audio in GarageBand, please proceed to the next section of the article for a more advanced tutorial.
For more advanced users, adjusting the tempo for specific sections of audio will be ideal since it will deliver a smoother listening experience once the audio has been produced.
Fortunately, this adjustment is simple to do in GarageBand, thanks to their Track menu.
To learn how to add tempo changes for specific sections of an audio file, please continue reading our provided guide below.
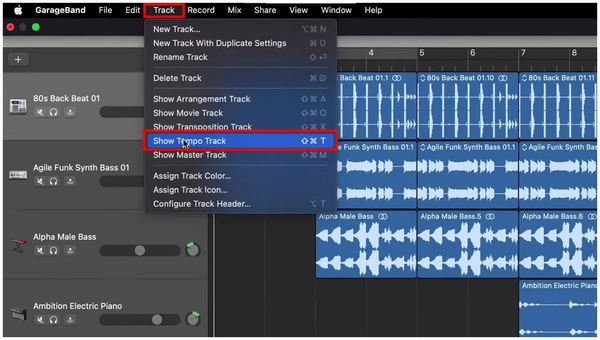
1. Open the GarageBand menu, click on Track, and select Show Tempo Track.
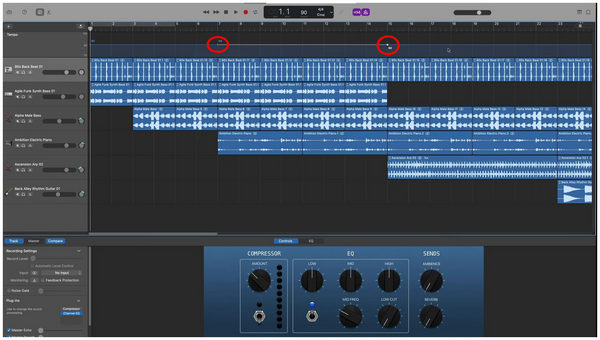
2. After clicking on Show Tempo Track, the Tempo adjustment option will be added to the audio editing menu. Double-click on the line to add a Tempo Point. These tempo points will serve as a divider for each section of the audio that you are editing.
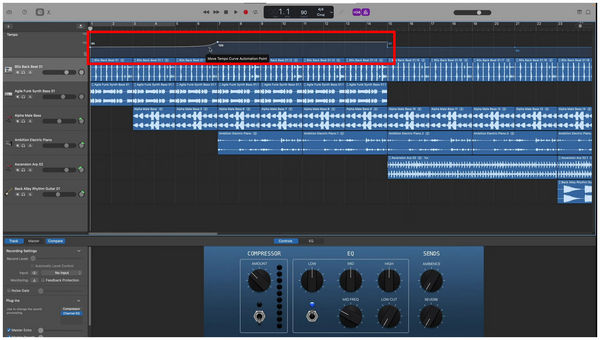
3. Once the Tempo Points have been added, you can adjust their tempo by clicking and dragging on each point or by adjusting the tempo points themselves to add curves for smoother tempo changes.
Since tempo adjustments are tricky to set, learning how to properly modify the transitions in tempo points takes practice. With that in mind, learning how to do this trick will require a skilled audio editor or designer.
Now that we have presented two options available in GarageBand that can be used for tempo adjustment options, we can now move on to the alternative that works better than GarageBand when it comes to ease of use and simplicity with none other than AnyMP4 Video Converter Ultimate.
Developed as a media format converter tool, this versatile software was also built to give much-needed practicality to its users through its Toolbox section, which provides twenty-one tools for different media uses. One of which is the Video Speed Controller, which also supports audio files.
As its name suggests, this tool can modify video and audio files that are imported into it by adjusting their speed. This process takes a few clicks to be added which makes it very practical to do even for beginner users.
To learn how to adjust audio speed in this versatile GarageBand alternative, please follow our provided tutorial below and download the software now for an easier time following each step.
Secure Download
Secure Download
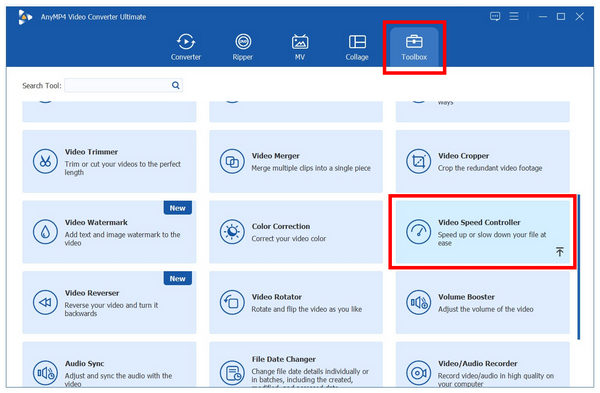
1. Open AnyMP4 Video Converter Ultimate, then go to the Toolbox section of the software. Scroll down until you find the Video Speed Controller tool select it. Add the audio file that you want to speed up in the Add File pop-up that will appear.
2. Inside the Video Speed Controller menu, select the audio speed multiplier that you want to use. The multiplier options range from an audio slowdown of 0.125X up to 8X faster.
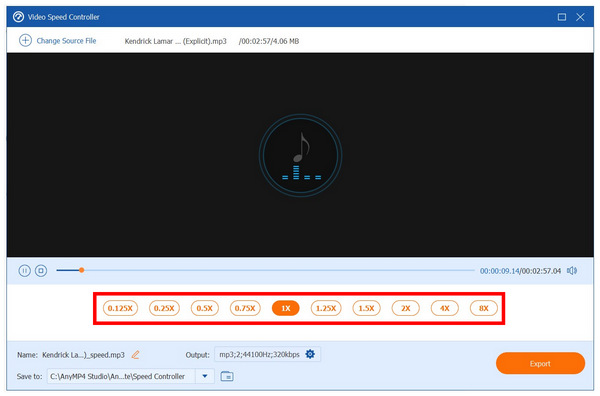
3. Once you have selected the speed that you want to use, click on Export to save the audio that has been modified back to your computer.

After following these three simple steps, you can now modify the speed of your video and audio files that can be used for different purposes. With that in mind, using an automated tool such as AnyMP4 Video Converter Ultimate is our most recommended option especially for beginners to audio editing.
Now that we have provided you with a complete tutorial on how to speed up music on GarageBand, we hope that this article has proved useful for your needs as a music editing practitioner. For users who are looking to adjust their audio speed for more casual reasons, make sure to check out AnyMP4 Video Converter Ultimate and use their Video Speed Controller tool.
Please share this article online to help other users looking for tutorials about audio-speed adjustments.
 Posted by Angelica Liwanag to Edit Audio
Related Articles
 How to Speed up Videos in Windows Media Player [Easy Guide]
Whether you need to speed up videos in Windows Media Player, or apply fast-motion effect, here is the easy guide. Follow the detailed steps in this article.
 Top 10 Video Speed Changers You Shouldn't Miss
Are you looking for a video speed editor to change the playback speed of your video? Lucky you! Check the ten tools we have listed here.
 5 Methods to Change Animated GIF Speed to Slow/Speed up
This post will outline five simple yet effective ways to change GIF speed. Learn how to modify GIF speed using offline and online tools effortlessly here.
 Step-by-step to Speed up a Video in Adobe Premiere Pro Properly
There are three ways to speed up a video in Adobe Premiere Pro in a variety of conditions. You can learn the workflow of each way in this single tutorial.